How to change the language Geogebra into Vietnamese
Geogebra is completely free Math software and can help users not only save time but also quickly solve troublesome exercises more gently.
GeoGebra is a free math software that supports the learning and teaching of algebra, geometry and calculus. With GeoGebra you can draw function graphs, spatial geometry, and more.
GeoGebra has an intuitive interface but new users may feel confused with the math, drawing a bit complicated. So why don't we learn from the simplest things? The following article will guide you to get started with creating a basic parallelogram using GeoGebra.
To draw a basic geometric shape in GeoGebra, follow these steps:
Step 1 : Select the Line tool and create an arbitrary AB line by double clicking in Graphics View .
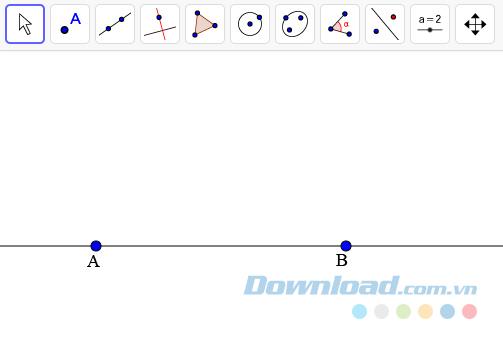
Step 2: Create a line BC with C as a new point.
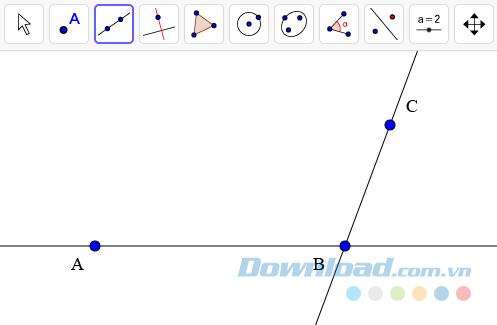
Step 3 : Activate Parallel Line tool and create a line parallel to AB passing through point C.
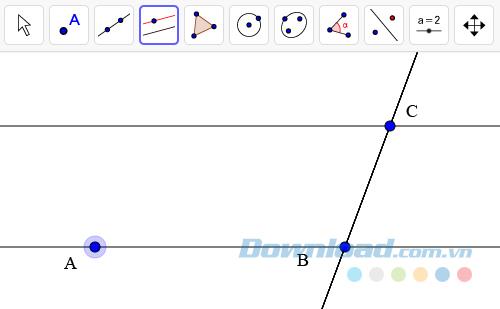
Step 4 : Create a line parallel to BC going through point A.
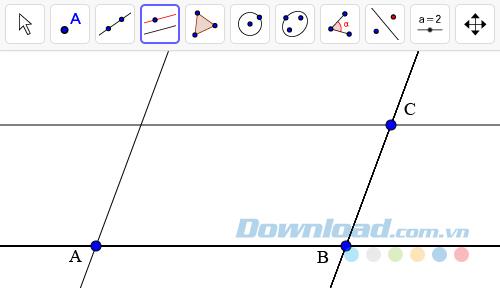
Step 5 : Select the Intersect tool and create the intersection D of the two lines you just created above.
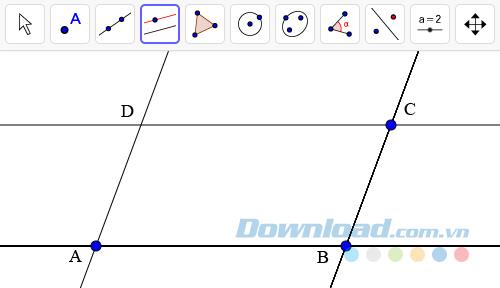
Step 6 : Draw the parallelogram ABCD with the Polygon tool .
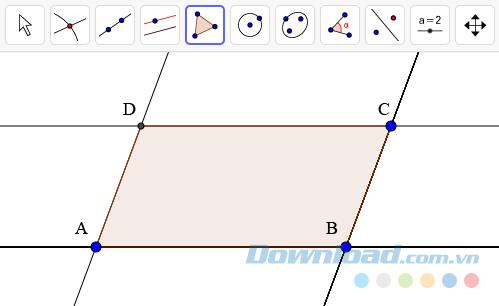
Step 7: Use the Move tool and drag the vertices of the parallelogram to change the size and position as you like.
Thus, with only 7 simple steps you have created a desired parallelogram. With GeoGebra, you can also manipulate even more complex drawings and calculations. Try exploring and experience!
Geogebra is completely free Math software and can help users not only save time but also quickly solve troublesome exercises more gently.
GeoGebra is a rare mobile application that helps you learn math for free - specifically here is learning to graph function on an intuitive interface. GeoGebra is a rare mobile application that helps you learn math for free - specifically here is learning to graph function on assignment
Drawing a square with GeoGebra is not difficult, you just need to be a bit careful and follow the instructions in the following article to be able to create the desired square to succeed.
GeoGebra provides tools that allow you to draw graphs, functions and tables on an easy-to-use interface and many powerful features. So, do you know anything about them?
Geogebra is a completely free tool and extremely useful in supporting users to learn and work with Mathematics or tasks requiring manipulation on spreadsheets, graphics, statistics .... The following will be broken
Explore the top classic tank shooting games that offer immersive gameplay and stunning graphics. Dive into the tank battle world with these must-try games.
Discover how to earn free spins in Coin Master every day. Learn the most effective tricks to gather spins effortlessly.
Discover everything about Gacha Club OC, from creation to customization, and tips to enhance your gaming experience.
Learn how to create a room and play with friends in Mini World: Block Art, including multiplayer options and map sharing. Perfect for gamers looking to enhance their experience.
Learn the efficient ways to tame various mounts in Mini World Block Art, speeding up your travel and enhancing your gameplay experience.
Discover the best MP40 skins in Free Fire and find out how they enhance gameplay. Learn more from WebTech360 about the top choices for Free Fire players.
A detailed guide on how to install the racing game ZingSpeed (ZingSpeed Mobile) on your computer using various methods.
Discover effective methods to delete all of your friends in Roblox effortlessly while maintaining your favorite connections!
Discover how to easily check how many hours you’ve spent playing Minecraft, along with detailed statistics of your gameplay for a comprehensive gaming experience.
Learn how to play PES 2019 (Pro Evolution Soccer 2019) with our comprehensive setup guide, ensuring a smooth gaming experience. Ideal for newcomers to Pro Evolution Soccer games.
Learn how to easily switch between Survival and Creative modes in Mini World: Block Art and enhance your gaming experience effortlessly.
Discover the best lightweight games for PC that are perfect for young gamers. Enjoy these popular titles without heavy system requirements!
Searching for a captivating gacha game to immerse yourself in? Check out our top 10 gacha games that are worth playing in 2023.
Learn how to connect a controller to Parsec for a seamless gaming experience. Perfect for multiplayer sessions and enhanced gameplay.
Learn how to install Discord on your Amazon Fire Stick using alternative app stores. This guide provides a step-by-step process to access Google Play Store apps.
