How to see yourself like any celebrity with B612

Discover how to find out which celebrities you resemble using the new Familiar Faces feature in B612.
On laptops running Windows 11, most battery saving functions will be activated when the remaining battery level is at a certain level (usually 20%). However, there are times when you will need to turn on this function early to save battery for a long period of time working without a charger. The article below will guide you how to turn on battery saving mode on laptops running Windows 11.

Ways to turn on battery saving mode on laptops running Windows 11
Note that to turn on the battery saving feature, you need to unplug your laptop from the charging cable first.
Method 1: Turn on battery saving in Settings
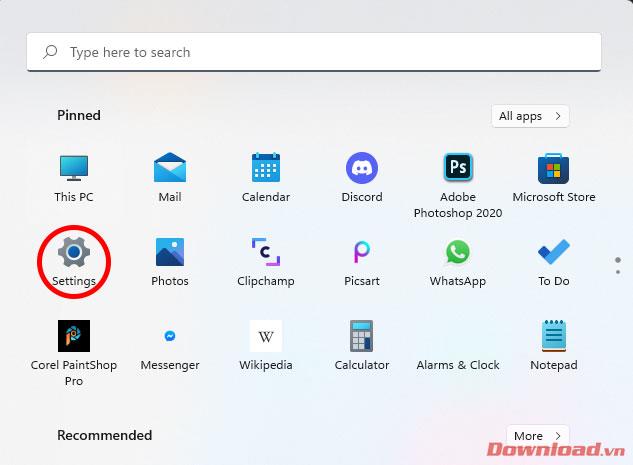
First, press the Start button then click Settings .
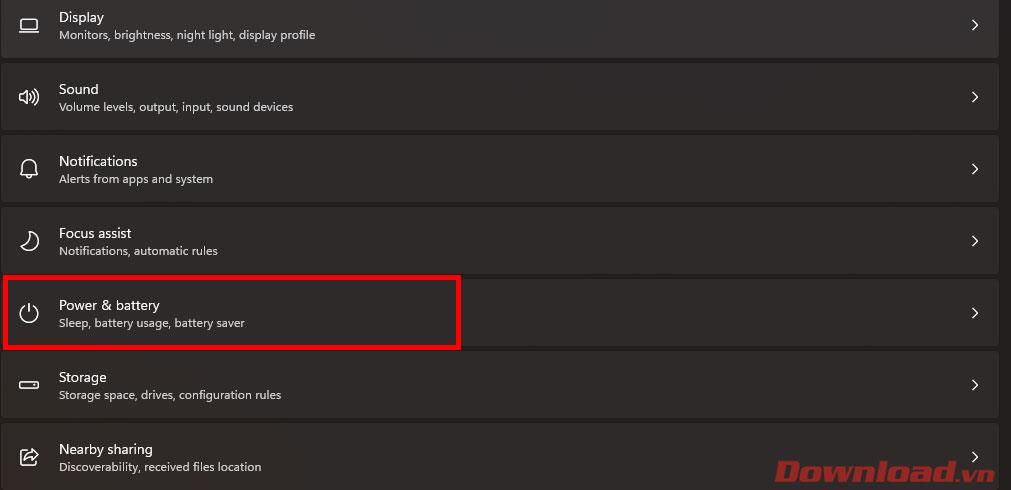
In the window that appears, select Power & battery .
Select the Battery saver item in the list that appears.
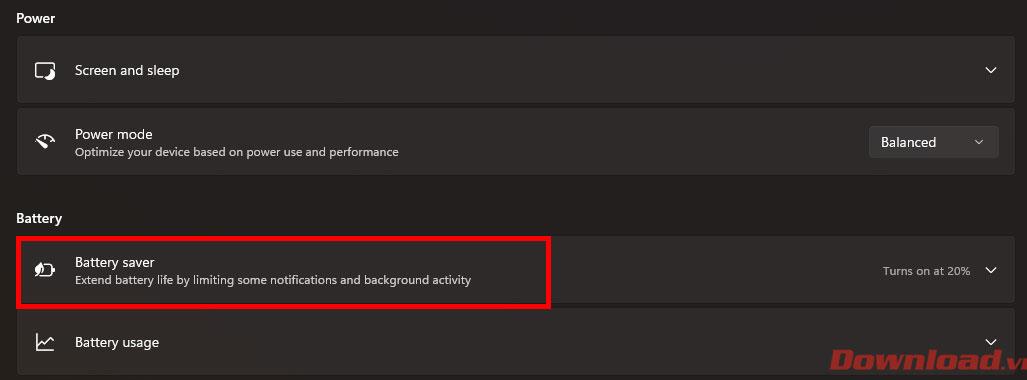
Click the Turn on now button in the Battery saver line to activate the battery saving function immediately.

Method 2: Turn on battery saving with Quick Settings
The second and much simpler way to turn on battery saving is to use the new Quick Settings bar on Windows 11.
On the Windows Desktop screen, click on the laptop battery icon in the lower right corner of the screen or press the keyboard shortcut Windows + A to open the Quick Settings dialog box. In this dialog box, we just need to click the Battery saver button to activate the battery saver. Note that you must unplug the charger from the laptop for this button to appear.
So with just a few simple steps, you can turn on battery saver on Windows 11 for laptops. Wishing you success!
Discover how to find out which celebrities you resemble using the new Familiar Faces feature in B612.
Learn how to disable the background mode of BlueStacks to enhance your computer’s performance while saving resources.
Learn how to effectively remove old boot menu options on Windows 10. Keep your boot menu clean and optimized for efficiency with these easy steps.
Discover the essential CROSH commands for your Chromebook. Get troubleshooting tips and system configurations to enhance your Chrome OS experience. Learn more!
Zoom is a top video conferencing service for connecting with friends, family, business associates, and classmates on various devices including Amazon Fire tablets.
Discover the advantages of the AccuType Keyboard in Lenovo laptops. Learn why this keyboard enhances productivity and provides a superior typing experience.
Learn how to utilize the SkyShare feature on Skyworth Smart TV for easy connection with your phone or tablet, enhancing your viewing experience.
Learn how to limit your download speed in Google Chrome to manage bandwidth and improve overall performance during downloads.
Discover how to fix the error of not being able to install software on Windows 10/11. Learn essential steps and troubleshooting techniques.
Learn how to create an Instagram account without a phone number. This step-by-step guide will help you sign up using an email address instead, making it quick and easy.
Step-by-step guide to change the location of the data sharing folder between the NoxPlayer Android emulator and your computer for enhanced file management.
Learn how to efficiently delete data (photos, videos, music, etc.) on the Android NoxPlayer emulator.
Learn how to remove fonts easily with PicsArt, one of the leading photo editing applications that enhances your photography experience.
Discover the 11 best Virtual Router Software for Windows that allows you to convert your PC into a virtual Wi-Fi router, enhancing your internet sharing capabilities.
Learn the comprehensive steps to reset your Smart TV Skyworth effectively with WebTech360. Optimize performance and settings!


