With all the tabs and buttons available in File Explorer, the Quick Access Toolbar in Windows 10 is surely overlooked by many users. That is a shame because the feature is subtle, practical, and easy-to-use, which are not words I often use when it comes to Windows 10. Brilliant in its simplicity, the Quick Access Toolbar can be customized to include buttons and options that access your favorite tools, letting you swiftly manage File Explorer items. Read this tutorial to learn all there is to know about the Quick Access Toolbar in Windows 10 and how you can use it to be more efficient when working with File Explorer:
Contents
- Where is the Quick Access Toolbar in Windows 10?
- Customize the Quick Access Toolbar with the buttons you need
- Change the position of the Quick Access Toolbar
- Use the Quick Access Toolbar menu to minimize File Explorer's ribbon
- Did the Quick Access Toolbar catch your eye? Why?
Where is the Quick Access Toolbar in Windows 10?
By default, the Quick Access Toolbar is present on the extreme left of the File Explorer title bar. Open a File Explorer window in Windows 10 and look at the top. You can see the Quick Access Toolbar in all of its minimalistic glory in the upper-left corner.
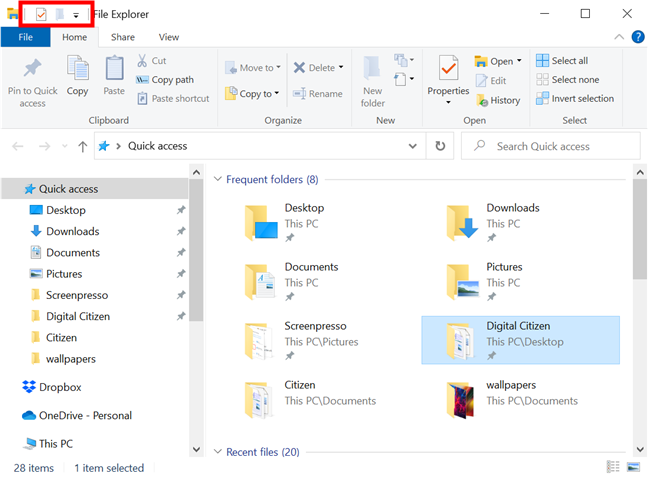
Discovering the Quick Access Toolbar in File Explorer
NOTE: The Quick Access Toolbar should not be confused with the Quick access location from File Explorer's Navigation pane, seen below. To add a folder you often use to the Quick access list, read 4 ways to pin items to Quick access in File Explorer.
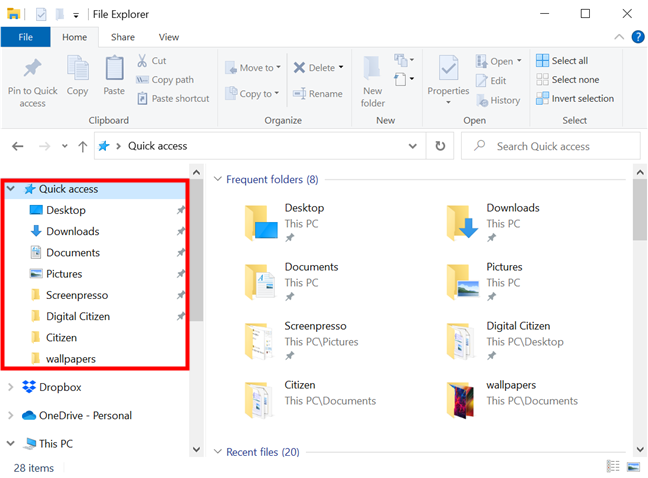
Quick access and the Quick Access Toolbar are easily confused
Customize the Quick Access Toolbar with the buttons you need
The Quick Access Toolbar is highly customizable, and you can configure it to include any commands and options you want from File Explorer's tabs. Anything you add is shown at all times, no matter what tab is displayed on the ribbon, and you can simply click or tap a button to use the corresponding action directly from the toolbar. By default, the Quick Access Toolbar contains only two buttons and an arrow that opens a drop-down menu.
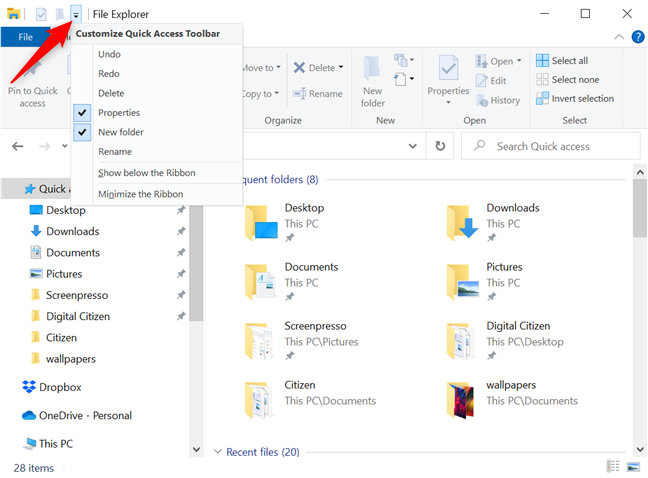
Click or tap the arrow to open the menu
The "Customize Quick Access Toolbar" menu reveals the complete set of default commands. The checked commands are shown, while the rest are hidden. Clicking or tapping on a command from the list checks or unchecks it, and only the selected options are displayed in the Quick Access Toolbar. There are six default commands available:
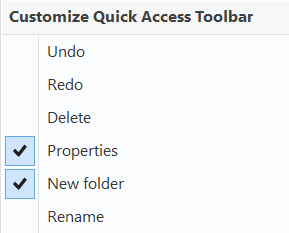
The default commands in the Customize Quick Access Toolbar menu
- Undo - Rolls back the last change you made to the active window.
- Redo - Redoes the previously undone action.
- Delete - Sends the selected items(s) to the Recycle Bin.
- Properties - Opens the selected file or folder's Properties window. This button is enabled by default and is displayed first on the Quick Access Toolbar.
- New Folder - Creates a new folder in the active File Explorer window. This button is the second option available by default on the Quick Access Toolbar.
- Rename - Highlights the name of the selected item(s), allowing you to replace it.
While these options are helpful, what we love about the Quick Access Toolbar is that you can easily add any item(s) from File Explorer's tabs to it, thus getting faster access to specific commands you use regularly. Since users often need to select multiple files on Windows, let's use the Select all option to show how this works. Right-click or press-and-hold the Select all button from File Explorer's ribbon to open a contextual menu. Then, click or tap on "Add to Quick Access Toolbar."
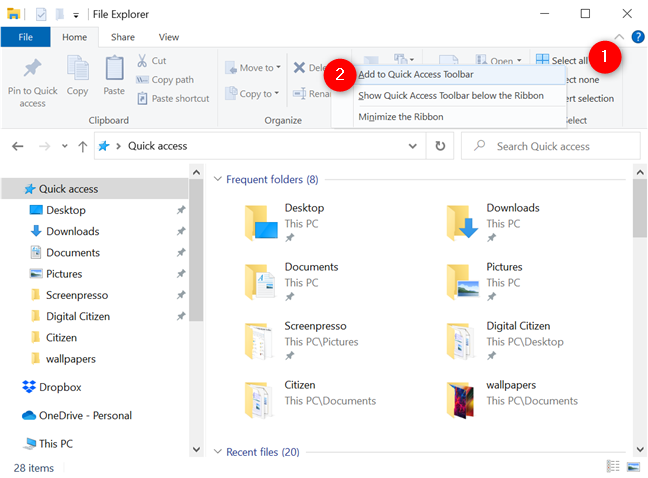
Adding a button to the Quick Access Toolbar
The button is added last to the Quick Access Toolbar, as seen below. You can click or tap on it at any time to immediately select the contents of your active File Explorer window.
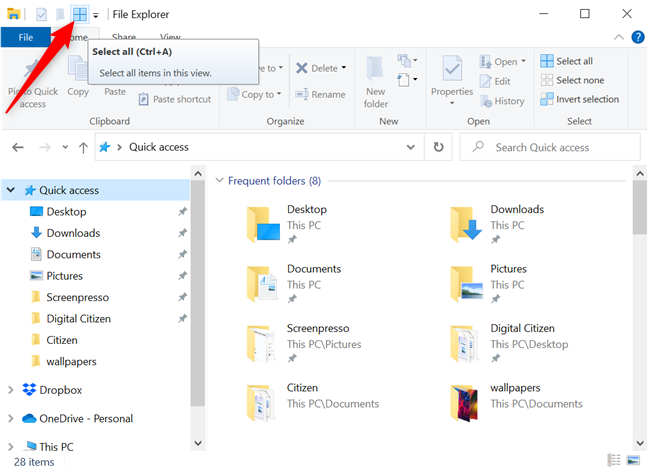
The new button is added to the toolbar, and you can click or tap on it to use it
This method can be used to add anything you want, including special buttons from specific tabs, like the Open Settings button from the Computer tab, available when you access This PC.
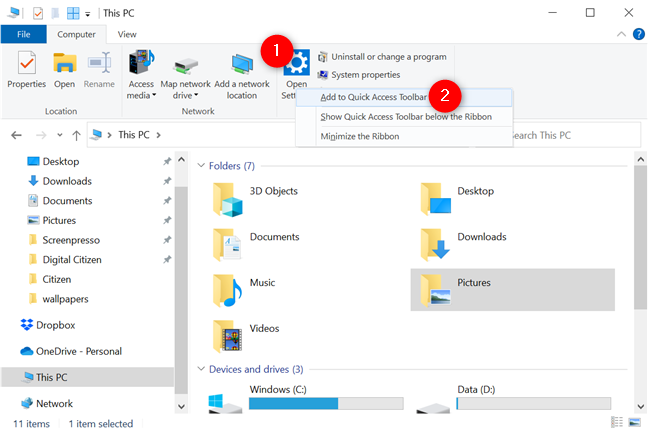
Add Open Settings to the Quick Access Toolbar
You can even open the Recycle Bin and right-click or press-and-hold the "Empty Recycle Bin" button. Click or tap "Add to Quick Access Toolbar," and the button is immediately attached to the bar.
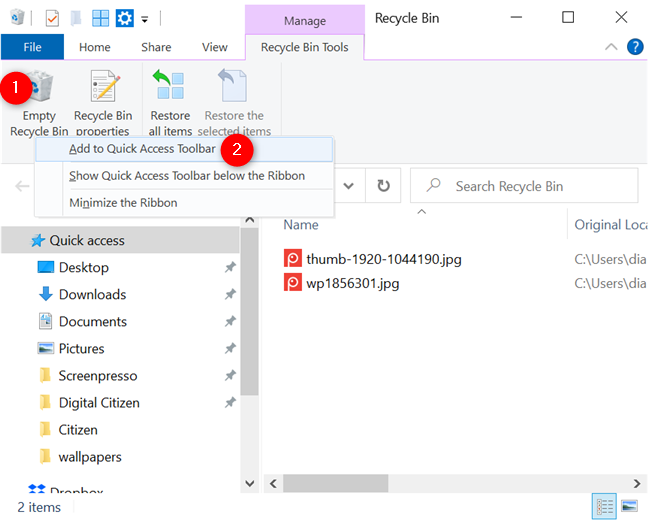
Add Empty Recycle Bin to the Quick Access Toolbar
Do you often need to switch between different views for your folders in File Explorer? No worries, go ahead and add the whole Views gallery by right-clicking or pressing-and-holding on it and then pressing "Add gallery to Quick Access Toolbar."
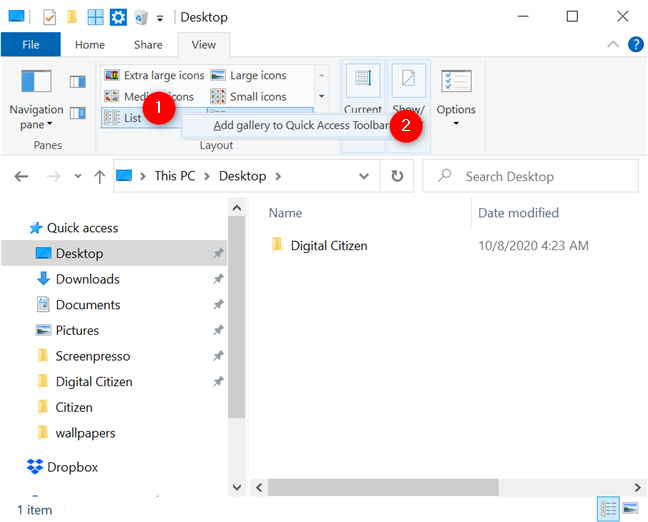
Adding the Views gallery to Quick Access Toolbar
The entire gallery is now displayed as an icon in the Quick Access Toolbar.
Press the gallery button to access the Views
The customization options are endless, and you can even add whole sections of a tab the same way. However, that means more clicking or tapping to reach the button you want. To really boost your productivity with the Quick Access Toolbar, we recommend adding the specific commands you need.
If the option to add a command is greyed out, the corresponding button is already added to the toolbar - below, we tried to attach the New folder button, which is there by default.
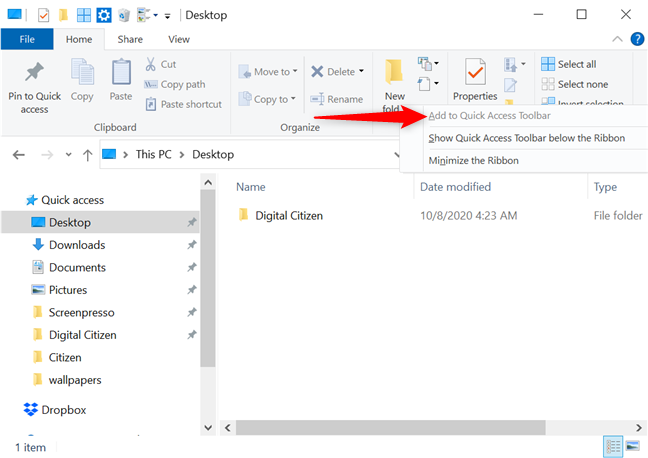
You can't add the same button multiple times
Removing buttons is done in two different ways. When it comes to the default set of commands described earlier, access the "Customize Quick Access Toolbar" menu and uncheck the options you want to eliminate. Additionally, you can remove any command by right-clicking or pressing-and-holding on its icon in the Quick Access Toolbar and then clicking or tapping "Remove from Quick Access Toolbar."
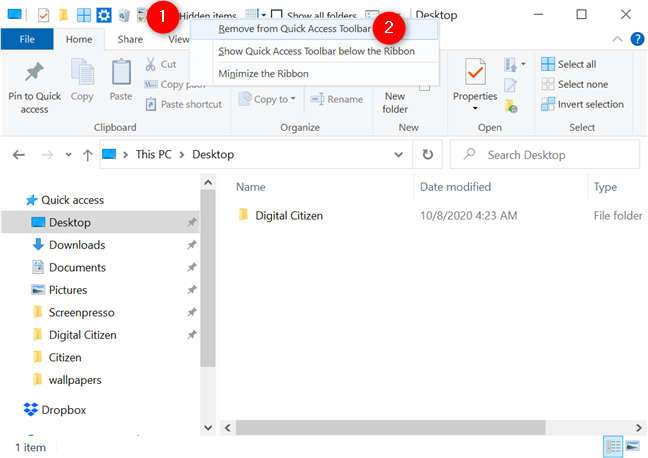
Removing a button from the Quick Access Toolbar
Take your time and experiment on the Quick Access Toolbar. Add and remove buttons until the commands you use are shown in an order that makes sense to you. While you can add as many buttons as you want, keep in mind that the Quick Access Toolbar can not be displayed on multiple lines. If there's no more room on the title bar, the toolbar shows a double arrow. Click or tap on it to access the last buttons - in the screenshot below, you can see the "Open Windows PowerShell" button and the menu arrow are shown in a secondary bar.
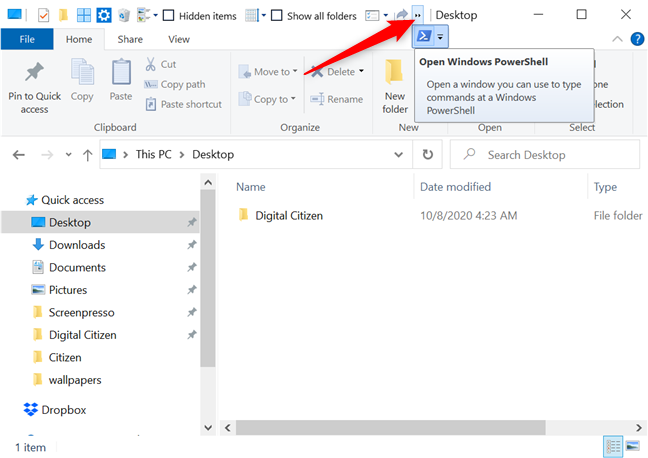
If you add too many buttons, you have to expand the toolbar to access them
You can maximize the File Explorer window to get more room on its title bar if you want to fit more icons. However, a better solution is to move the Quick Access Toolbar, as you can see in the next chapter.
Change the position of the Quick Access Toolbar
There is not a tremendous amount of flexibility as to the position of this toolbar, and you can only choose one of two possible locations. While the Quick Access Toolbar defaults to the top-left corner of the File Explorer window, you can move it below the ribbon, if you prefer. Use the down menu arrow on the toolbar and click or tap "Show below the Ribbon."
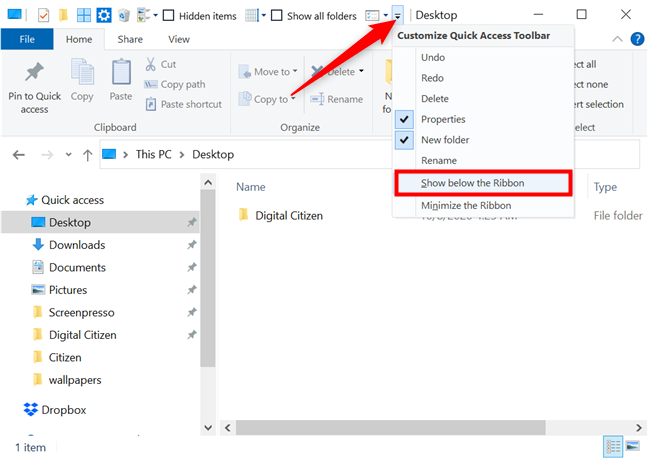
Press Show below the Ribbon from the Customize Quick Access Toolbar menu
Alternatively, you can right-click or press-and-hold any button on the ribbon or the toolbar to access the "Show Quick Access Toolbar below the Ribbon" option.
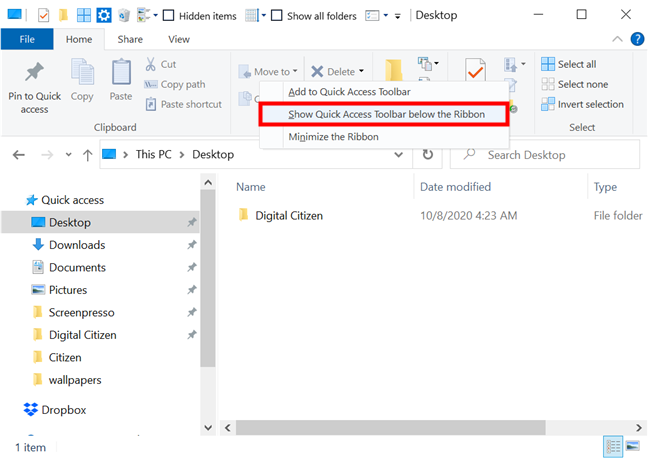
The option can be accessed from any button's contextual menu
The new position places the Quick Access Toolbar just under the ribbon, on the left side of the window, which also provides more room for your buttons. This lower position makes sense if you're using your mouse and want the bar close to the files to minimize the amount of movement required between clicks.
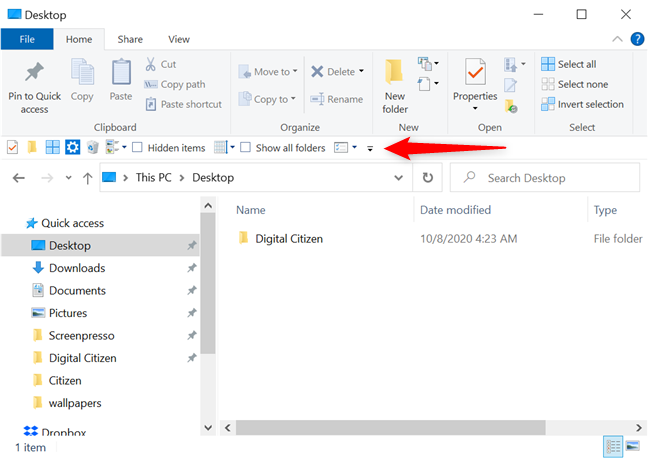
The Quick Access Toolbar in its lower position, under the ribbon
If you change your mind and decide to place it above the ribbon rather than under it, you can configure it to display in its original position the same way. One way is to open the "Customize Quick Access Toolbar" menu and click or tap "Show above the Ribbon." Alternatively, right-click or press-and-hold any button from the toolbar or the ribbon to "Show the Quick Access Toolbar above the Ribbon."
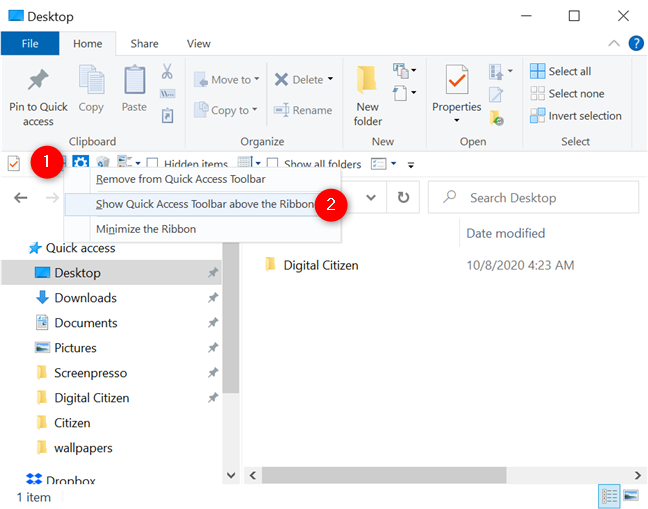
Any toolbar button's contextual menu gives you the option to relocate it
Use the Quick Access Toolbar menu to minimize File Explorer's ribbon
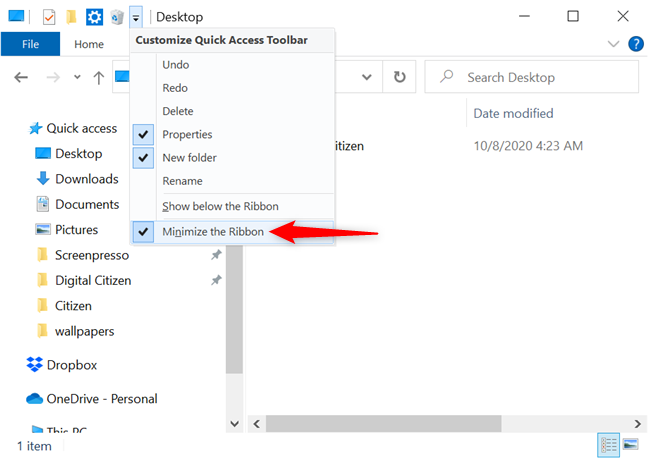
Using the Quick Access Toolbar might make File Explorer's ribbon obsolete, so you might want to get rid of it altogether, since it takes up an awful lot of room. While there are other ways to remove or hide the ribbon from File Explorer in Windows 10, you can also do it from the "Customize Quick Access Toolbar" menu. Click or tap the arrow on the toolbar, followed by "Minimize the Ribbon."
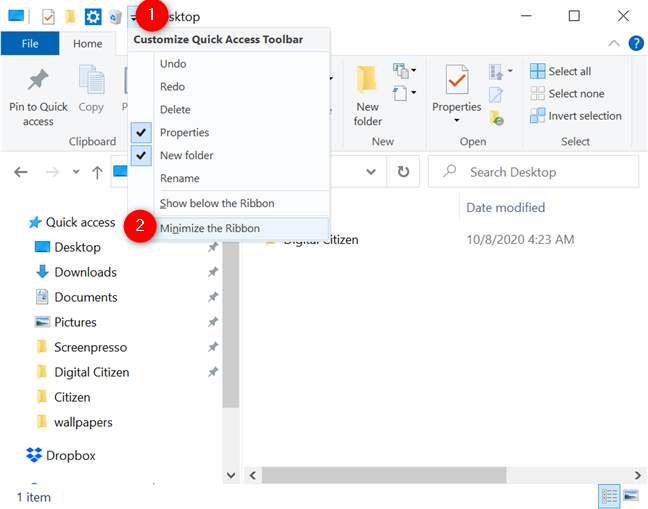
Minimize the Ribbon from the toolbar's menu
Alternatively, in the previous chapters, you might have noticed that this option is also present in the right-click menu of buttons on both the ribbon and the Quick Access Toolbar.
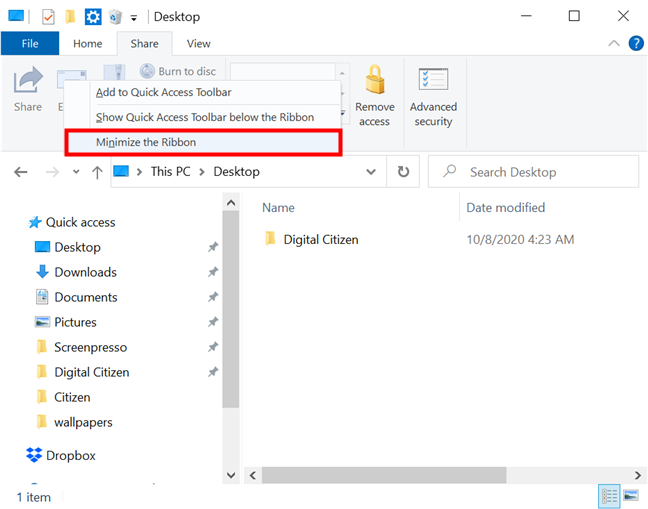
Minimize the Ribbon from the contextual menu of buttons on it
The ribbon recedes into itself, freeing up screen space, which comes in handy if you're working on a laptop or tablet instead of a big screen.
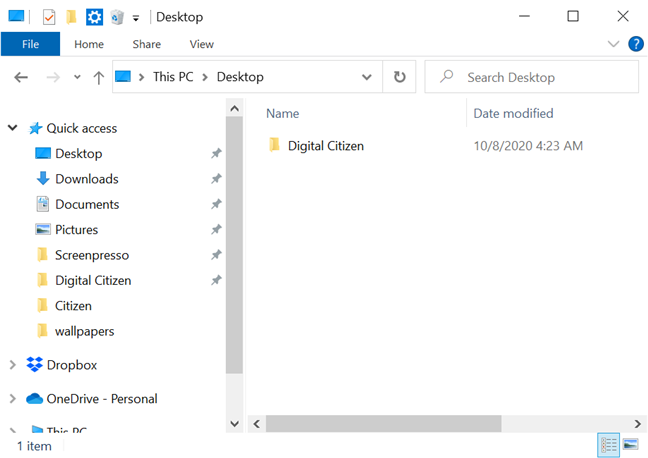
Get more screen space by minimizing File Explorer's ribbon
Don't worry about losing the ribbon completely while it's minimized because you can still access it. Clicking or tapping a tab name extends the ribbon, showing its options in File Explorer. However, after you click or tap on the option you want to use, the tab is minimized once more. If you don't like this behavior and want to keep the ribbon interface open, you can follow the steps in this chapter to access either menu. Then, click or tap the "Minimize the Ribbon" option to uncheck it and maximize the ribbon.
Uncheck the option to return the ribbon to its standard size
The Quick Access Toolbar is just one of the many features that make File Explorer great in Windows 10, and you can learn about others by reading 15 ways to improve File Explorer.
Did the Quick Access Toolbar catch your eye? Why?
If you don't like keyboard shortcuts or you rely mostly on your mouse, the Quick Access Toolbar is an impressive tool in Windows 10. It can successfully replace the ribbon, giving you more space on your screen, while also saving you the time typically spent going through tabs and menus to access commands. That is a lot of value for users who spend a significant amount of time in File Explorer. Before you close this guide, let us know what you like about the Quick Access Toolbar. What would you add? Share your thoughts and opinions in a comment below.


