Are you wondering how to stop Skype from starting automatically in Windows 10? Whether you're using the default app for Windows 10 or the Skype desktop app, it is easy to disable Skype on startup. If you want to decide for yourself when to launch Skype on your Windows 10 computer or device, read this tutorial to learn how to stop Skype from starting automatically:
Contents
- How to stop the default Skype app in Windows 10 from starting automatically
- How to stop the Skype desktop app from starting automatically in Windows 10 (3 ways)
- Why do you want to disable Skype on startup?
IMPORTANT: There are two versions of Skype you can have on your Windows 10 PC: the Skype app that comes with Windows 10 and the "classic" Skype desktop app. By default, both apps start automatically in Windows 10, but the process to disable them on startup is entirely different.
How to stop the default Skype app in Windows 10 from starting automatically
The Skype app in Windows 10 comes preinstalled, so it's the most comfortable to use. However, the steps needed to stop this Skype app from starting automatically in Windows 10 are anything but obvious. First, open the Settings app and click or tap on Privacy.
Access Privacy Settings
On the left side of the Privacy window, scroll down, and, under App permissions, you can find the Background apps tab hidden towards the bottom. Click or tap on it.
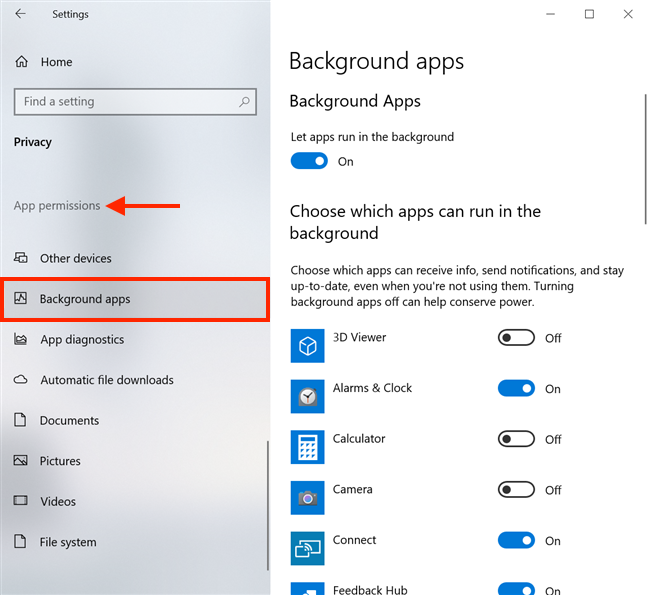
Scroll on the left-hand side of the window and press Background apps
The apps displayed on the right side of the window run in the background, even when you're not using them.
Since apps are listed alphabetically, scroll down, and click or tap on the switch next to Skype to turn it Off.
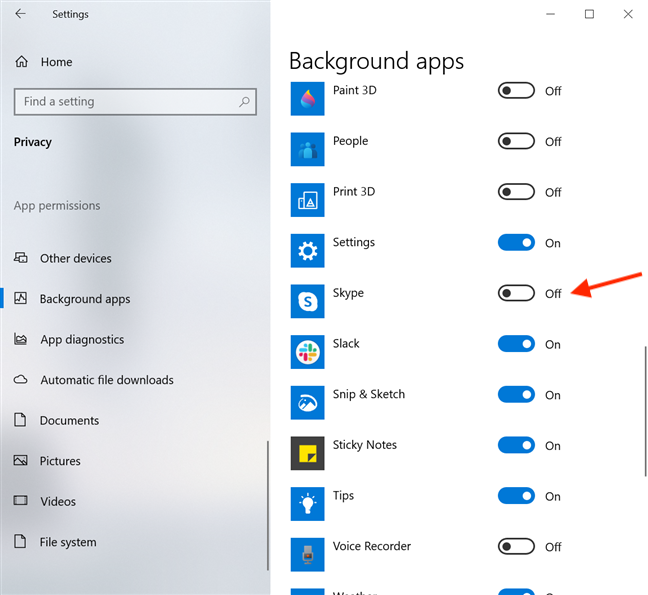
Turn the switch next to Skype off
That's it! You now disabled Skype on startup, if you're using the default (UWP) Windows 10 Skype app.
How to stop the Skype desktop app from starting automatically in Windows 10 (3 ways)
The classic Skype desktop app can be downloaded from here. This version of Skype has some improvements over the default Windows 10 one, like increased privacy while sharing your screen on Skype and more intuitive ways to stop Skype from starting automatically with Windows 10. To begin, log into the Skype for desktop app and press Ctrl + Comma (,) on your keyboard to access its Settings.

Pressing the Ctrl and Comma keys simultaneously opens Skype Settings
Alternatively, you can also press the More (...) button from the upper-right corner of Skype's main window. Then, click or tap on Settings.

Press More and then Settings
Access the General tab on the left-hand side, and then, on the right, click or tap on the switch next to "Automatically start Skype" to disable it.
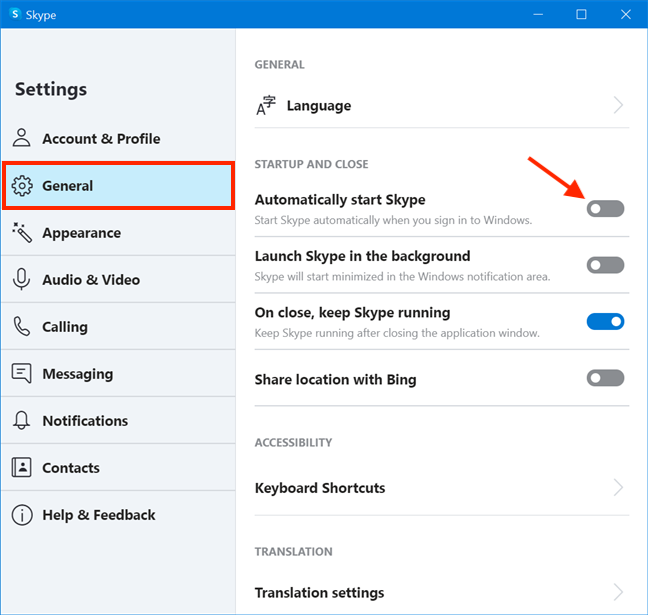
Disable Skype on startup for the desktop app
If you don't want to log into your account to stop Skype from starting automatically with Windows 10, you can also disable Skype on startup from the Settings app. Launch Settings and click or tap on Apps.
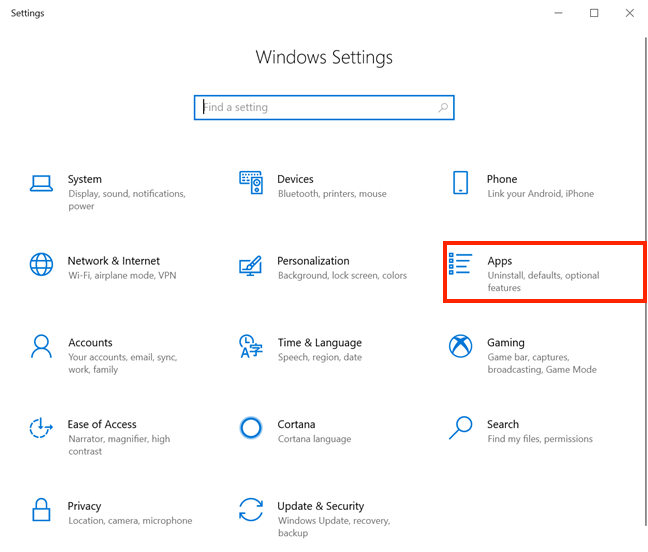
Access Apps Settings
Access Startup from the tabs on the left, and you can see an alphabetical list of the apps you can configure to start with Windows 10 displayed on the right-hand side. Find Skype and turn Off the switch next to it.
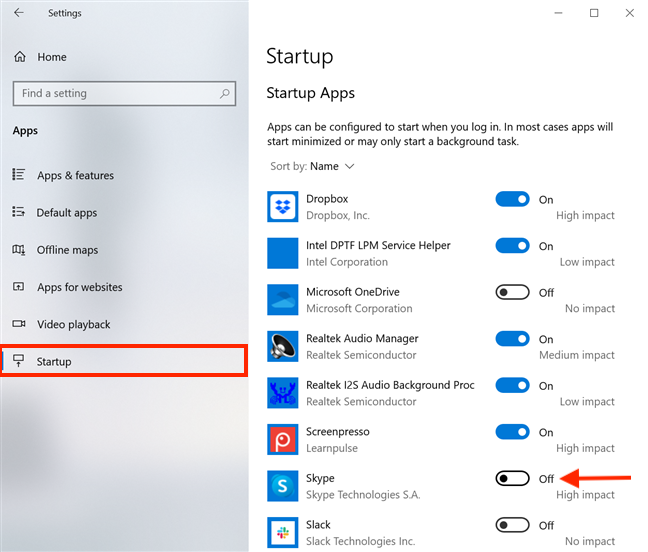
Turn off the switch to disable Skype on startup
If you like using the Task Manager, it offers a third way to prevent the Skype desktop app from starting automatically in Windows 10. To learn more about it, read our tutorial on How to view and disable startup programs from Windows 10's Task Manager.
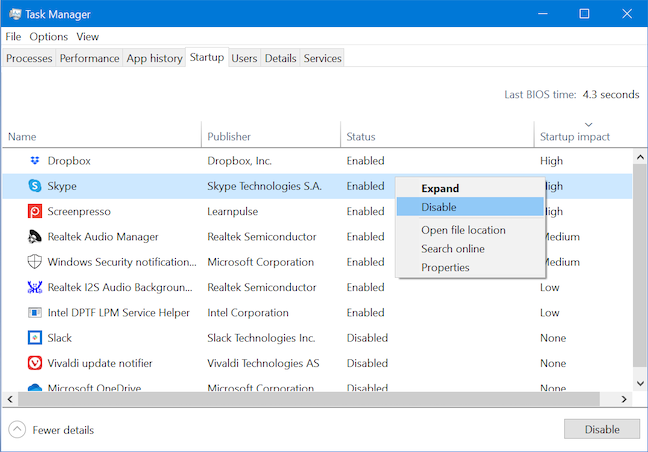
Disable Skype from Task Manager's Startup tab
That's it! You can now use any of these three ways to stop the Skype desktop app from automatically starting whenever you turn on your Windows 10 computer or device.
Why do you want to disable Skype on startup?
Like many users, we find this setting annoying and, as a rule, disable Skype on startup in Windows 10. This lets us organize our schedule without being prompted to answer any unwanted messages and losing focus on what we're working on. What about you? Do you also think Skype is a distraction? Why do you want to disable Skype on startup? Let us know in the comment section.


