How to see yourself like any celebrity with B612

Discover how to find out which celebrities you resemble using the new Familiar Faces feature in B612.
Windows 11 has been officially launched for a while, but during use there are still many errors affecting users. The article below will guide you how to fix the Snipping Tool not working error, a very common error on Windows 11.

Instructions for fixing Snipping Tool errors on Windows 11
Snipping Tool is an extremely useful system tool on Windows from older versions that helps users take screenshots quickly. Users can use this tool by going to Start -> finding Snipping Tool or pressing the key combination Windows + Shift + S. Snipping Tool can easily take a photo of any screen area, a Windows window or the entire screen. The photo will then be automatically saved to the Clipboard for pasting anywhere or exporting to a separate image file.
On Windows 11, when users open this tool with a keyboard shortcut, nothing happens; Or open the Snipping Tool application from Start but when you press the shutter, the message as shown below appears, then your Snipping Tool has failed.

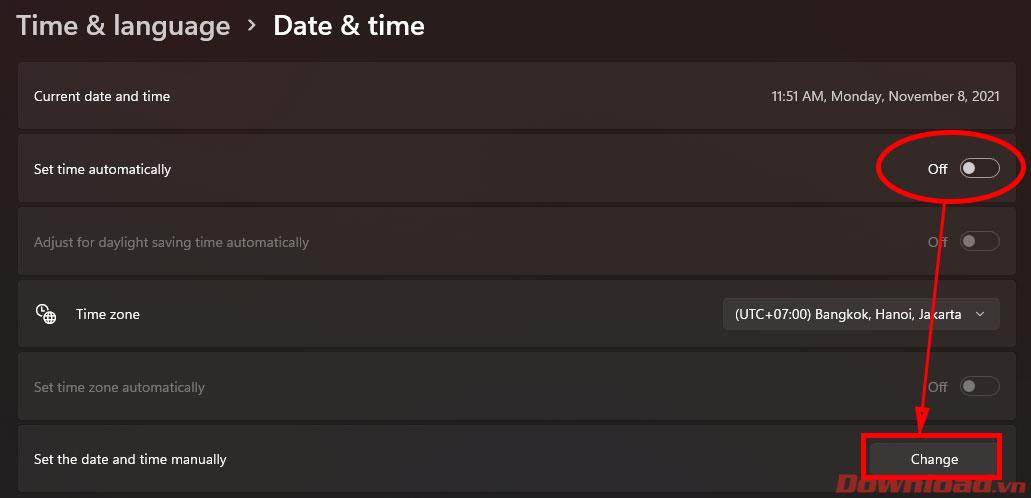
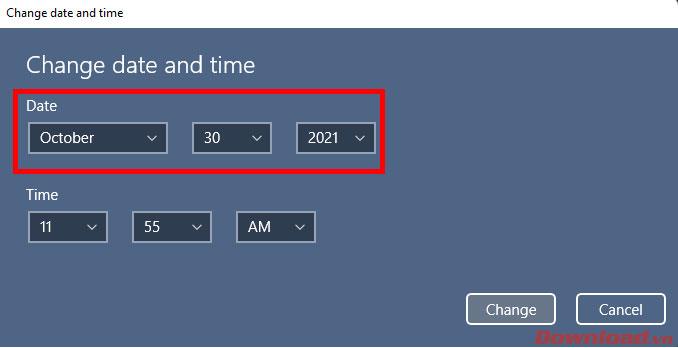
To fix this error is also very simple, follow the steps below:


That's it, try opening the Snipping Tool again or using the keyboard shortcut Windows + Shift + S to see if you can take a screenshot. After fixing the error, please go back to the Date & Time section and reopen the automatic time synchronization function in the Set time automaticlly section so that the system displays the correct time again.
Wishing you success!
Discover how to find out which celebrities you resemble using the new Familiar Faces feature in B612.
Learn how to disable the background mode of BlueStacks to enhance your computer’s performance while saving resources.
Learn how to effectively remove old boot menu options on Windows 10. Keep your boot menu clean and optimized for efficiency with these easy steps.
Discover the essential CROSH commands for your Chromebook. Get troubleshooting tips and system configurations to enhance your Chrome OS experience. Learn more!
Zoom is a top video conferencing service for connecting with friends, family, business associates, and classmates on various devices including Amazon Fire tablets.
Discover the advantages of the AccuType Keyboard in Lenovo laptops. Learn why this keyboard enhances productivity and provides a superior typing experience.
Learn how to utilize the SkyShare feature on Skyworth Smart TV for easy connection with your phone or tablet, enhancing your viewing experience.
Learn how to limit your download speed in Google Chrome to manage bandwidth and improve overall performance during downloads.
Discover how to fix the error of not being able to install software on Windows 10/11. Learn essential steps and troubleshooting techniques.
Learn how to create an Instagram account without a phone number. This step-by-step guide will help you sign up using an email address instead, making it quick and easy.
Step-by-step guide to change the location of the data sharing folder between the NoxPlayer Android emulator and your computer for enhanced file management.
Learn how to efficiently delete data (photos, videos, music, etc.) on the Android NoxPlayer emulator.
Learn how to remove fonts easily with PicsArt, one of the leading photo editing applications that enhances your photography experience.
Discover the 11 best Virtual Router Software for Windows that allows you to convert your PC into a virtual Wi-Fi router, enhancing your internet sharing capabilities.
Learn the comprehensive steps to reset your Smart TV Skyworth effectively with WebTech360. Optimize performance and settings!


