How To Resize An Image In PhotoPea

Device Links

If you’ve ever shared an image online, you’ve likely had to use an editor to resize the picture to preserve its quality or meet certain website requirements. But some users struggle to find a reliable and user-friendly image editor. Most options, like Adobe Photoshop, require paid subscriptions, while free programs might be packed with glitches and could degrade the photo’s quality. Fortunately, the web-based editing and design program Photopea has all the features you need to modify the dimensions of your pictures.

How To Resize An Image In PhotoPea

Keep reading to learn more.

How to Resize an Image on a PC

Photopea will check all your boxes if you prefer to edit pictures on your PC. When paired with a larger screen, the program is relatively simple to navigate and caters to both professional and amateur creatives.

To resize an image:

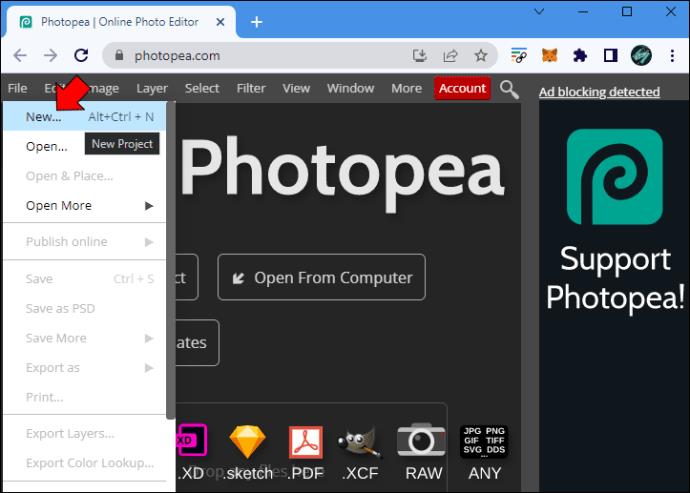
  1. Open the program, press “File,” and select “New.” (Alternatively, hold “Ctrl + N.”)
    How To Resize An Image In PhotoPea
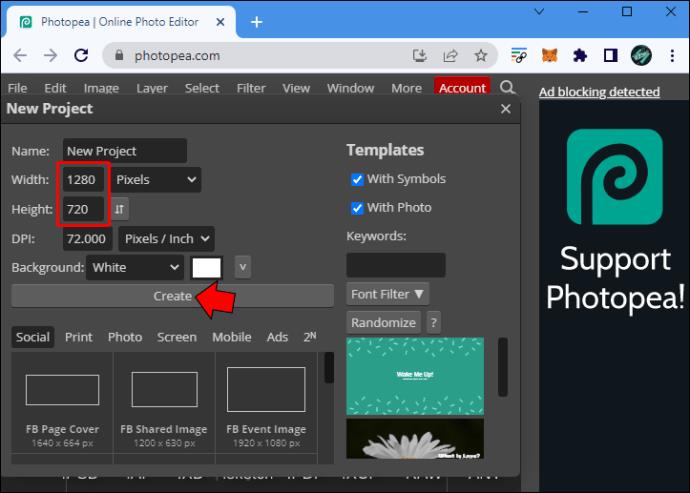
  2. Type the desired width and height in the appropriate fields and click on “Create” to make a transparent layer.
    How To Resize An Image In PhotoPea
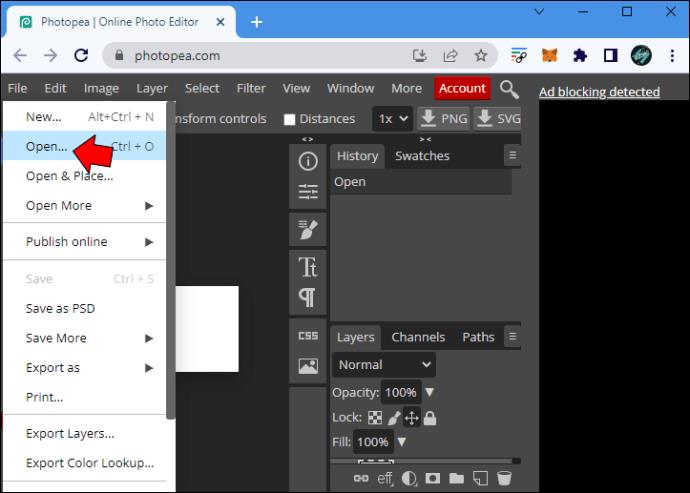
  3. Tap “File” and select “Open” to load your image. (You can also press “Ctrl + O.”)
    How To Resize An Image In PhotoPea
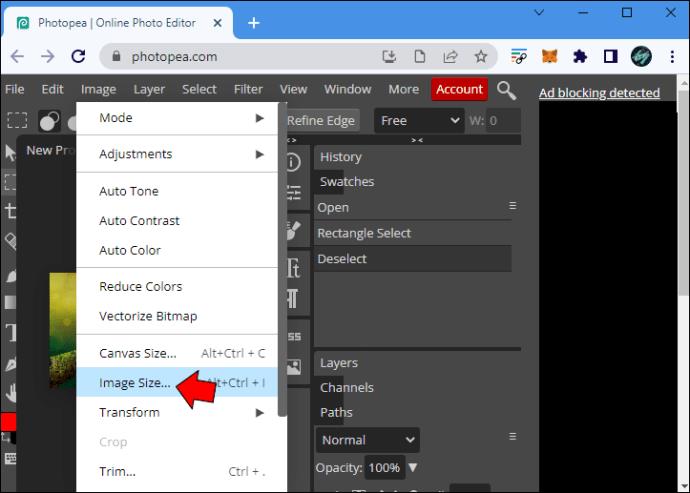
  4. Choose “Image” and hit “Image size” to view modification options. Depending on your needs, you’ll either adjust the width or height of the image.
    How To Resize An Image In PhotoPea
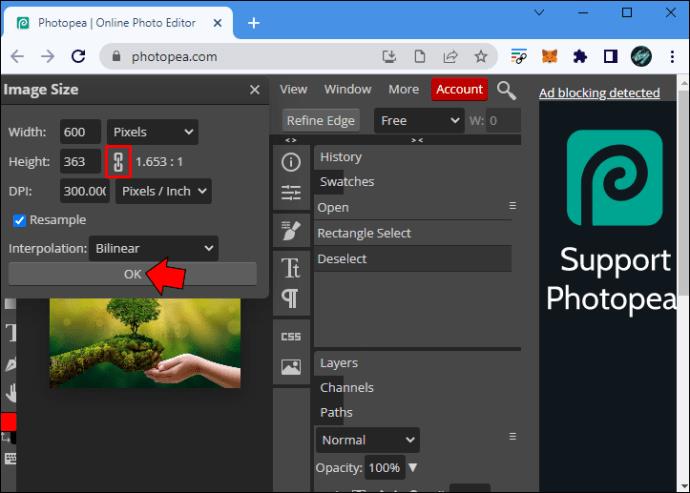
  5. Click the “Key Aspect Ratio” to make the desired changes. When you’re ready to move on, click “Ok.”
    How To Resize An Image In PhotoPea
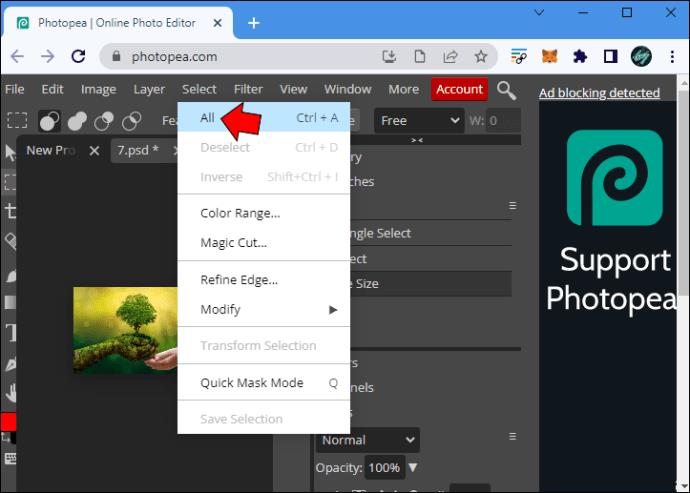
  6. Press “Select” and choose “All” to select the photo.
    How To Resize An Image In PhotoPea
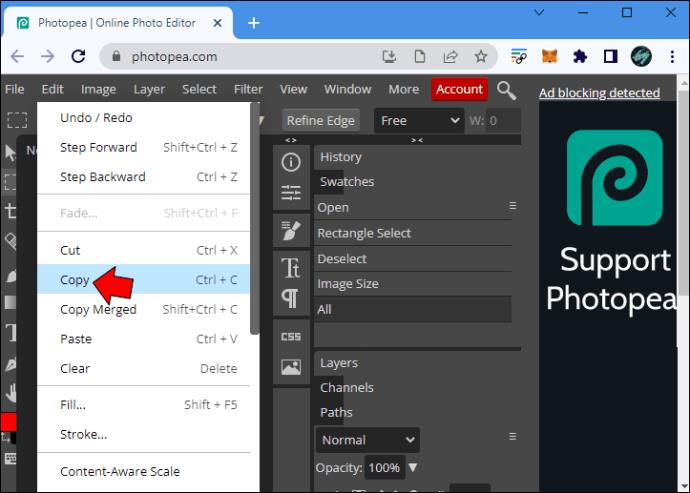
  7. Tap “Edit” and click on “Copy.”
    How To Resize An Image In PhotoPea
  8. Return to the transparent layer, select “Edit,” and press “Paste” to combine the image with the transparent layer.
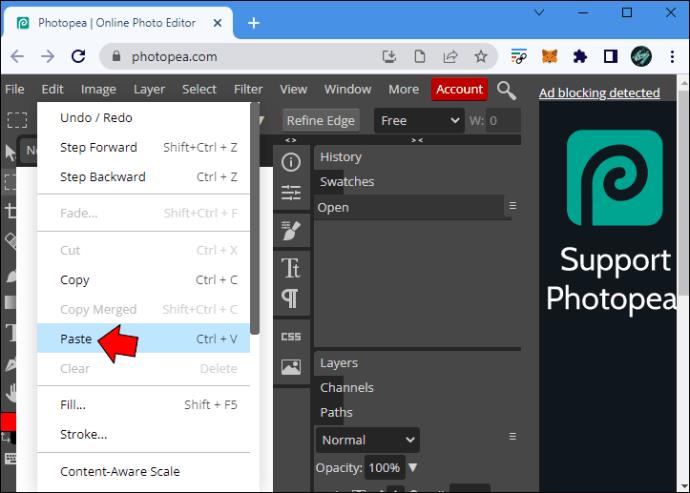
    How To Resize An Image In PhotoPea
  9. Use the “Move” feature from the app’s sidebar to align the image.
    How To Resize An Image In PhotoPea
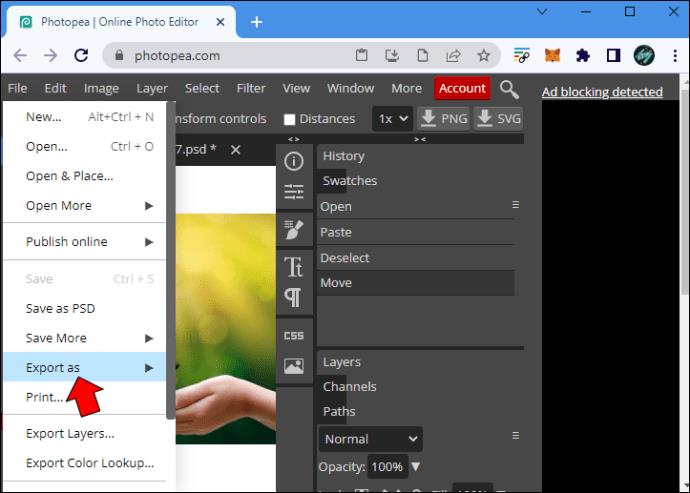
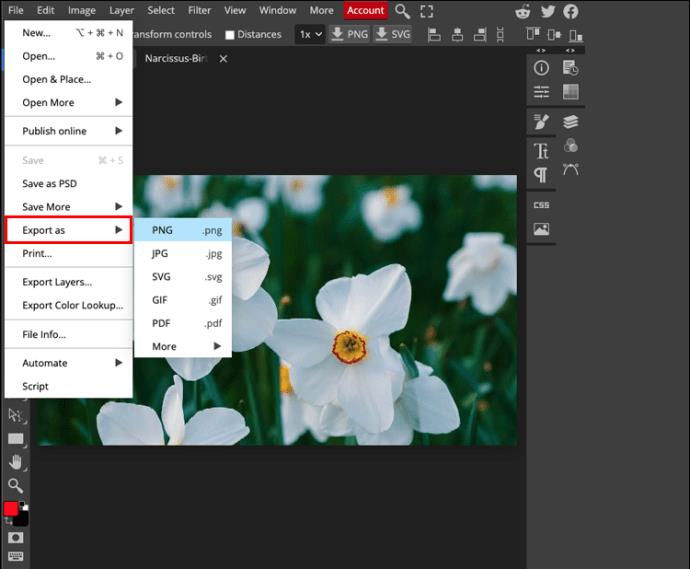
  10. Tap “File” and select “Export as.”
    How To Resize An Image In PhotoPea

Photopea also allows you to save images in JPG form, but the transparent layer will turn black when you export your pictures. To preserve image quality, go for the “PNG” option.

How to Resize an Image on a Mac

Thanks to Photopea, Mac users can hone their photo editing skills without breaking their budget. It’s an excellent app when you need to resize a photo quickly. To do so:

  1. Launch the program, click on “File,” and tap “New.”
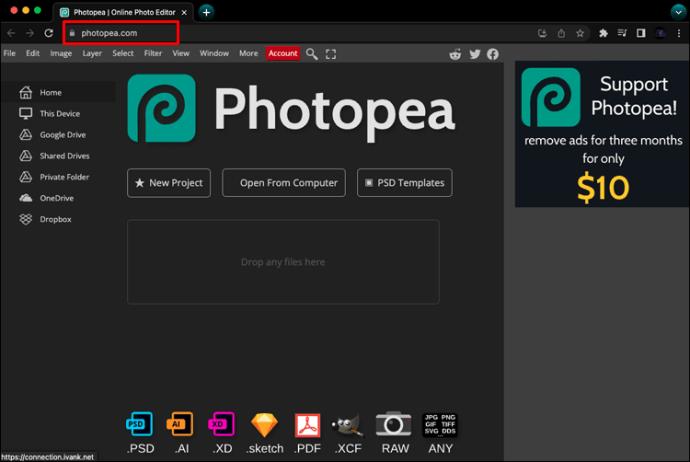
    How To Resize An Image In PhotoPea
  2. Type the dimensions of the transparent layer and hit “Create.”
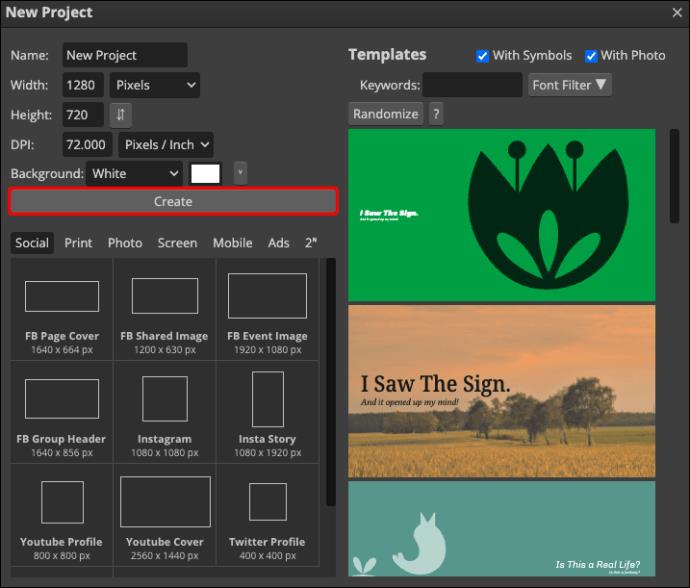
    How To Resize An Image In PhotoPea
  3. Tap “File” and select “Open” to upload your picture.
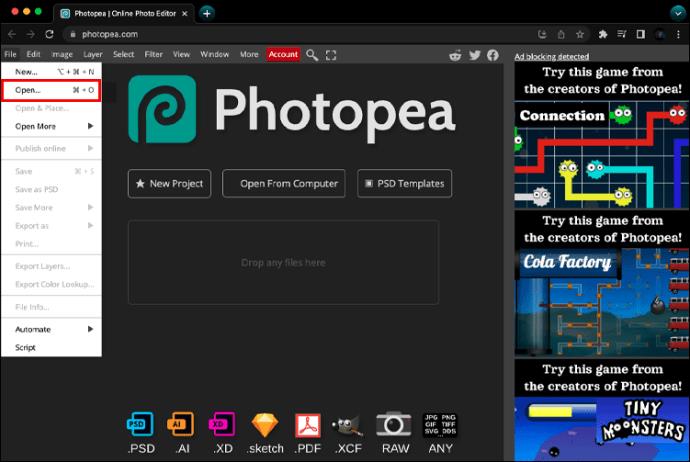
    How To Resize An Image In PhotoPea
  4. Go to “Image “ and pick “Image Size.” You only have to alter one, since modifying the width will automatically change the height.
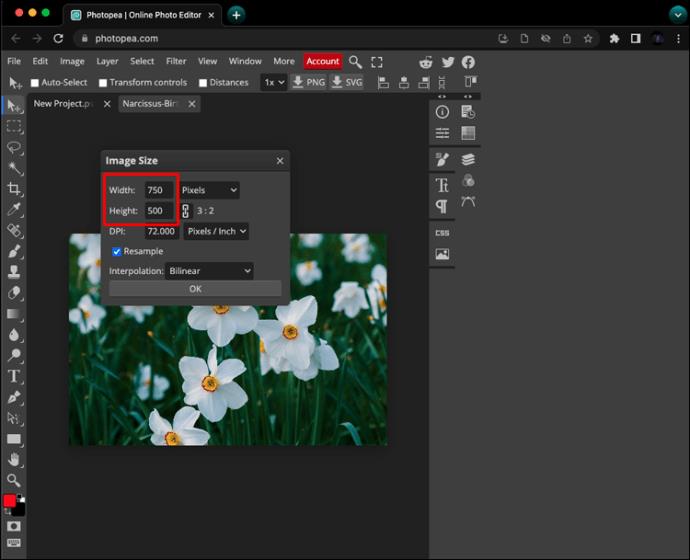
    How To Resize An Image In PhotoPea
  5. Navigate to “Keep Aspect Ratio,” make the appropriate changes, and hit “Enter.”
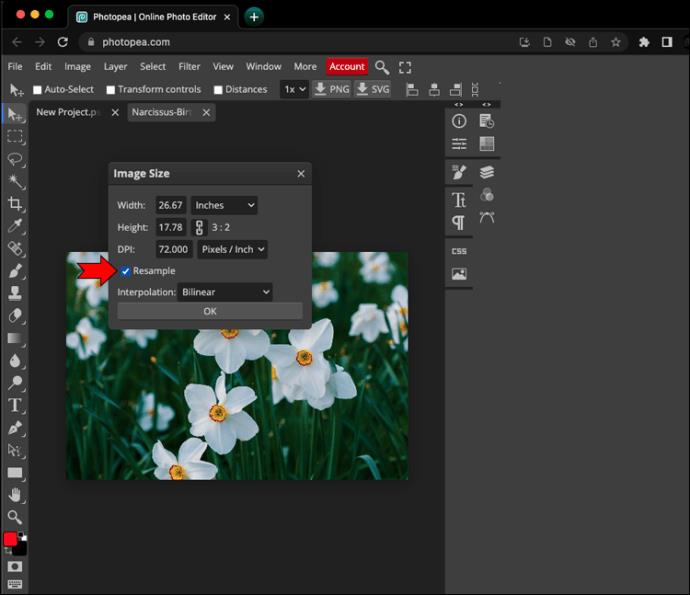
    How To Resize An Image In PhotoPea
  6. To select the picture, click on “Select File” and pick “All.”
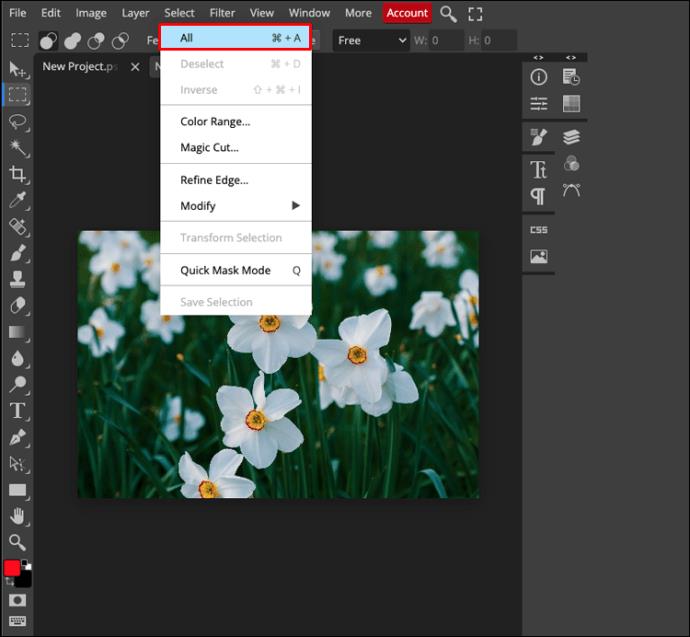
    How To Resize An Image In PhotoPea
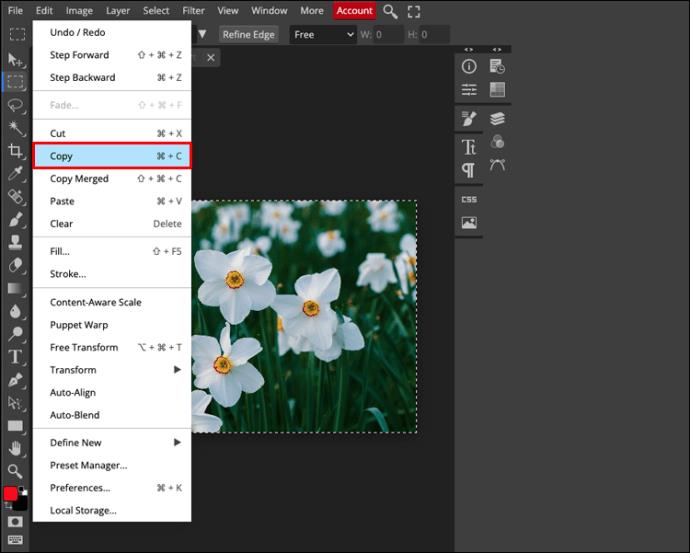
  7. Choose “Edit” and tap the “Copy” option from the drop-down menu.
    How To Resize An Image In PhotoPea
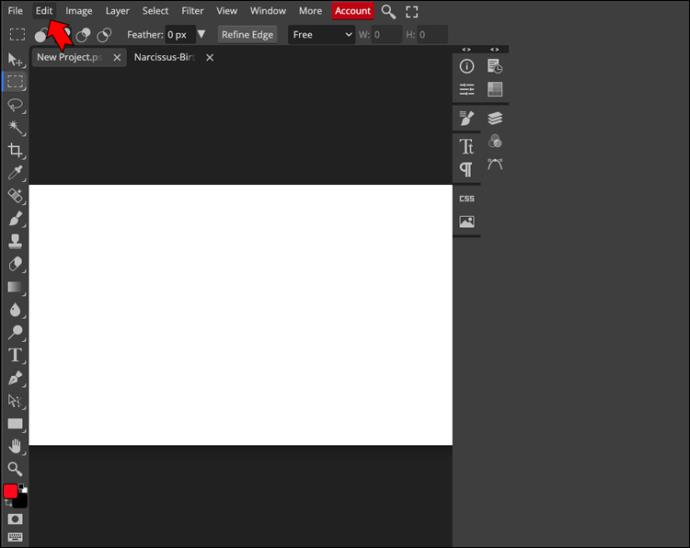
  8. Go back to the transparent layer and go to “Edit.”
    How To Resize An Image In PhotoPea
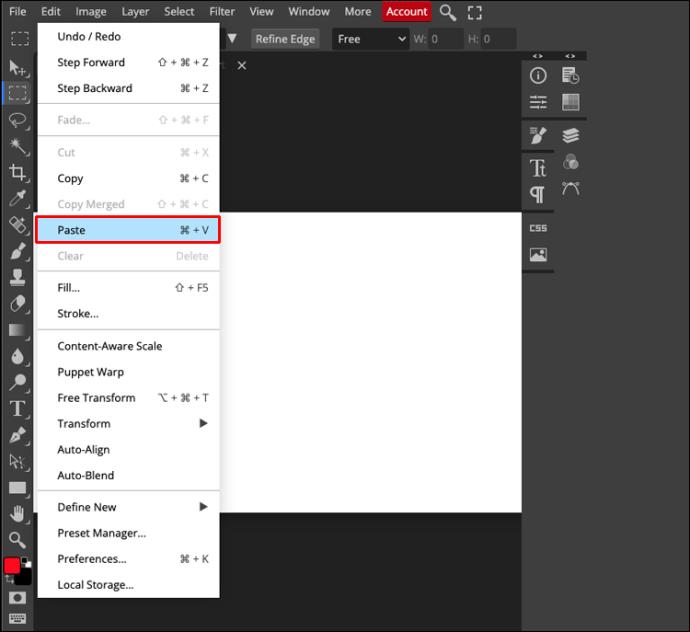
  9. Press “Paste” to place your photo over the transparent layer.
    How To Resize An Image In PhotoPea

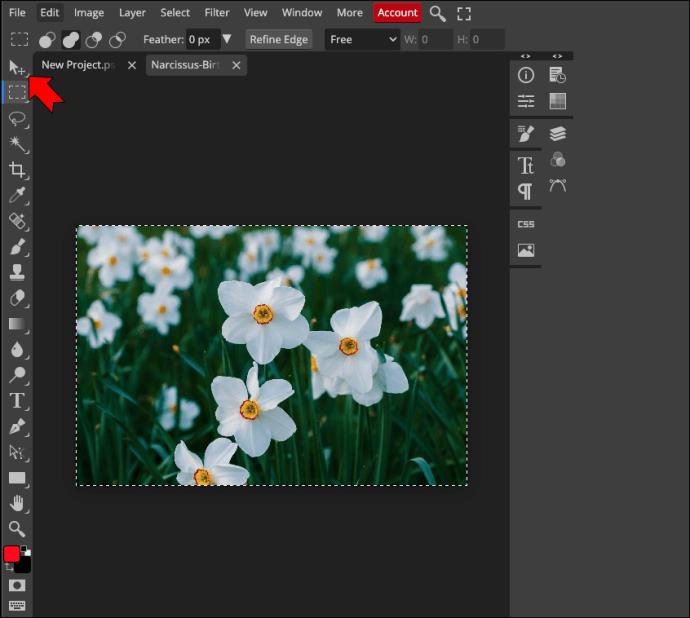
Although you could stop here, the image will remain in the left corner of the background layer. To modify the alignment:

  1. Navigate to the sidebar and use the “Move” tool to find the perfect placement. Move the picture around until you’re satisfied with the results.
    How To Resize An Image In PhotoPea
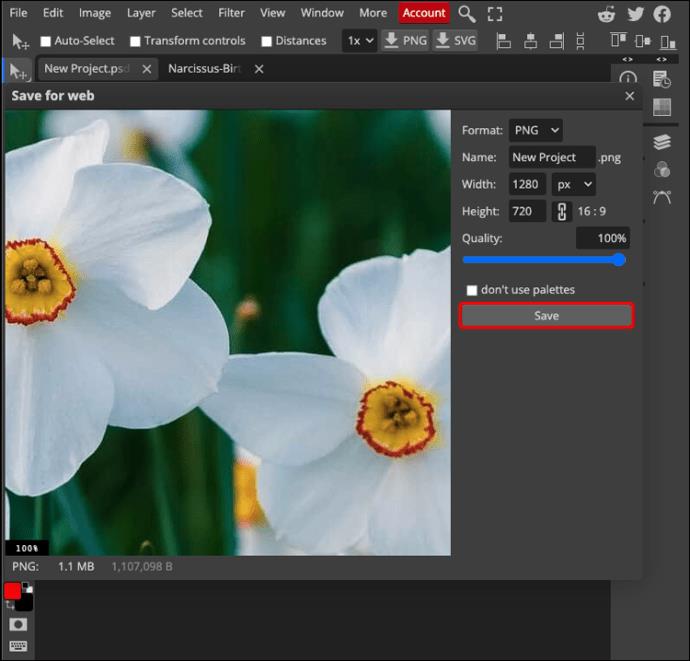
  2. Select “File” and choose “Export as.”
    How To Resize An Image In PhotoPea
  3. Pick “PNG” and tap the “Save” button to save the image to your local storage.
    How To Resize An Image In PhotoPea

Avoid saving your images in JPG form. Although Photopea supports this format, the transparent layer will become black once you download the image. It’s best to choose the GIF or PNG format to keep the picture sharp.

How to Resize an Image on an iPad

Although it’s challenging to navigate editing apps on smaller screens, iPad users often rely on Photopea to resize their images. Most people can do so without difficulty. The steps are as follows:

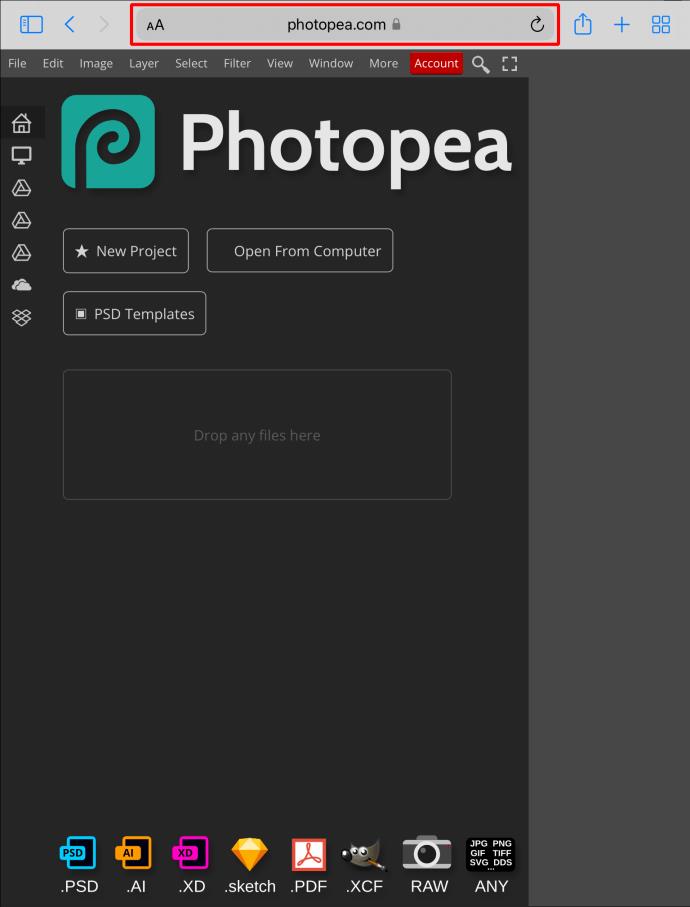
  1. Open the program from your browser.
    How To Resize An Image In PhotoPea
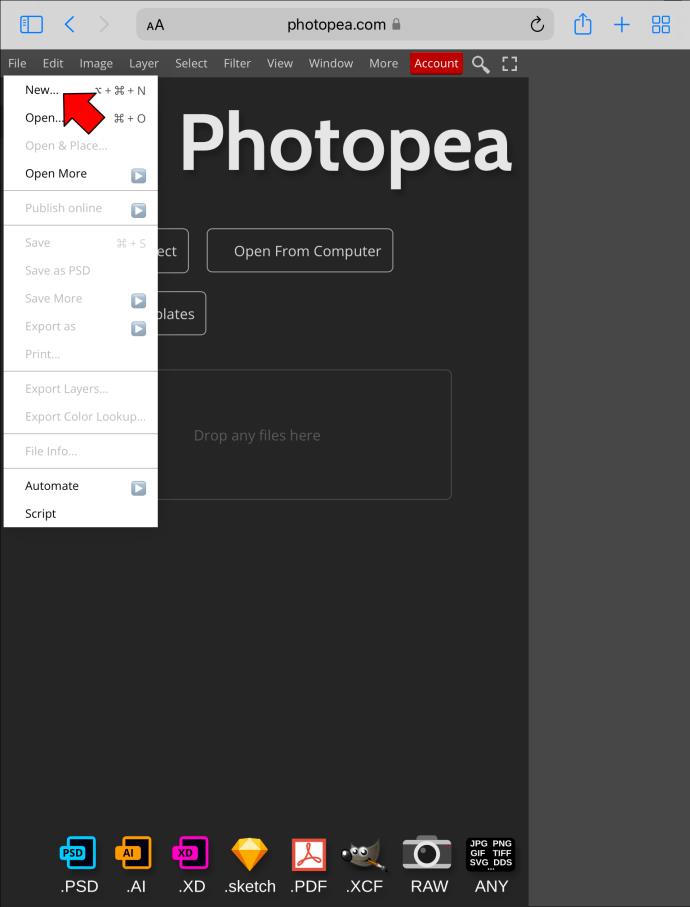
  2. Press “File” and select “New.”
    How To Resize An Image In PhotoPea
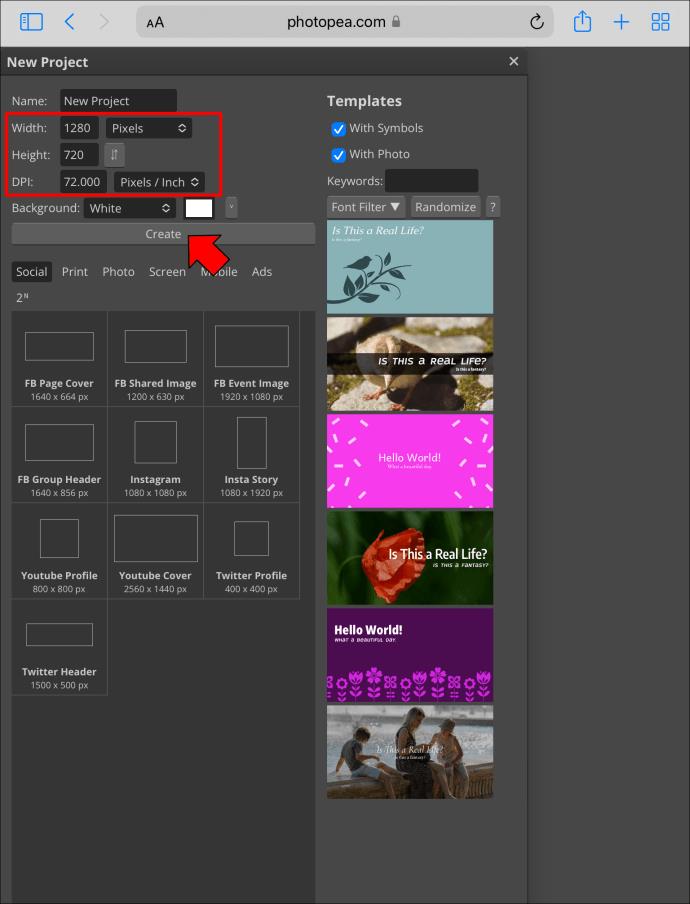
  3. Enter the dimensions of your transparent layer and tap “Create.”
    How To Resize An Image In PhotoPea
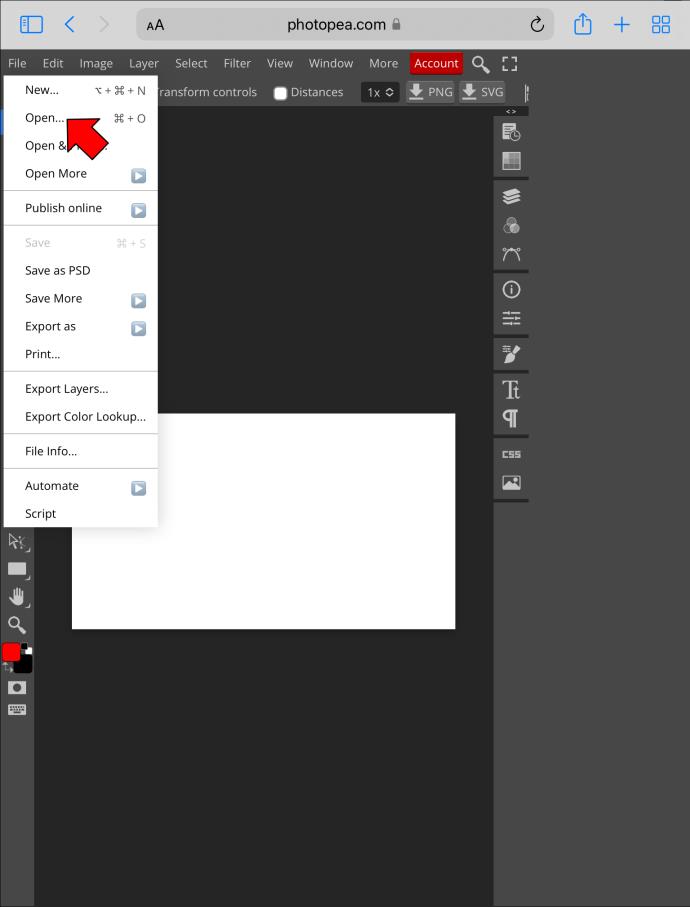
  4. Choose “File” and hit “Open” to upload your image.
    How To Resize An Image In PhotoPea
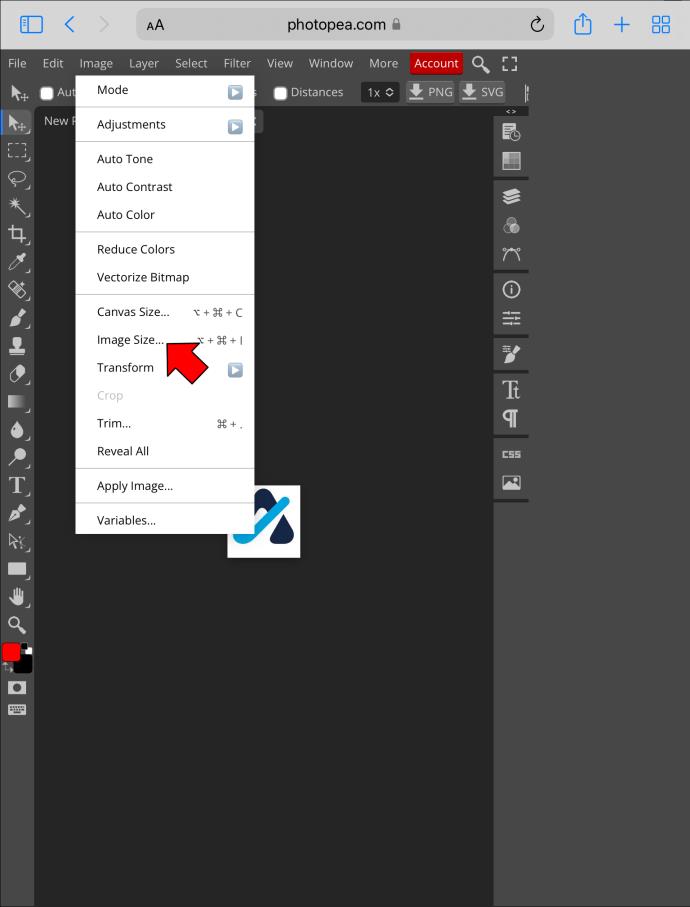
  5. Select “Image” and tap “Image Size” to modify the dimensions.
    How To Resize An Image In PhotoPea
  6. Click on “Keep Aspect Ratio” to tweak the height or width of the image. Hit “Enter” when you’re happy with the changes.
    How To Resize An Image In PhotoPea
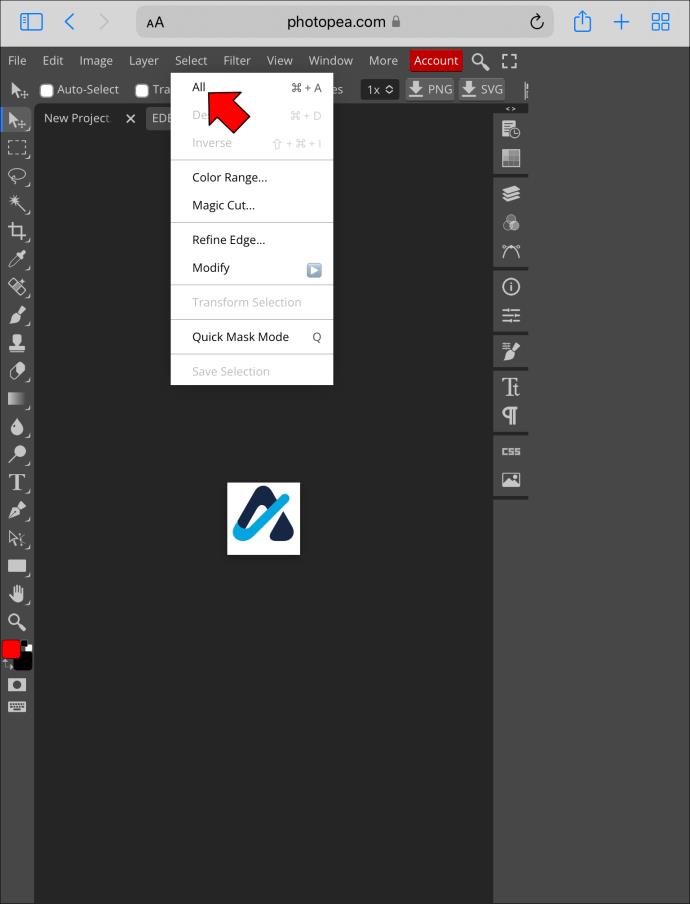
  7. Choose “Select” and tap “All.”
    How To Resize An Image In PhotoPea
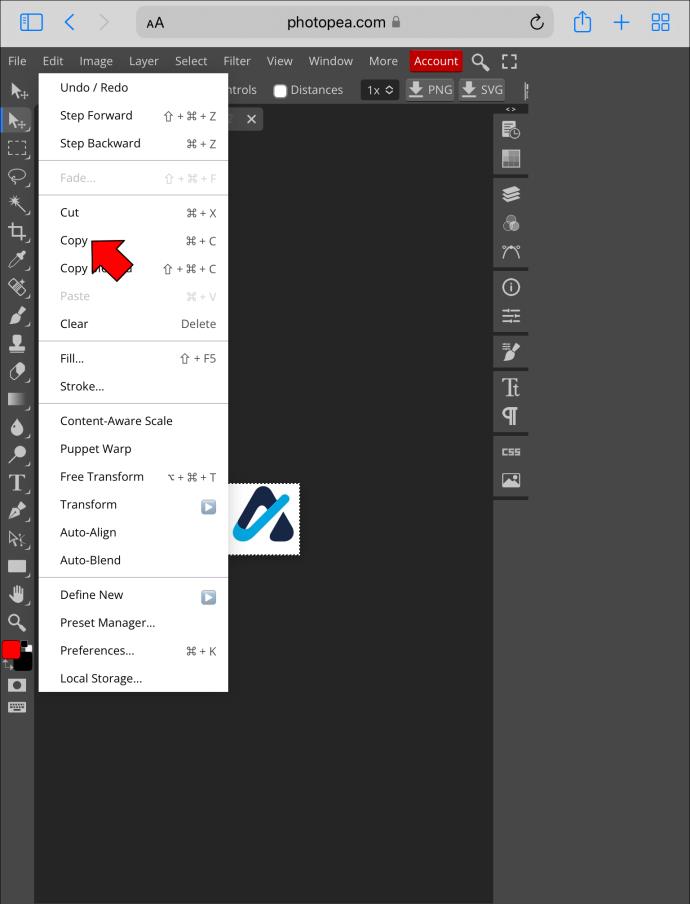
  8. Pick “Edit” and select “Copy.”
    How To Resize An Image In PhotoPea
  9. Return to the transparent layer and press “Edit.”
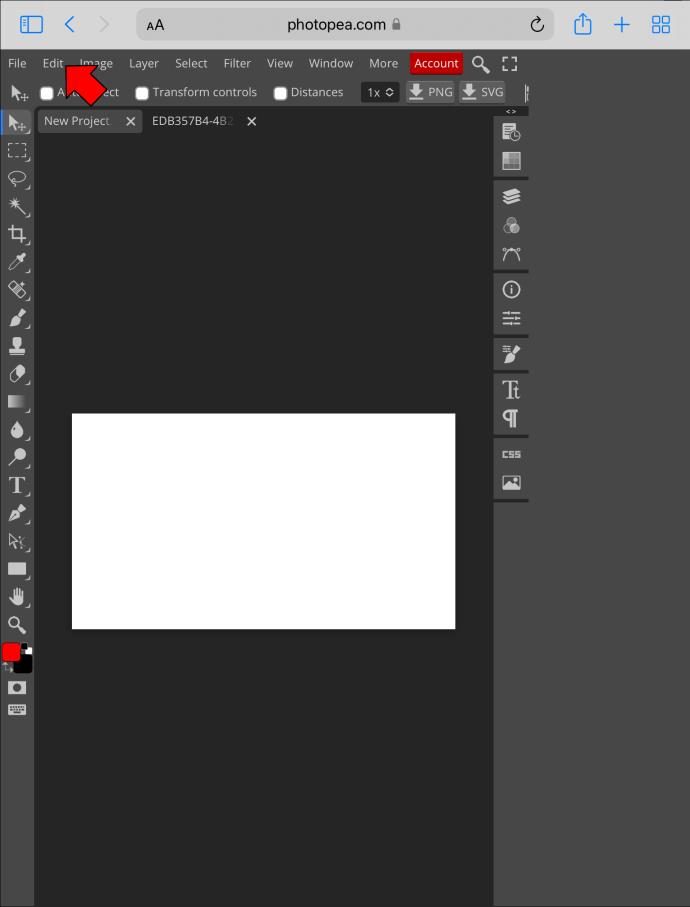
    How To Resize An Image In PhotoPea
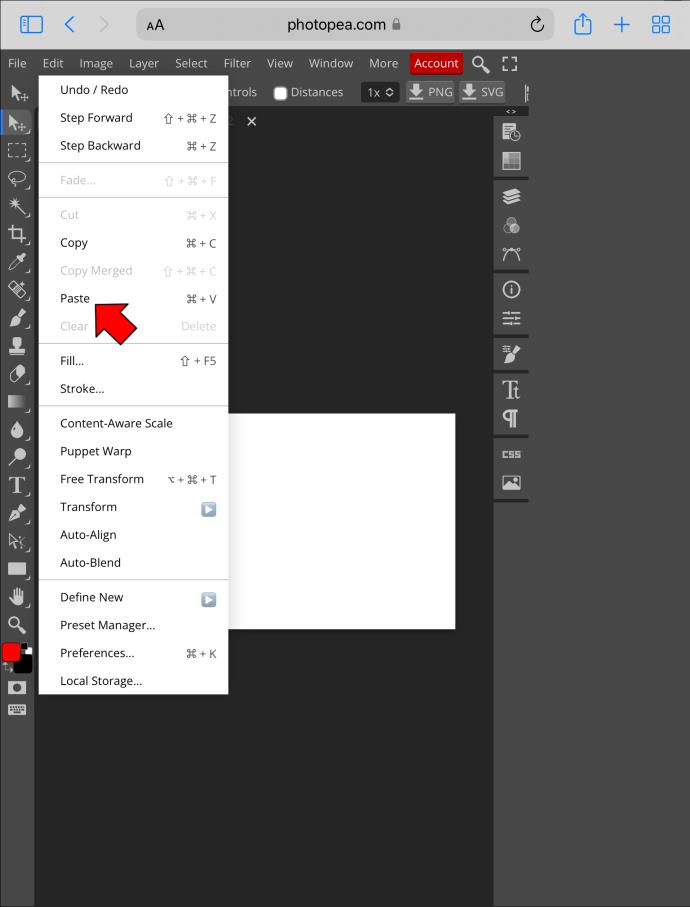
  10. Choose “Paste” to merge the photo with the transparent layer.
    How To Resize An Image In PhotoPea

You could save the image as is, but it would sit in the left corner of the transparent layer. Fortunately, tweaking the alignment is relatively straightforward.

  1. Go to the sidebar and reposition the picture using the “Move” tool.
    How To Resize An Image In PhotoPea
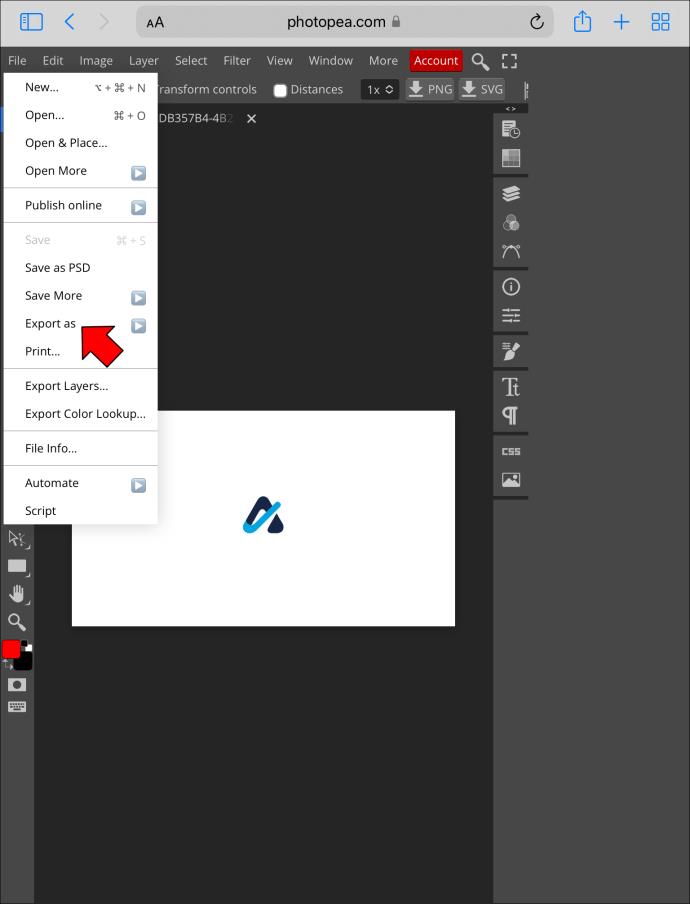
  2. Press “File” and tap “Export as.”
    How To Resize An Image In PhotoPea
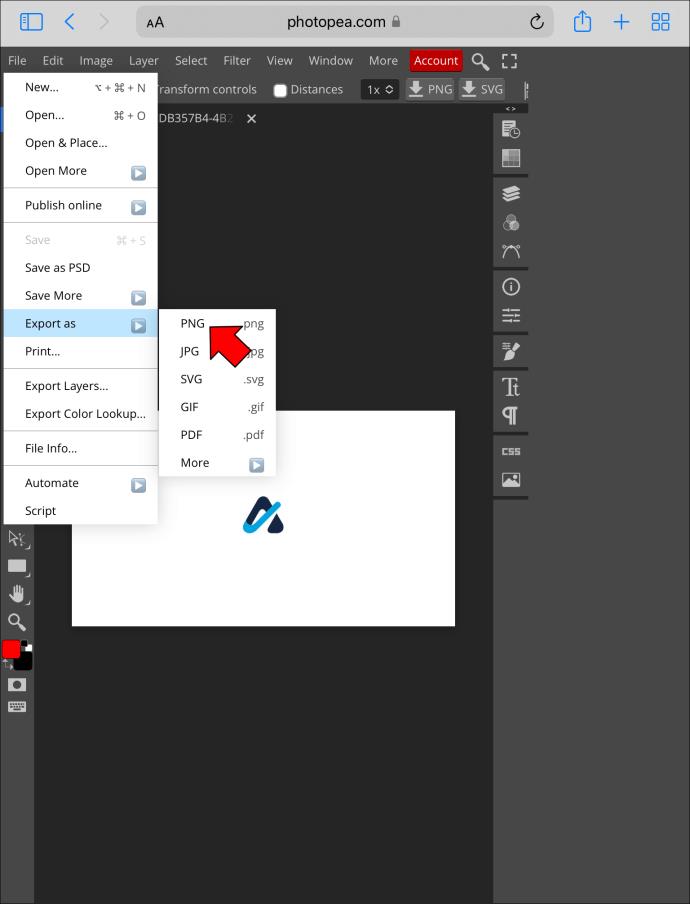
  3. Choose “PNG” to download the resized image.
    How To Resize An Image In PhotoPea

The transparent layer preserves the quality of your photos. Note that if you save pictures in JPG form, the layer will a ppear black.

Resize Images Without Difficulty in Photopea

Thousands of people use Photopea to edit their photos. The program is free, easy to use, and compatible with multiple devices. You can use the software on your computer, Mac, or iPad to resize images quickly without lowering their quality.

Have you used Photopea before? Which features attracted you the most? Let us know in the comments section below.

Sign up and earn $1000 a day ⋙

How to pin comments on TikTok

How to pin comments on TikTok

How to pin comments on TikTok, TikTok allows users to pin comments easily. Here's how to pin comments on TikTok videos.

Instructions for Organizing a Q&A session on Facebook

Instructions for Organizing a Q&A session on Facebook

Instructions for Organizing a Q&A session on Facebook, Recently, Facebook has launched the feature to create a Q&A session, when you post a question for everyone to answer.

Instructions for installing and recording videos with Likee

Instructions for installing and recording videos with Likee

Instructions for installing and recording videos with Likee, Likee is an application that supports extremely beautiful and impressive video recording, and is loved by many young people today. The following,

How to export the list of meeting participants in Zoom

How to export the list of meeting participants in Zoom

How to export the list of meeting participants in Zoom, How to take attendance on Zoom is not difficult, it even allows you to export the list of students participating in the class.

How to change font on Xiaomi

How to change font on Xiaomi

How to change font on Xiaomi, Want to create a new image for Xiaomi device? Just follow the instructions below to change the font style and size above

Instructions for creating a mirror image effect on Picsart

Instructions for creating a mirror image effect on Picsart

Instructions for creating a mirror image effect on Picsart, Picsart is an application where users only need to perform a few simple steps to transform the photo.

How to add new fonts to Microsoft Word

How to add new fonts to Microsoft Word

How to add new fonts to Microsoft Word, Can't find the font you want to use for documents in Microsoft Word? Don't worry, you can install new fonts for Word according to these steps

How to turn off the computer screen and still keep the computer running

How to turn off the computer screen and still keep the computer running

How to turn off the computer screen and still have the computer running, How to turn off the PC screen and still have the computer running on Win 10/11? Very simple. Here's how to turn off the computer screen

How to fix facebook error logging in 3/2024

How to fix facebook error logging in 3/2024

To fix the “An unexpected error occurred” issue when logging in to Facebook, you can try the following steps

Cant access Facebook, Messenger and Instagram, how to fix it immediately

Cant access Facebook, Messenger and Instagram, how to fix it immediately

Users reported that their Facebook, Messenger and Instagram accounts were suddenly logged out and could not be accessed again, both on the app and web version.

Instructions on how to take photos on Tiktok are extremely simple

Instructions on how to take photos on Tiktok are extremely simple

Instructions on how to take photos on Tiktok are extremely simple. Tiktok is a famous application for recording and creating short videos on social networks. However, this application also

How to find and get Instagram links

How to find and get Instagram links

How to find and get Instagram links, Instagram is one of the most popular and easy-to-use social networking platforms today. However, because it is designed specifically for mobile,

Instructions for locking the mouse cursor when playing games on BlueStacks

Instructions for locking the mouse cursor when playing games on BlueStacks

Instructions for locking the mouse cursor when playing games on BlueStacks, Instructions for turning on/off the mouse cursor lock feature when playing games in the BlueStacks App Player emulator.

Instructions for installing and using Faceapp using an emulator on PC

Instructions for installing and using Faceapp using an emulator on PC

Instructions for installing and using Faceapp using an emulator on PC, Simple and easy instructions on how to install and use the Faceapp face editing app using an emulator on PC

Instructions for creating a cover photo group on Facebook

Instructions for creating a cover photo group on Facebook

Instructions for creating a cover photo group on Facebook, Creating a cover photo group is a feature that helps users set Facebook cover photos with many different images (maximum of 6 photos).

Mastering Technical Analysis with the Stochastic Indicator on Bubinga

Mastering Technical Analysis with the Stochastic Indicator on Bubinga

Learn how to effectively use the Stochastic Indicator for technical analysis on Bubinga. Explore advanced techniques to enhance your trading strategies

Instructions for adding angel wings to photos using PicsArt

Instructions for adding angel wings to photos using PicsArt

Instructions for adding angel wings to photos using PicsArt, PicsArt is a photo editing application used by many people today. Today WebTech360 will introduce the article

How to turn off the Just accessed notification on Zalo

How to turn off the Just accessed notification on Zalo

How to turn off the Just accessed notification on Zalo. This article WebTech360 will guide you to turn off the Just accessed notification under your Zalo chat name.

Instructions for blocking and unblocking accounts on TikTok

Instructions for blocking and unblocking accounts on TikTok

Instructions for blocking and unblocking accounts on TikTok. Similar to other social networking applications, TikTok also allows users to block someone's account

How to write a long status with a colorful background on Facebook

How to write a long status with a colorful background on Facebook

How to write a long status with a colorful background on Facebook, Today, WebTech360 will introduce some steps to post a long status with a colorful background on Facebook,