Aegisub 3.2.2 - Movie Subtitle Creation and Editing Application (Updated 2024)

Aegisub, Aegisub 3.2.2 is a multifunctional subtitle editing software that helps users correct subtitle issues efficiently.
The subtitle creation software Aegisub is a completely sub-free software for users or filmmakers, you can fully manage subtitles completely automatically allowing users to plan their work and conduct operations. In a very convenient way, with this feature you will save a lot of time for the daily operations.
Aegisub has a pretty clear interface, you can completely edit or create new subtitles for movies, in addition this software also supports you the ability to edit video and audio, allowing users to edit The error can be encountered when watching movies or listening to music. Besides, the software also comes with a color correction tool, the style of subtitles and a translation support tool. spell checker and subtitle quality template generator, with detailed support to help users use the most basic steps.
Those who like the color can choose to edit the color, font size of the subtitles and other effects to make your movie subtitles look more attractive, and can create individual fonts for each character in the movie. , to do that, you follow the instructions of Download.com.vn below. You can refer to the article How to install Aegisub on your computer and how to create subtitles with Aegisub offline.
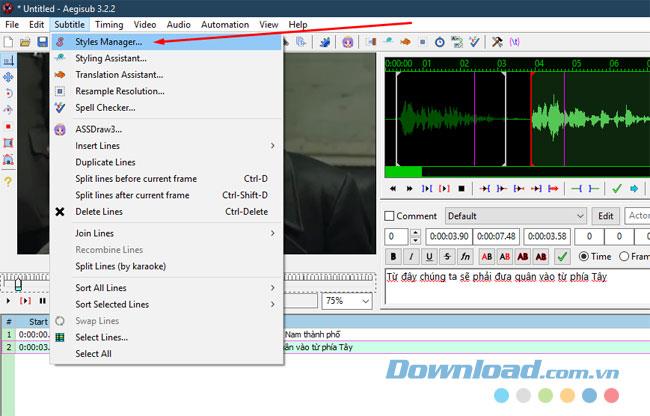
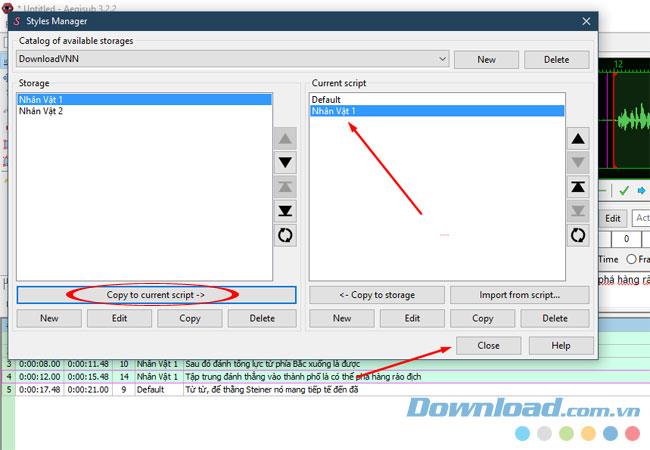
Step 1: After installing the software and creating subtitles for the video, select Subtitle > Styles Manager to start editing.
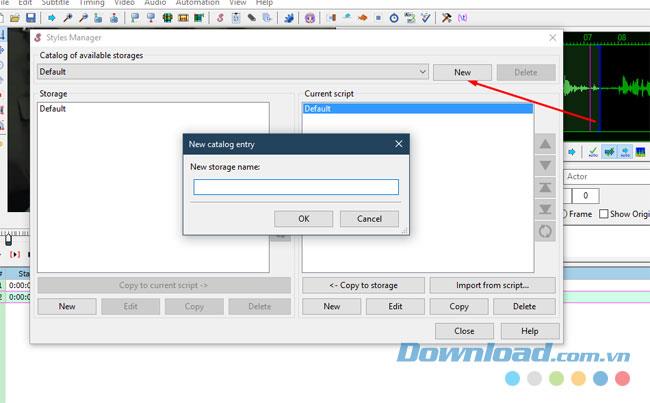
Step 2: Next to the Catalog of available storages, click New to create a new editing list. Then enter the new category name and click OK.
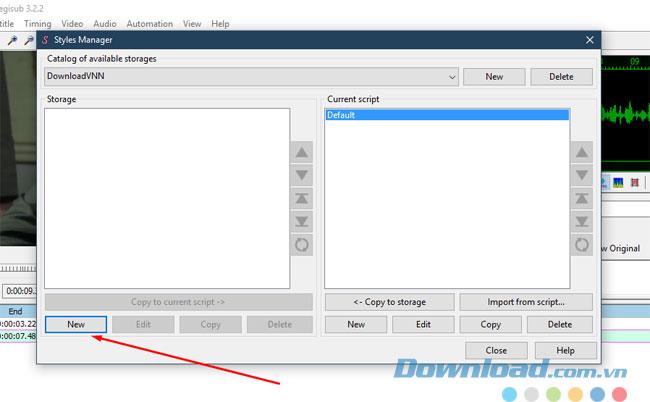
Step 3: Under the Storage window , click New to create a new edit, this window contains the edits of the subtitles, and the Current script is to select those edits and apply it to any character you want to place. subtitle.
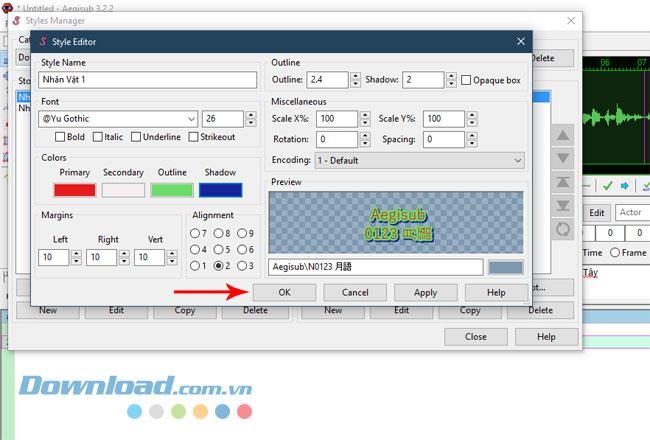
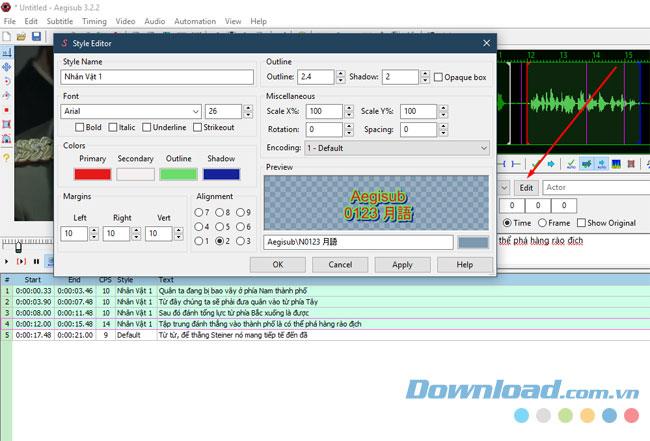
Step 4: The Style Editor subtitles editor will appear, at this edit panel you will see items such as:
You can preview in the Preview section for easy editing, after finishing editing and then click OK to save.
Step 5: After you have saved the subtitle editing, click Copy to current script to switch to the Current script section to apply the revision to the character's subtitles, finally click Close to finish.
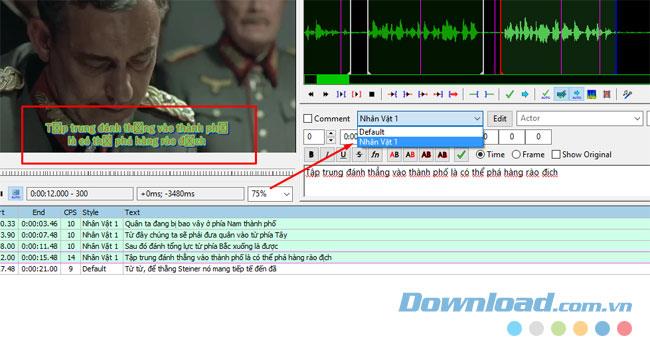
Step 6: Usually a movie will have many characters, based on the content and dialogue of the characters in the movie, you can select multiple subtitle lines created by that character by holding Ctrl and selecting lines that the character says, then choose to edit the previously created subtitles as shown in the picture. Here I put the Character 1
And the beginning that the subtitle character said would appear in the preview screen on the left, here I have a font error so the subtitles appear like that.
Step 7: If you want to edit directly, click Edit next to and can edit subtitles directly.
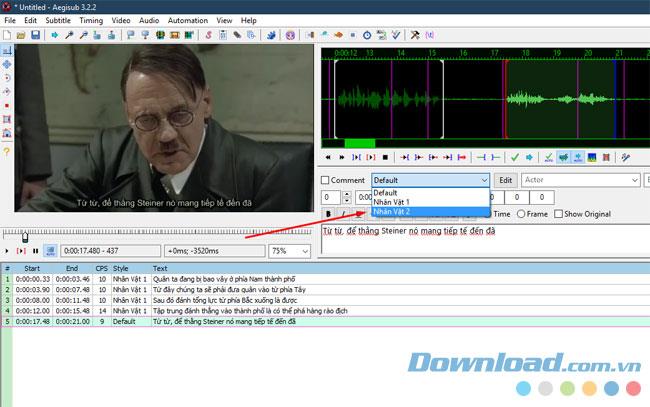
Just like that, you continue to create subtitles editing for each character, here the subtitle of the character Hitler was different when I made a separate edit for this character,
Step 8: If you want to edit the position, the shape of the content line, you can choose the items as in the image below.

So you've done editing subtitles for the movie with Aegisub already, with any movie that has many characters that you want each character to have its own subtitles, then do it this way.
Good luck.
Aegisub, Aegisub 3.2.2 is a multifunctional subtitle editing software that helps users correct subtitle issues efficiently.
Aegisub is the most commonly used video subtitle software. Not only simple, friendly and free, the subtitle quality of Aegisub is also very high.
Transporting bulky goods presents a unique set of challenges. Whether you’re moving furniture, heavy machinery, construction materials, or large appliances, ensuring that these items reach their destination safely, on time, and without unnecessary expense requires a carefully thought-out approach.
Step-by-step guide on how to create a green tick for Facebook. Learn how to verify your account and gain credibility with the green verification mark.
Learn how to download torrent files directly using the Firefox web browser with the Torrent Tornado add-on. Simple steps for effective torrent downloading.
Learn how to view someone else’s TikTok followers, both on public and private accounts. Discover effective methods to access follower counts and improve your TikTok strategy.
Learn how to login to Facebook using your email, phone number, or even QR Code authentication without entering a password.
Learn how to stop echo during your Parsec streaming sessions with effective solutions. Echo is a common issue that disrupts communication in games, and we provide proven methods to eliminate it.
Discover how to change your avatar and cover photo on Zalo to express your personality. Follow our easy guide and optimize your Zalo profile image.
Learn how to manage your relationships on Zalo by marking close friends, similar to Instagram. This feature allows easy access to frequently contacted individuals.
Learn how to send screenshots via Viber quickly and without saving them. This guide provides step-by-step instructions to enhance your messaging experience.
Learn how to easily restore deleted messages on Zalo with our step-by-step instructions. Quickly recover your important chats on this popular messaging app.
Discover how to easily add background music to your personal Zalo page with our comprehensive guide on using Zalo for Android and iOS devices.
If you’ve ever found yourself at the end of a Minecraft raid, searching for the last raider to eliminate, you’re not alone. Many players have faced this challenge.
Learn how to uninstall Coc Coc browser completely from your computer, ensuring all data is removed. Follow these simple steps for an effective uninstallation.
Discover how to effectively use the Toshiba AW-A800SV washing machine control panel with our detailed guide!
Discover how to effectively use emergency features on Samsung Galaxy Watch and other smartwatches, including SOS alerts, fall detection, and health records.


