How to Copy Partition to Another Drive in Windows 11/10/8/7
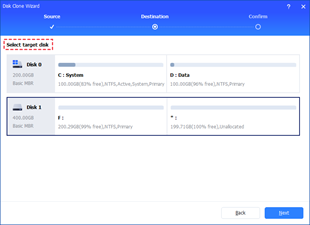
In Windows 11, 10, 8, and 7, you can quickly copy a partition to a different drive using the flexible disk cloning tool AOMEI Partition Assistant.
Remote computer access can be highly beneficial both in your personal life and your business endeavors. You can use this handy option to quickly find an important file from the office computer or solve a problem for your less tech-savvy friends.
If TeamViewer is your software of choice, you might be wondering how you can make this remote control possible. Keep reading to learn how to add a computer to TeamViewer and access it with or without a password.
How to Add a Computer to TeamViewer
There can be multiple devices under your TeamViewer account. Once you add a new device to your account, you can manage and monitor it remotely at any time.
Adding a new computer to your TeamViewer account is fairly straightforward and similar across all platforms.
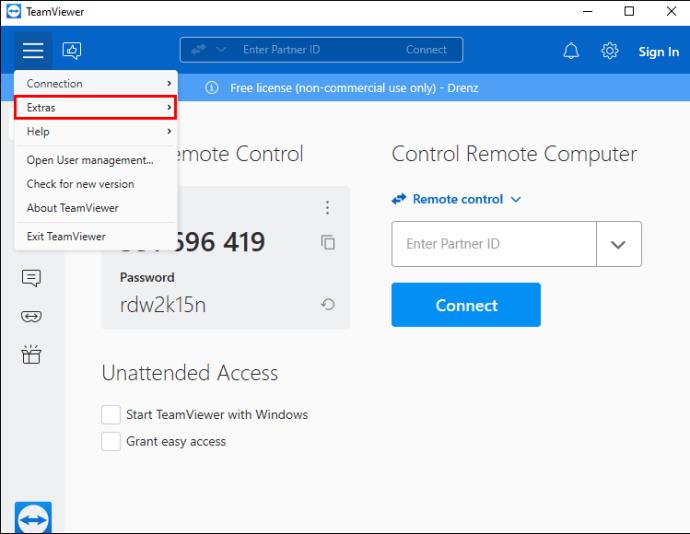
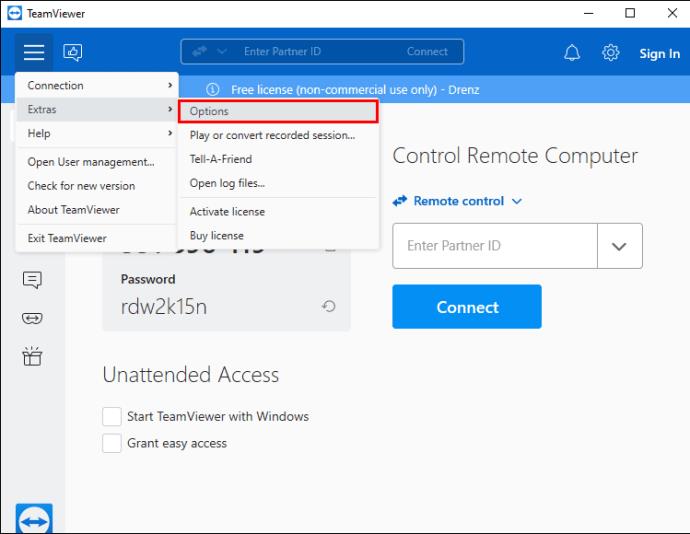
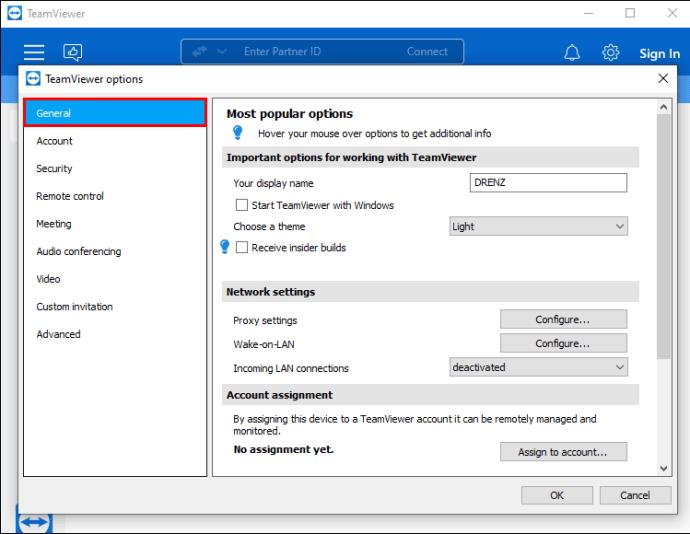
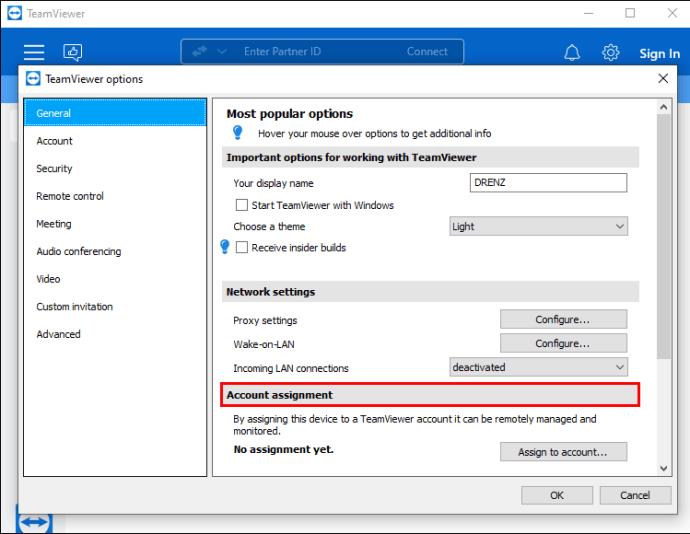
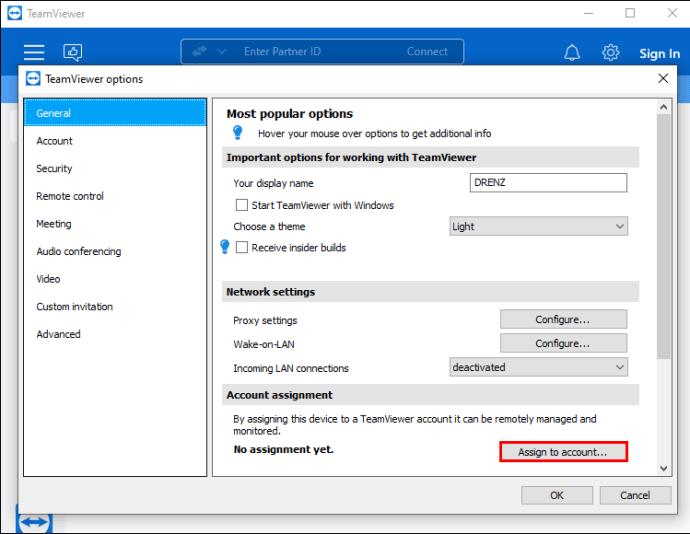
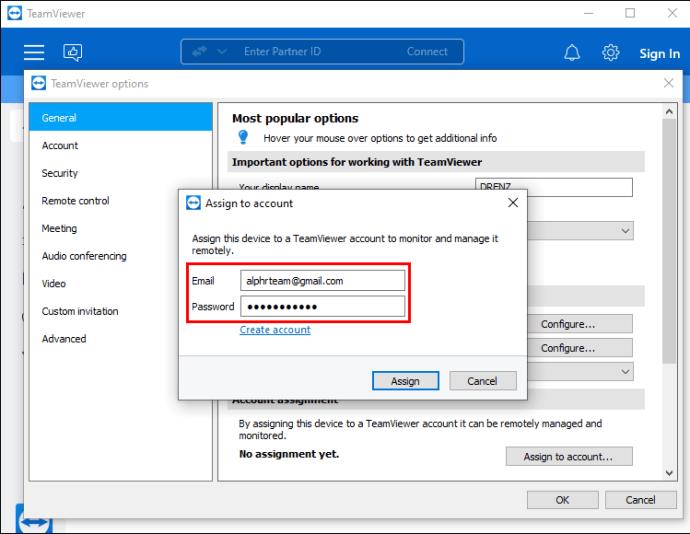
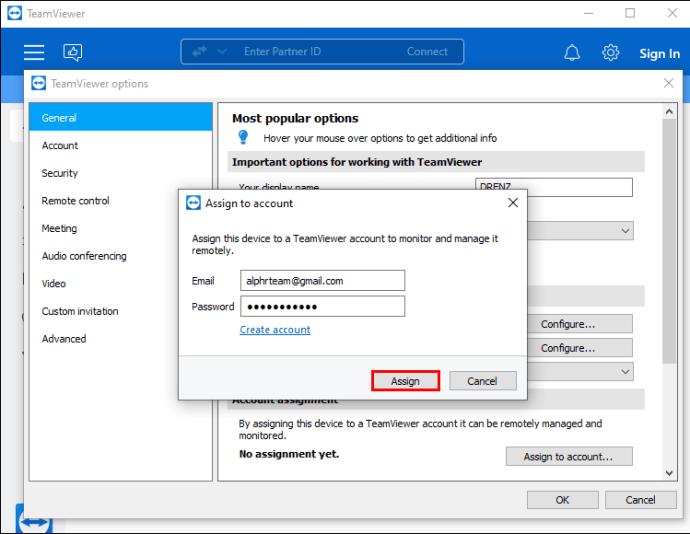
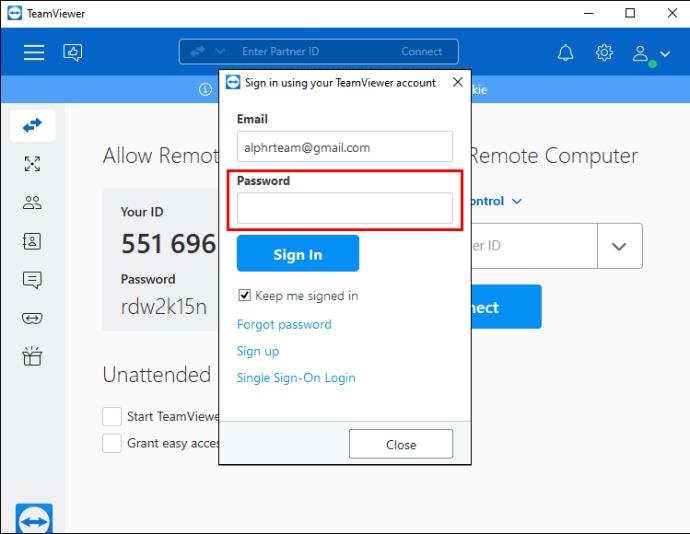
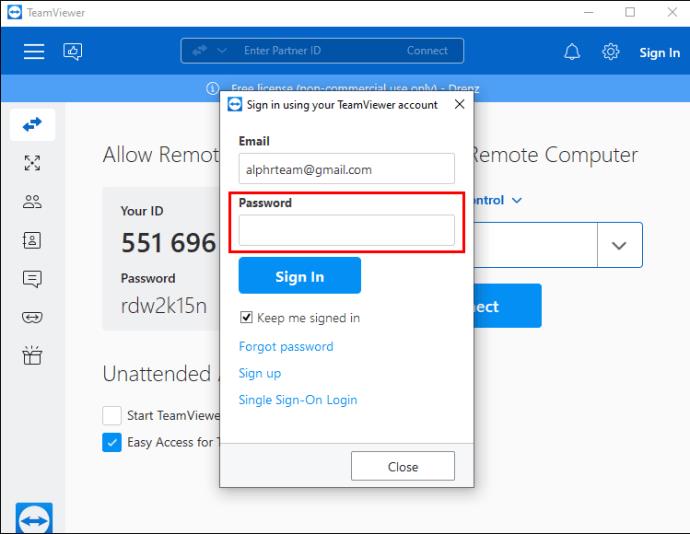
Each time you add a new device to your TeamViewer account, you’ll have to authorize it. If this is the first time you’re using your account credentials on this device, you’ll need to add it to your Trusted Devices list.
After entering the log-in details for the first time, a pop-up window will appear. The pop-up will inform you that a confirmation email has been sent to your email address. The email will contain a device authorization link valid for 24 hours.
To authorize the new device, navigate to your email account and click on the link within the received email. Once you click on the link, the TeamViewer Management Console will open.
You can complete the authorization process in the console by selecting the trust scope you’d like to grant to the device. To do so, navigate to the drop-down menu under the “Do you want to trust this device or the IP address permanently?” question. Click on the down-arrow to expand the options and choose one of the following.
Once you select the desired option, tap “Trust” to complete the process. After seeing the “Device successfully added” message, you can sign in using the new device.
How to Add a Computer to TeamViewer Without a Password
When you’re connecting to a new device via TeamViewer, you’ll typically need to enter a password to authorize the connection. Although this feature is put in place for security reasons, there are situations when it isn’t needed. In fact, if you need to access a computer quickly when no one is present on the other side, the password can be a hindrance.
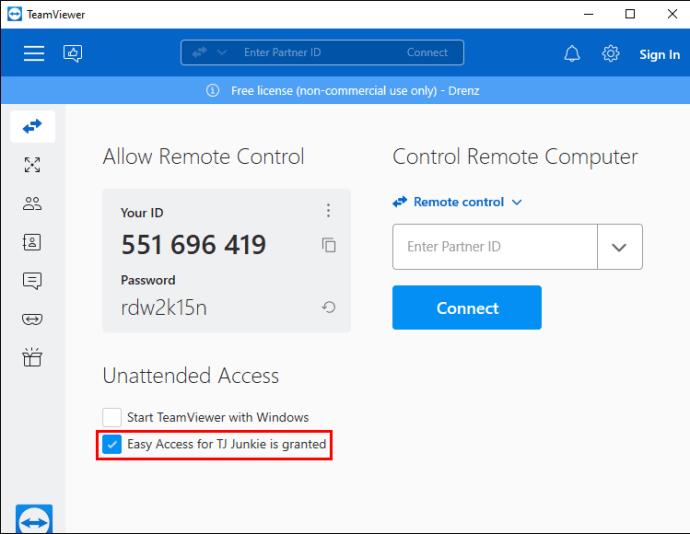
Fortunately, TeamViewer offers an option to connect to a device with no personal or random password required. This feature is called Easy Access. Once activated, all you need to do is log in to your account and access the desired device.
Before activating Easy Access, ensure that the device you want to connect to is assigned to your TeamViewer account. After that, follow these steps to enable Easy Access:


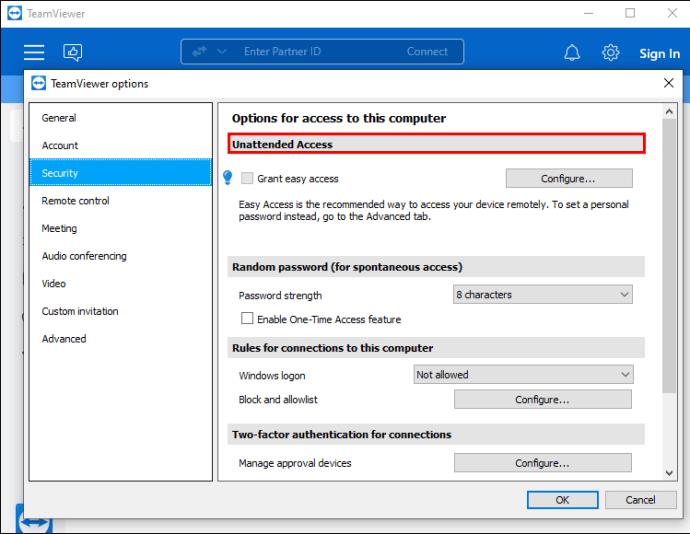
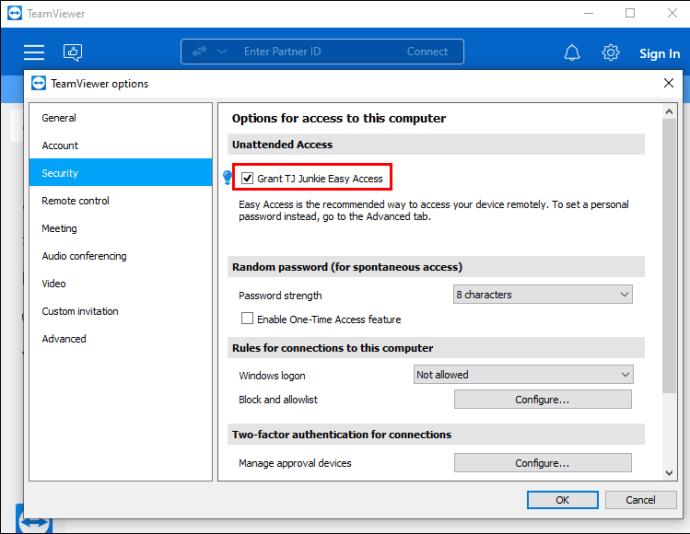
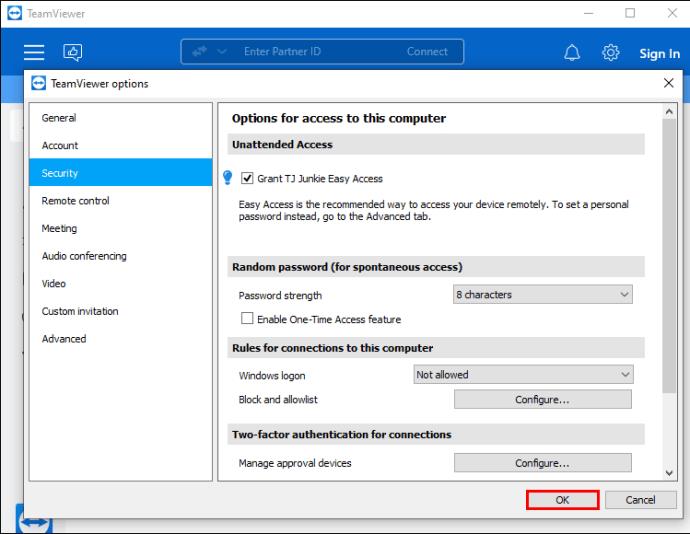
If you’re worried about possible security risks, you should know that Easy Access is very secure. Only an approved account can access a device without a password, and the account itself is protected with two-factor authentication.
How to Add a Computer to TeamViewer for Unattended Access
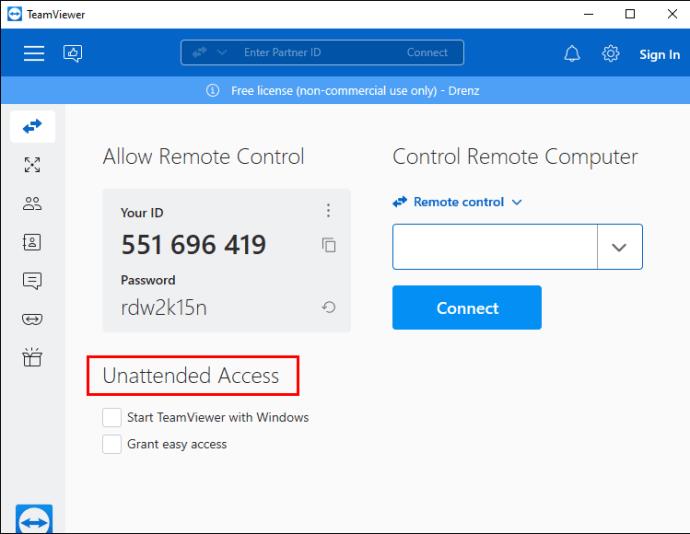
Users who regularly connect to a device remotely can significantly benefit from the Unattended Access feature. This allows you to access a device at any time without having to put in a password.
Before setting up the Unattended Access feature, you need to ensure the following.
Once everything is set, follow these steps to enable unattended access to that device.
How to Add a Computer by IP to TeamViewer
TeamViewer offers an option to establish a remote control session within your local area network using an IP address. This option can be helpful as it doesn’t require using the internet to connect to your desired device.
If you’d like to add a computer using its IP address, you first have to enable incoming LAN connections.
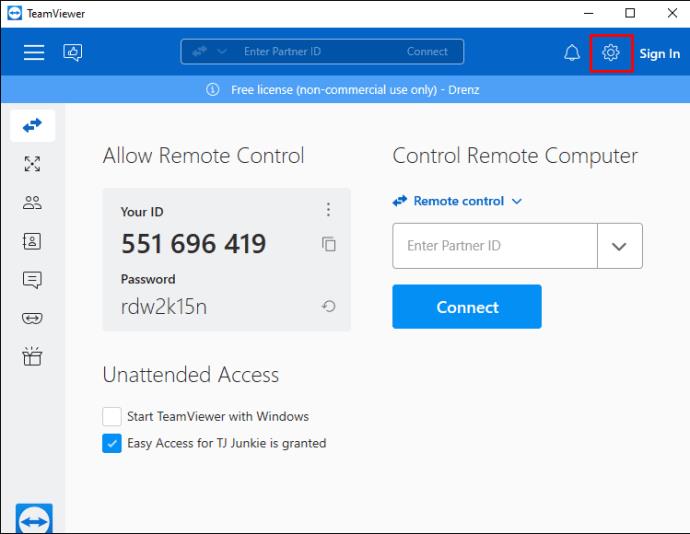

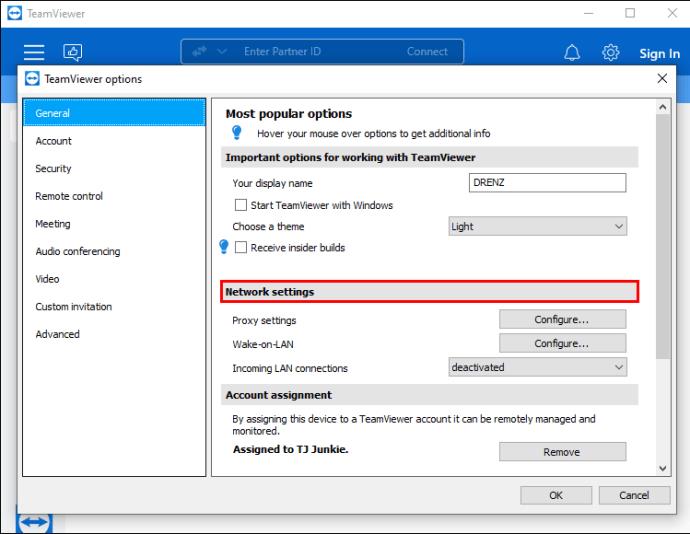
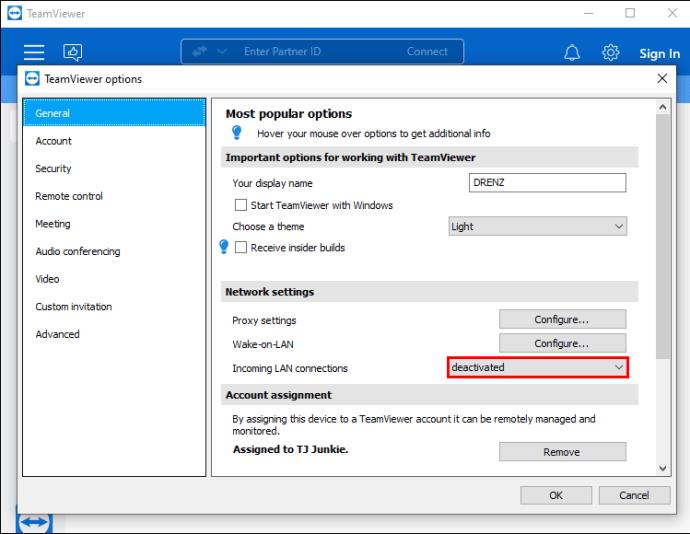
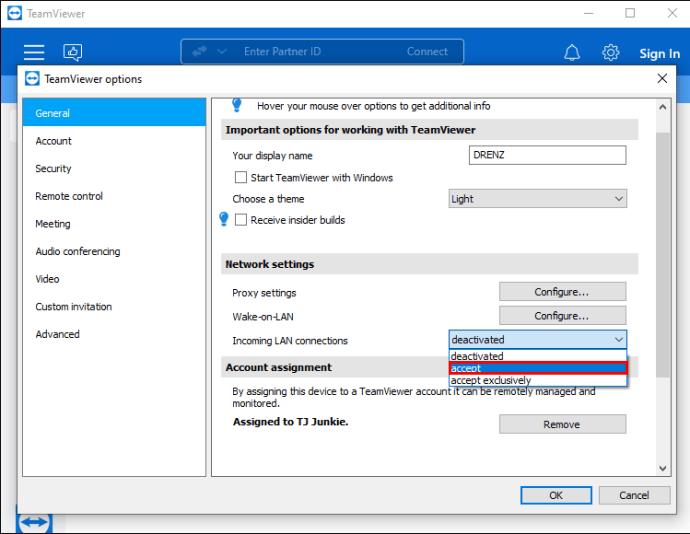
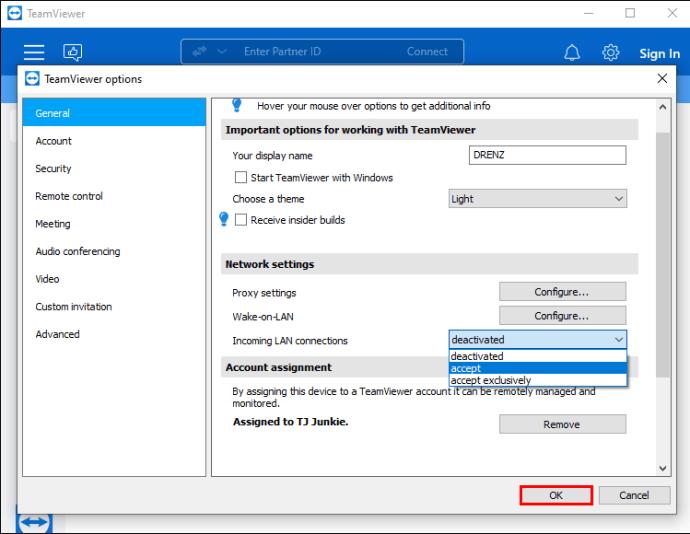
If you choose to accept exclusively, you’ll only be able to connect via the IP address, as the app will disconnect from the internet. When the option is selected, you will see the computer’s internal IP address on the TeamViewer app’s main window.
Once you’ve obtained the IP address, go to the TeamViewer’s Remote Control page. Follow these steps to connect to a device using the IP address.
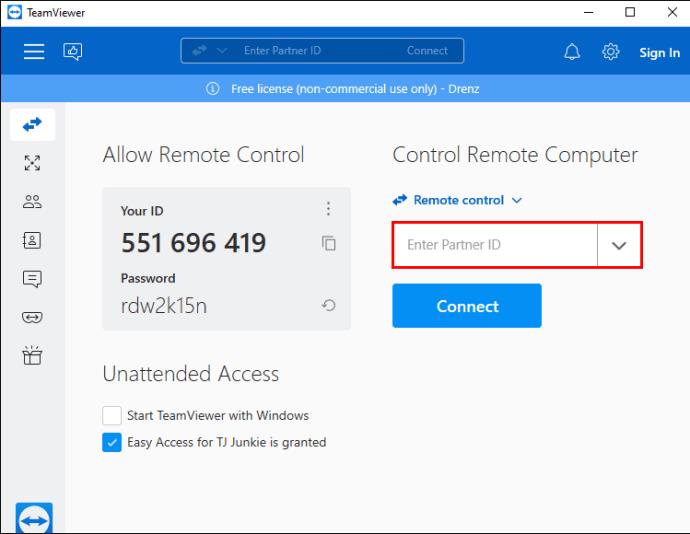
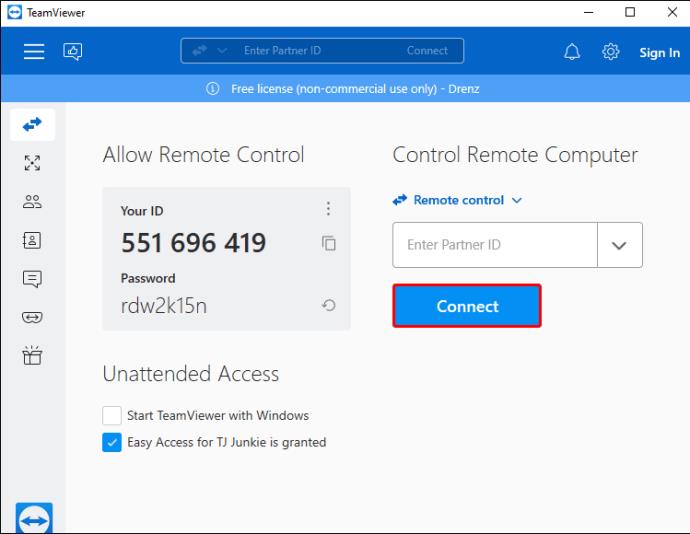
Alternatively, if you choose to accept the incoming LAN connections but not exclusively, the TeamViewer app will remain online. You can connect to a device with both a TeamViewer ID and the IP address.
In this case, TeamViewer will not display the computer’s IP address. Instead, you’ll have to locate it yourself.
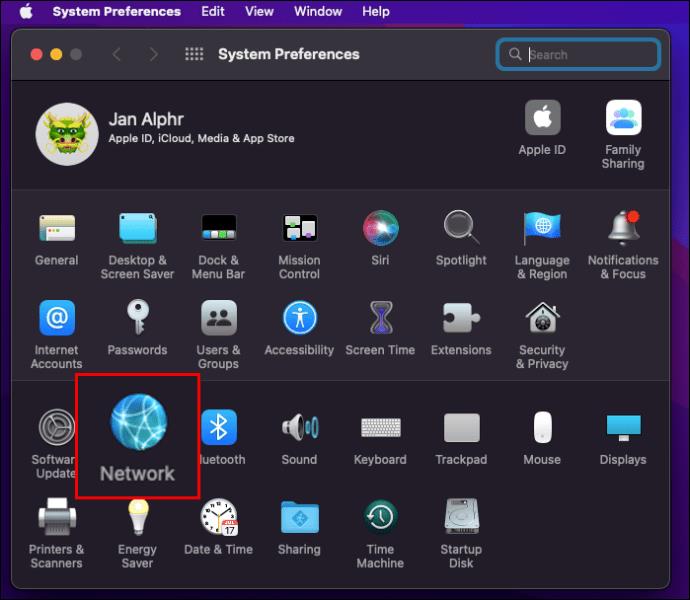
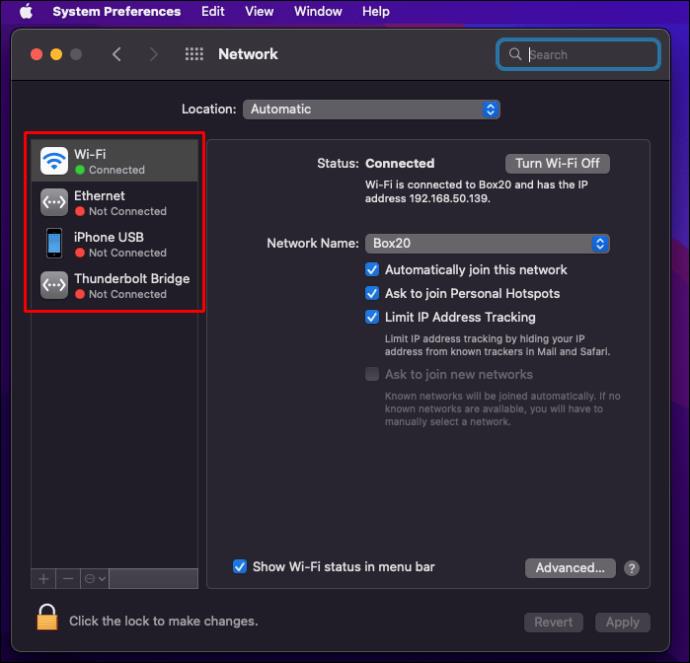
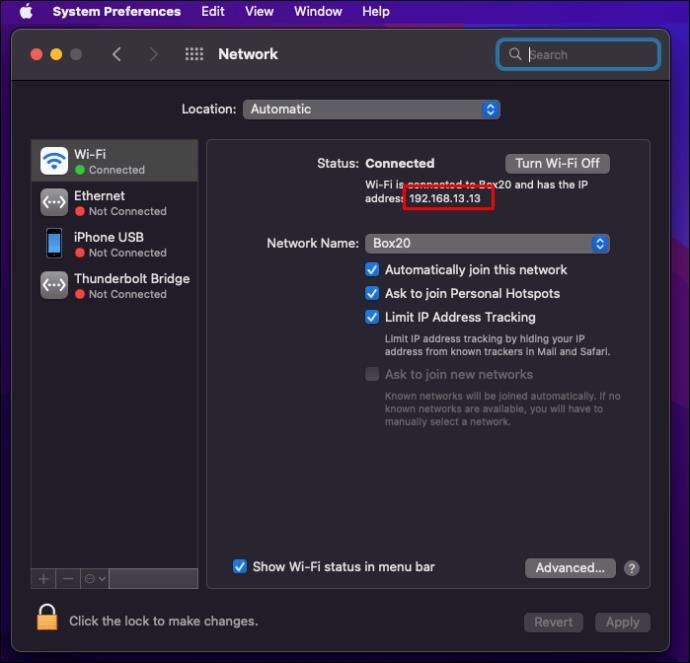
To find the internal IP address of a Windows computer, do the following.
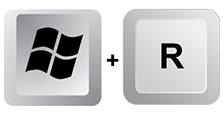
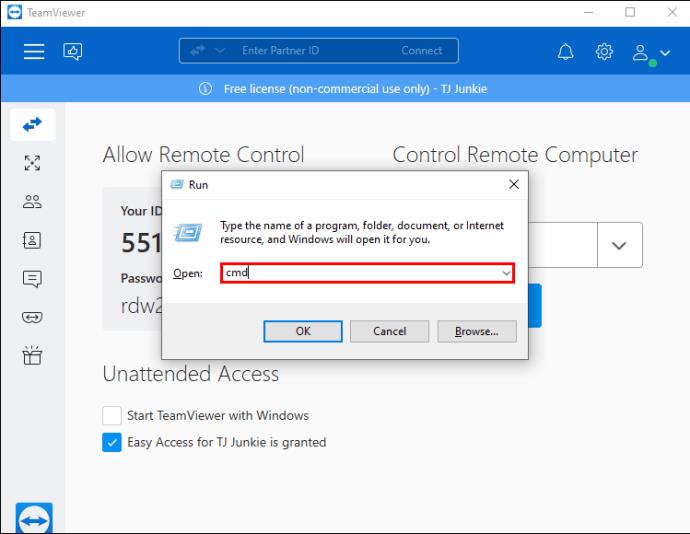

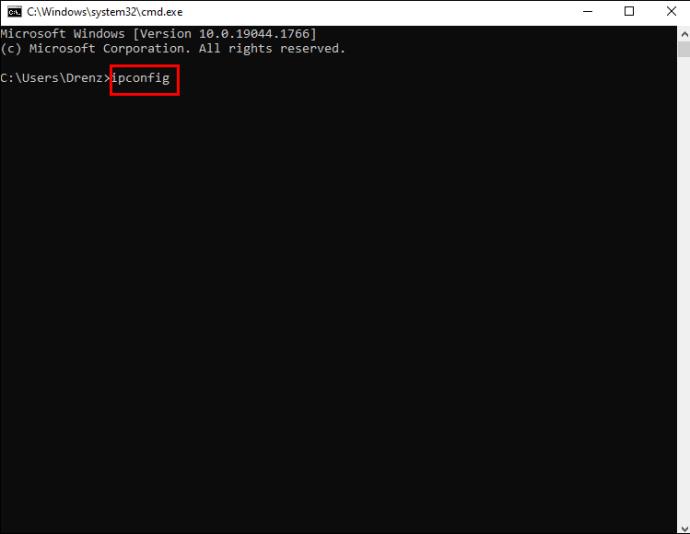
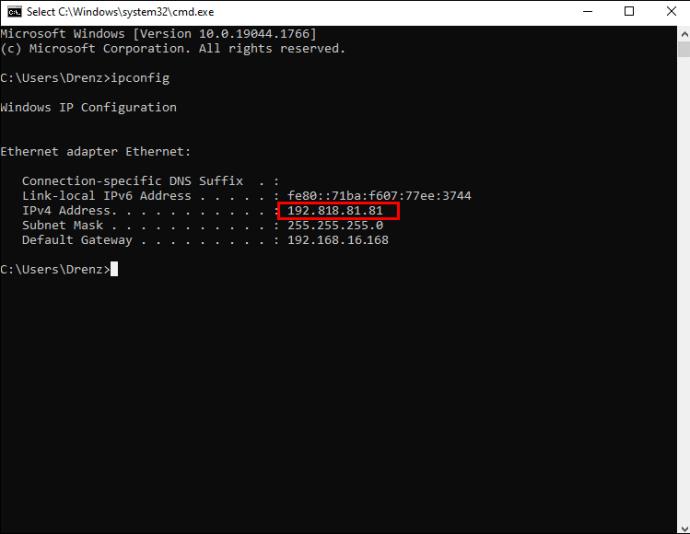
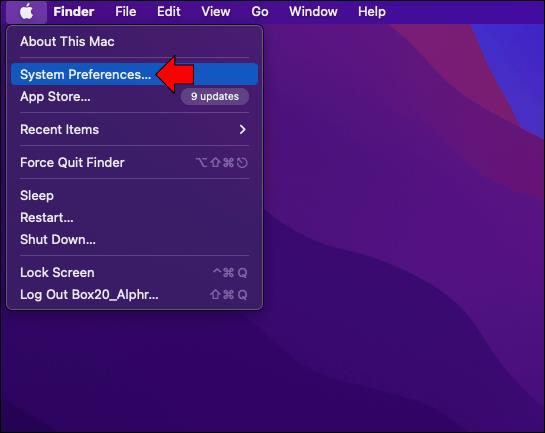
The process is equally as straightforward on a Mac computer.

Remote Access Made Easy
Thanks to TeamViewer’s intuitive, all-in-one platform, accessing any device remotely is reasonably straightforward. You might need to work on a client’s computer while they’re beside it. Or perhaps you need to access your office computer when no one’s around. Whatever the case may be, you can quickly add and connect to a new computer using the methods outlined in our guide.
How often do you use TeamViewer to access a device remotely? Do you find the software easy to use? Let us know in the comments section below.
In Windows 11, 10, 8, and 7, you can quickly copy a partition to a different drive using the flexible disk cloning tool AOMEI Partition Assistant.
Driver Booster 12 Free is an effective tool that will keep your computers drivers up to date, which will make the system run faster and more reliably. This driver updater from IObit keeps your PC running at its best by checking for lost, out-of-date, or broken drivers immediately.
In an era where digital efficiency is paramount, Advanced SystemCare 17 Free emerges as a beacon for those seeking to enhance their PC's performance.
Summary of Movies & TV application shortcuts on Windows 10, Summary of Movies & TV application shortcuts on Windows 10 to bring you a great experience. Maybe
How to fix Messages Failed to Load error on Discord for Windows, Discord isn't fun if you can't read what other people write. Here's how to fix Messages error
How to display the This PC icon on the Windows 11 desktop, During the process of using Windows 11, many users need to access This PC (management).
How to find information in the Windows Registry quickly, Do you find it difficult to find information in the Windows Registry? So below are quick ways to find the registry
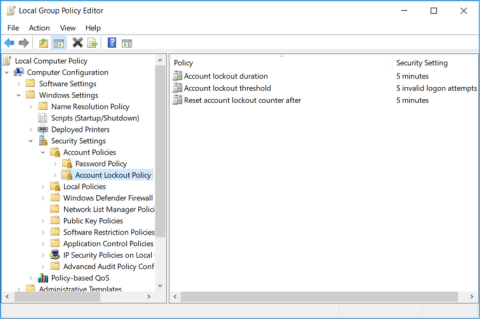
How to limit the number of failed login attempts on Windows 10. Limiting the number of failed password login attempts on Windows 10 helps increase computer security. Here's how
How to create fake error messages in Windows, Windows can come up with some pretty creative error messages but why don't you try creating your own content for them to make fun of?
Ways to open Windows Tools in Windows 11, Windows Administrative Tools or Windows Tools are still useful on Windows 11. Here's how to find Windows Tools in Windows 11.
How to fix Windows Quick Assist not working error, Windows Quick Assist helps you connect to a remote PC easily. However, sometimes it also generates errors. But,
How to pin Word, Excel and PowerPoint files to the corresponding app icon on the Windows 11 taskbar, How to pin Office files to the taskbar icon on Windows 11? Invite
How to fix the error of not being able to install software on Windows, Why can't you install apps or software on Windows 10/11? Here's everything you need to know about how to fix it
Instructions for deleting or changing the PIN code on Windows 11, In Windows 11, the PIN code is a very useful and convenient security tool for users. However some people
How to fix There Are Currently No Power Options Available error in Windows 10, Can't select power mode in Windows 10, what should I do? Here's how to fix the error
The simplest way to fix Photos app errors on Windows 10, what should I do if Microsoft Photos doesn't work? Don't worry about ways to fix Photos app errors on Windows
Instructions for installing shortcuts to switch input languages on Windows 11. During the process of using Windows, users will often have to switch between methods.
How to check power status is supported on Windows 11, Windows 11 can handle many different power states. Here's how to check the power status
How to switch from 2.4GHz to 5GHz in Windows 10, If you want to find a quick and simple way to speed up the Internet, changing the WiFi band from 2.4GHz to 5GHz may help.
How to fix Not Enough Memory to Run Microsoft Excel error on Windows, Are you having an error of not enough memory to run Microsoft Excel? So, how to fix Not Enough Memory error


