How to Copy Partition to Another Drive in Windows 11/10/8/7
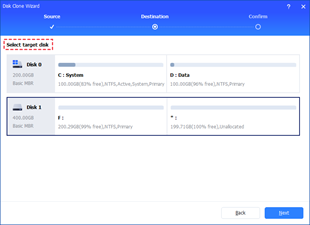
In Windows 11, 10, 8, and 7, you can quickly copy a partition to a different drive using the flexible disk cloning tool AOMEI Partition Assistant.
You can use Excel to break information into smaller pieces. Finding the data you need and manipulating it is an important goal for many Excel users.

If you have a person’s full name, you may need to zero in on just their first name or their last name. For example, if you’re sending a friendly automated email to your clients, you need to use their first names to avoid sounding impersonal. If you’re looking over a list of poll respondents, it might be important to just use their last names, or to hide their last names to maintain anonymity.
Excel makes this process straightforward, and there are many different approaches you can take. Here is a tutorial that will help you create separate First Name and Last Name columns using formulas. We cover the issue of middle names as well.
Excel Formulas for Splitting Names into Parts
Where do you start?
Separating First Names
This is the generic formula:
=LEFT(cell,FIND(” “,cell,1)-1)
To execute it, replace cell with the cell pointer that contains the first full name that you want to split up. In this example, you want to select B2 and enter the formula:
=LEFT(A2,FIND(" ",A2,1)-1)
However, it’s important to note that on some devices, this formula uses semicolons instead of commas. So if the above formula doesn’t work for you, you might need to use the following version instead:
=LEFT(cell;FIND(” “;cell;1)-1)
In the example, you’d use:
=LEFT(A2,FIND(" ",A2,1)-1)
Now you can simply drag the fill handle down to the end of the First Name column.
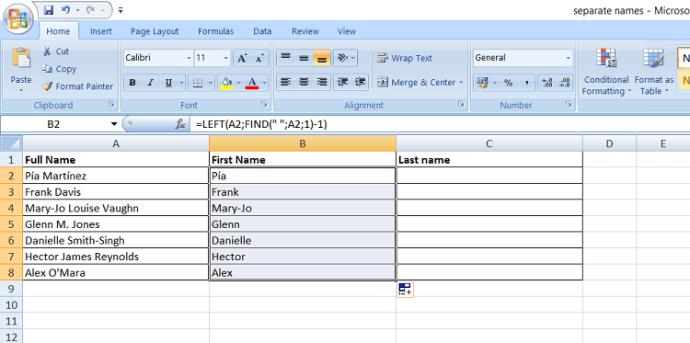
The LEFT function lets you separate a string, starting from the left end of the text. The FIND part of this formula locates the first space in the full name, so you get the part of your full name that comes before an empty space.
Hence, hyphenated first names stay together, and so do first names that contain special characters. But your Full Name column won’t contain middle names or middle initials.
Comma or Semicolon?
Why isn’t the formula the same for everybody?
For many Excel users, Excel functions use commas to separate input data. But on some devices, the regional settings are different.
To discover which symbol is used by your Excel, simply start typing in the formula. When you start enter =LEFT(, you will see a hover text that will suggest the right formatting.
Separating Last Names
Take the same approach to separating last names. This time, you should use the RIGHT formula, which separates strings starting from the right side.
The formula you need is:
=RIGHT(cell, LEN(cell) – SEARCH(“#”, SUBSTITUTE(cell,” “, “#”, LEN(cell) – LEN(SUBSTITUTE(cell, ” “, “”)))))
In the example above, you would use the following formula in cell C2:
=RIGHT(A2,LEN(A2)-SEARCH("#",SUBSTITUTE(A2," ","#",LEN(A2)-LEN(SUBSTITUTE(A2," ","")))))
Once again, you may need to switch from the comma to a semicolon, meaning that you may need to use:
=RIGHT(A2;LEN(A2)-SEARCH("#";SUBSTITUTE(A2;" ";"#";LEN(A2)-LEN(SUBSTITUTE(A2;" ";"")))))
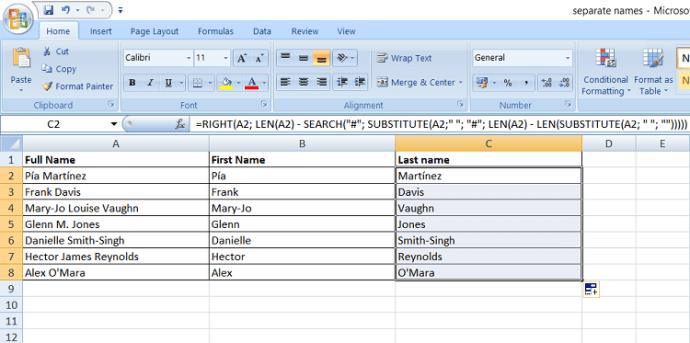
Hyphenated last names and last names with special characters stay intact.
Why is this formula more complex than the one for first names? It’s more difficult to separate middle names and middle initials out of last names.
If you want the middle names and initials to be listed with the last names, you can use the formula:
=RIGHT(cell, LEN(cell) – SEARCH(” “, cell))
or:
=RIGHT(A2,LEN(A2)-SEARCH(" ",A2))
or:
=RIGHT(A2;LEN(A2)-SEARCH(" ";A2))
But what if you want to separate the middle names? This is less common but it can be useful to know.
Separating Middle Names
The formula for middle names is the following:
=MID(cell, SEARCH(” “, cell) + 1, SEARCH(” “, cell, SEARCH(” “, cell)+1) – SEARCH(” “, cell)-1)
In the example above, you get:
=MID(A2,SEARCH(" ",A2)+1,SEARCH(" ",A2,SEARCH(" ",A2)+1)-SEARCH(" ",A2)-1)
If your Excel uses semicolons, the formula is:
=MID(A2;SEARCH(" ";A2)+1;SEARCH(" ";A2;SEARCH(" ";A2)+1)-SEARCH(" ";A2)-1)
After entering the formula, drag the fill handle down. Here is a Middle Name column added to the example above:
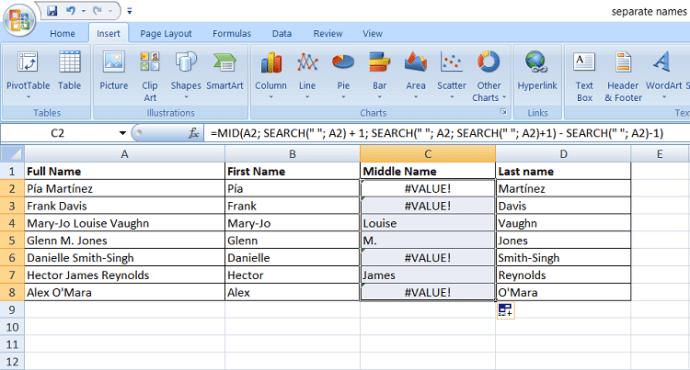
If the full name contains no middle name or initial, your get zero-values in this column, which may be displayed as #VALUE!. To get blank cells in place of #VALUE!, you can use the IFERROR function.
Then, your formula becomes:
=IFERROR(MID(cell, SEARCH(” “, cell) + 1, SEARCH(” “, cell, SEARCH(” “, cell)+1) – SEARCH(” “, cell)-1),””)
or:
=IFERROR(MID(A2,SEARCH(" ",A2)+1,SEARCH(" ",A2,SEARCH(" ",A2)+1)-SEARCH(" ",A2)-1),"")
or:
=IFERROR(MID(A2;SEARCH(" ";A2)+1;SEARCH(" ";A2;SEARCH(" ";A2)+1)-SEARCH(" ";A2)-1);"")
One Approach to Separating Multiple Middle Names
What happens if someone on your list has multiple middle names? Using the above formula, only their first middle name will be retrieved.
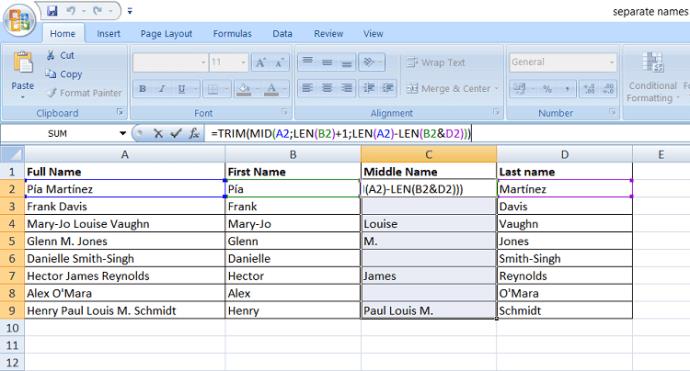
To solve this issue, you can try a different approach to separating middle names. If you have the first name and last name columns created, you can simply cut them off. Everything that’s left will count as the middle name.
This formula is:
=TRIM(MID(cell1,LEN(cell2)+1,LEN(cell1)-LEN(cell2&cell3)))
Here, cell1 refers to the cell pointer under column Full Name, cell2 refers to the cell pointer under column First Name, while cell3 refers to the cell pointer under column Last Name. In the example above, we get:
=TRIM(MID(A2,LEN(B2)+1,LEN(A2)-LEN(B2&D2)))
or:
=TRIM(MID(A2;LEN(B2)+1;LEN(A2)-LEN(B2&D2)))
If you go with this formula, you won’t have to worry about zero-values.
Quick Recap
Here are the formulas that you can use for splitting full names into parts:
First names: =LEFT(cell,FIND(” “,cell,1)-1)
Last names: =RIGHT(cell, LEN(cell) – SEARCH(“#”, SUBSTITUTE(cell,” “, “#”, LEN(cell) – LEN(SUBSTITUTE(cell, ” “, “”)))))
Middle names: =IFERROR(MID(cell, SEARCH(” “, cell) + 1, SEARCH(” “, cell, SEARCH(” “, cell)+1) – SEARCH(” “, cell)-1),””)
Alternative formula for middle names: =TRIM(MID(cell1,LEN(cell2)+1,LEN(cell1)-LEN(cell2&cell3)))
Separating First and Last Names Without Using Formulas
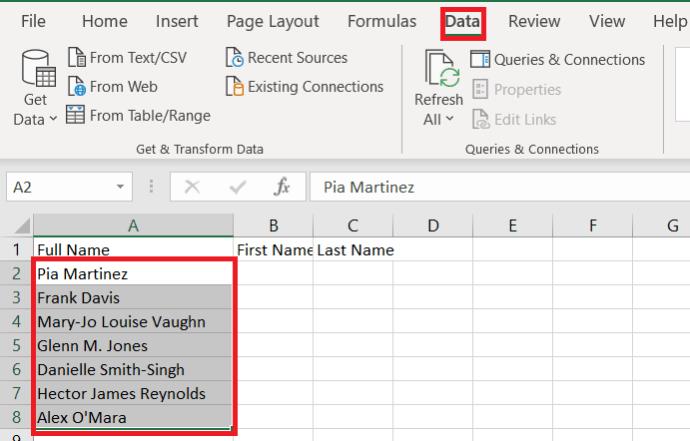
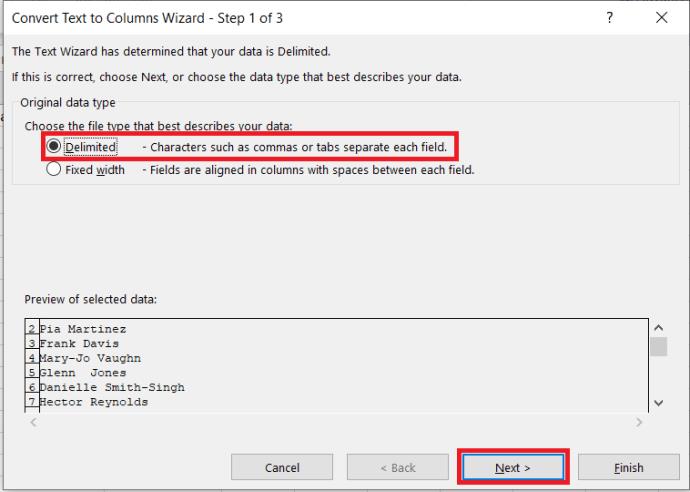
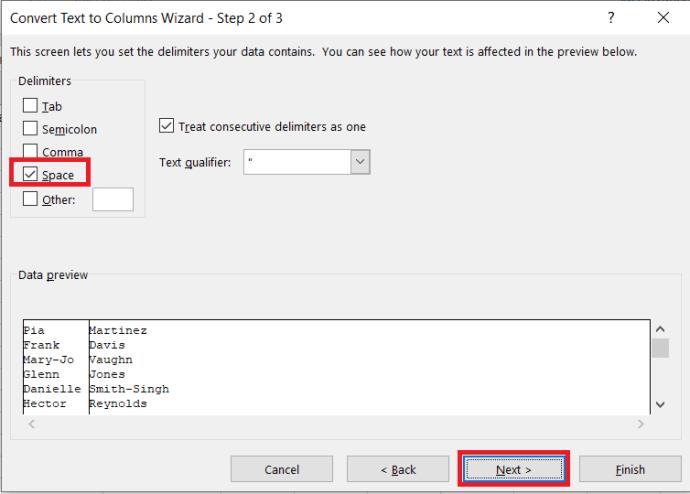
If you don’t feel like typing out a bunch of formulas that may get entered in wrong, then take advantage of Excel’s built-in Convert Text to Columns Wizard.

 .
.
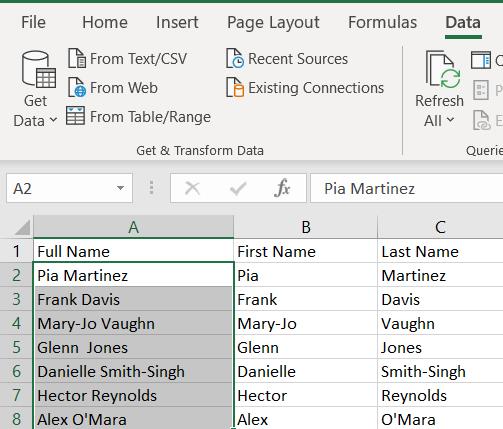
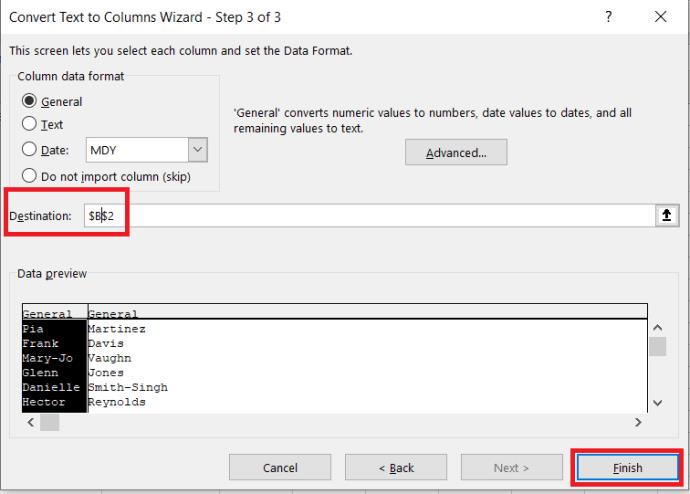 The end result should look like this.
A Final Word
There are many other ways to solve this problem in Excel. If none of the available options do what you need, do some more research.
Using formulas is relatively simple and it doesn’t depend on the version of Excel you’re using. But unfortunately, you still may run into errors.
For example, if a person’s full name starts with their family name, it will get split apart the wrong way around. The formulas will also have trouble with last names that contain prefixes or suffixes, such as le Carré or van Gogh. If someone’s name ends in Jr., that will get listed as their last name.
However, there are modifications you can add to solve these issues as they appear. Working with formulas gives you the flexibility you need to tackle these complexities.
In Windows 11, 10, 8, and 7, you can quickly copy a partition to a different drive using the flexible disk cloning tool AOMEI Partition Assistant.
Driver Booster 12 Free is an effective tool that will keep your computers drivers up to date, which will make the system run faster and more reliably. This driver updater from IObit keeps your PC running at its best by checking for lost, out-of-date, or broken drivers immediately.
In an era where digital efficiency is paramount, Advanced SystemCare 17 Free emerges as a beacon for those seeking to enhance their PC's performance.
Summary of Movies & TV application shortcuts on Windows 10, Summary of Movies & TV application shortcuts on Windows 10 to bring you a great experience. Maybe
How to fix Messages Failed to Load error on Discord for Windows, Discord isn't fun if you can't read what other people write. Here's how to fix Messages error
How to display the This PC icon on the Windows 11 desktop, During the process of using Windows 11, many users need to access This PC (management).
How to find information in the Windows Registry quickly, Do you find it difficult to find information in the Windows Registry? So below are quick ways to find the registry
How to limit the number of failed login attempts on Windows 10. Limiting the number of failed password login attempts on Windows 10 helps increase computer security. Here's how
How to create fake error messages in Windows, Windows can come up with some pretty creative error messages but why don't you try creating your own content for them to make fun of?
Ways to open Windows Tools in Windows 11, Windows Administrative Tools or Windows Tools are still useful on Windows 11. Here's how to find Windows Tools in Windows 11.
How to fix Windows Quick Assist not working error, Windows Quick Assist helps you connect to a remote PC easily. However, sometimes it also generates errors. But,
How to pin Word, Excel and PowerPoint files to the corresponding app icon on the Windows 11 taskbar, How to pin Office files to the taskbar icon on Windows 11? Invite
How to fix the error of not being able to install software on Windows, Why can't you install apps or software on Windows 10/11? Here's everything you need to know about how to fix it
Instructions for deleting or changing the PIN code on Windows 11, In Windows 11, the PIN code is a very useful and convenient security tool for users. However some people
How to fix There Are Currently No Power Options Available error in Windows 10, Can't select power mode in Windows 10, what should I do? Here's how to fix the error
The simplest way to fix Photos app errors on Windows 10, what should I do if Microsoft Photos doesn't work? Don't worry about ways to fix Photos app errors on Windows
Instructions for installing shortcuts to switch input languages on Windows 11. During the process of using Windows, users will often have to switch between methods.
How to check power status is supported on Windows 11, Windows 11 can handle many different power states. Here's how to check the power status
How to switch from 2.4GHz to 5GHz in Windows 10, If you want to find a quick and simple way to speed up the Internet, changing the WiFi band from 2.4GHz to 5GHz may help.
How to fix Not Enough Memory to Run Microsoft Excel error on Windows, Are you having an error of not enough memory to run Microsoft Excel? So, how to fix Not Enough Memory error


