Instructions for creating green ticks for Facebook

Step-by-step guide on how to create a green tick for Facebook. Learn how to verify your account and gain credibility with the green verification mark.
When buying a new computer, you must transfer the old file to the new system. Copying each folder in turn is a real time-consuming and labor-intensive solution. Instead, you can use Clonezilla to copy the entire old hard drive to the new one.
Cloning drive with Clonezilla is fast, simple and completely free. Here's how to clone a Windows 10 hard drive with Clonezilla and a USB flash drive .
Clonezilla is a free, open source image cloning and partition software. You can use Clonezilla to backup the system, clone the entire drive, deploy the system ... In addition, it also supports a wide range of file systems, bootloaders, encryption and more.
Note that this cloning requires a second hard drive equal to or larger than the current storage drive. For example, if you want to clone a 60 GB drive, you must prepare the drive with at least 60 GB free space to complete the data copying process.
First, you need to install this software on your computer.
To create a bootable Clonezilla USB flash drive, you need USB 1 GB or more and Rufus - USB boot creation tool.
Note, creating USB Clonezilla will completely wipe the data currently on your hard drive.
Here are the steps:
Clonezilla is a small ISO. Therefore, the process of creating USB flash is fast.
At this point, you should connect the second hard drive to the system and make sure it is compatible.

Now you need to reboot the system in the selected boot mode. The easiest way to do this is to reboot the system, then press the boot menu button for the type of hard drive.
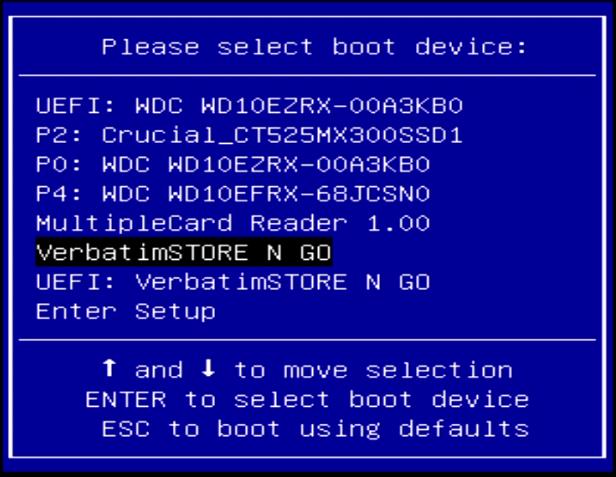
Access the Boot Selection menu with the function key
Not sure which button to press to access the system BIOS? You can find it in the article Summary of the shortcut to access the Boot Option (Boot menu) and the computer's BIOS .
After rebooting the system, touch the necessary keys. For example, on a Gigabyte motherboard, tap F12 after reboot to access the Boot Selection menu.
When entering the menu, you can scroll down and select the USB flash drive that can boot Clonezilla.
Access the Boot Selection menu via Advanced Startup on Windows 10
Some UEFI systems will not allow you to access boot options manually for safety. Instead, you can access it from the UEFI firmware menu.
Press and hold the Shift key > click the Restart button in the Start menu . This key combination opens the Advanced Startup menu . Here, you can select Troubleshoot> Advanced Options> UEFI Firmware Settings . When the UEFI firmware menu is open, look for the boot options section. Here, you can change the boot order for the motherboard to boot USB Clonezilla before installing Windows 10 normally.

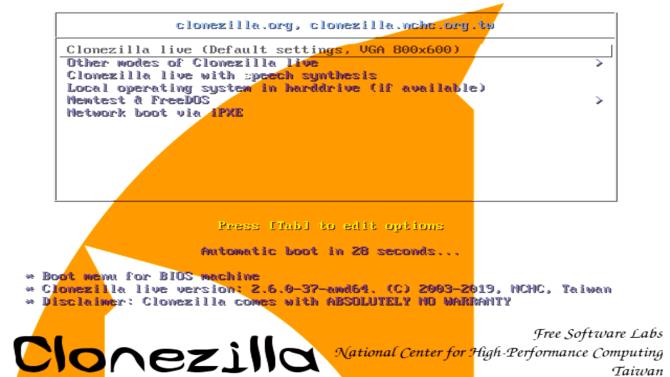
When Clonezilla starts up, you have a few options. Click Clonezilla Live (Default Settings, VGA 800 × 600) . Wait for a while for the system to load the Clonezilla live environment. You will have to choose a keyboard layout and language. When you reach the Clonezilla boot screen, select Start Clonezilla .
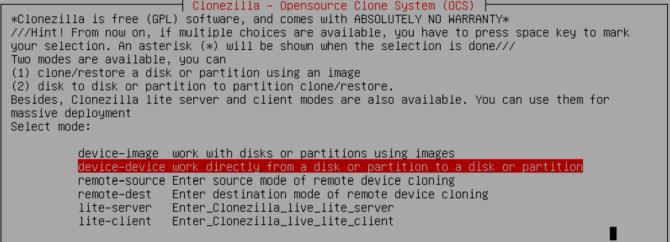
You will now be at the Clonezilla Options screen. At this point, you only need to care about the following 2 options:
This first option helps you create the disk image of the currently used storage device. The second option helps you clone the device, directly copying it to another form of storage.

Because you're copying the hard drive, use the second option, device-device , then access Beginer Mode . Other advanced options are not necessary for you at the moment, so please ignore them.
You now have two more options:
Again, when copying the entire drive, press the first option. The second option, to clone a partition, allows you to make a partial copy of the storage device.

Now enter the drive you want Clonezilla to clone.
Clonezilla is a Linux-based utility, so hard drives use a Linux naming convention. That means your primary partition - the main storage drive - will use the name "sda", the second drive is "sdb". You can also cross-reference hard drives according to their size.
On the second screen, select the memory you want to copy. Remember, the local disk size you are copying must be smaller than the second drive.
Now, choose the task you want Clonezilla to do when the cloning process is complete. You have 3 options:
The last option is to copy the local drive bootloader. If you're making a copy of a Windows 10 drive and want it to boot, type Y , then press Enter .

If you want to recover your hard drive when cloned, follow the steps in this guide. Note, in this case, you need to copy that mirror to the target drive and copy the bootloader again.
Above is a guide to cloning Windows 10 hard drive with Clonezilla . Hope the article is helpful to you.
Step-by-step guide on how to create a green tick for Facebook. Learn how to verify your account and gain credibility with the green verification mark.
Learn how to download torrent files directly using the Firefox web browser with the Torrent Tornado add-on. Simple steps for effective torrent downloading.
Learn how to view someone else’s TikTok followers, both on public and private accounts. Discover effective methods to access follower counts and improve your TikTok strategy.
Learn how to login to Facebook using your email, phone number, or even QR Code authentication without entering a password.
Learn how to stop echo during your Parsec streaming sessions with effective solutions. Echo is a common issue that disrupts communication in games, and we provide proven methods to eliminate it.
Discover how to change your avatar and cover photo on Zalo to express your personality. Follow our easy guide and optimize your Zalo profile image.
Learn how to manage your relationships on Zalo by marking close friends, similar to Instagram. This feature allows easy access to frequently contacted individuals.
Learn how to send screenshots via Viber quickly and without saving them. This guide provides step-by-step instructions to enhance your messaging experience.
Learn how to easily restore deleted messages on Zalo with our step-by-step instructions. Quickly recover your important chats on this popular messaging app.
Discover how to easily add background music to your personal Zalo page with our comprehensive guide on using Zalo for Android and iOS devices.
If you’ve ever found yourself at the end of a Minecraft raid, searching for the last raider to eliminate, you’re not alone. Many players have faced this challenge.
Learn how to uninstall Coc Coc browser completely from your computer, ensuring all data is removed. Follow these simple steps for an effective uninstallation.
Discover how to effectively use the Toshiba AW-A800SV washing machine control panel with our detailed guide!
Discover how to effectively use emergency features on Samsung Galaxy Watch and other smartwatches, including SOS alerts, fall detection, and health records.
Discover how to effectively <strong>share QR code on Zalo</strong>. QR codes enhance connectivity, enabling easy friend requests and more on Zalo.


