Unlocking Baccarats Social Thrills: Tedbets Global Gaming Hub

Discover the vibrant social scene of baccarat on Tedbet, where players worldwide connect, chat, and enjoy the excitement of live dealer games.
Microsoft Word is an indispensable software in our computers today. It makes writing and editing documents easier and faster when writing on paper as before.
In the process of drafting documents, we need to create a cover page, which will make our text more impressive when having a beautiful cover page. Here we will introduce how to create beautiful covers on Microsoft Word , please refer to the article.
Download Microsoft Office 2016 Download Microsoft Office 2019
Step 1: First, click on the Insert item in the Menu bar.
Step 2: Click on the Cover Page item .
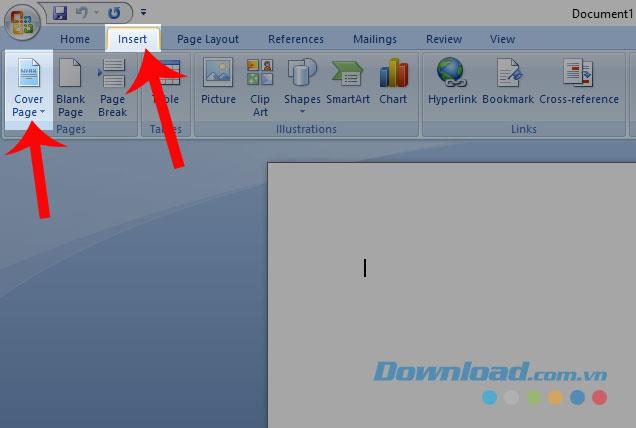
Step 3: Select the cover page template you want to use for the document.
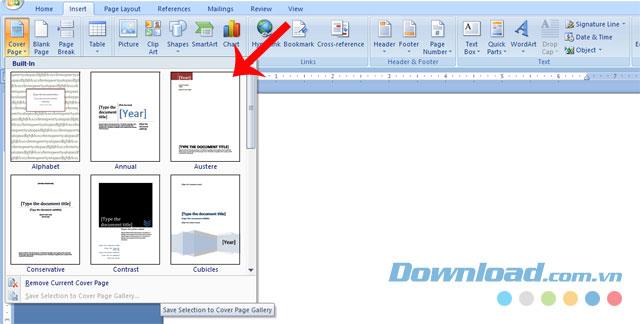
Note: If left-click on the cover template, by default it will insert on the first page of the text, and if right-clicking, then there will be many options where the cover image is displayed as:
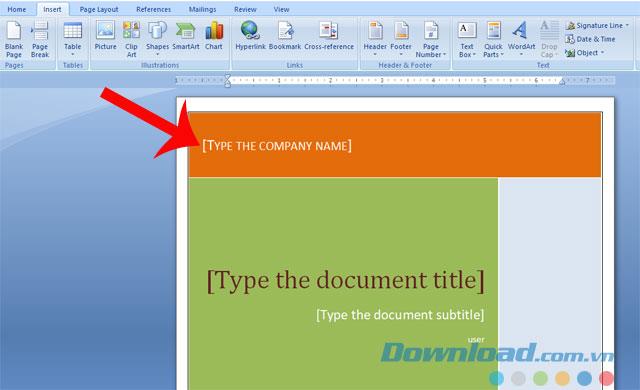
Step 4: Edit the content of the cover page to match the content of the document.

The following will be the cover image image after it has been created:
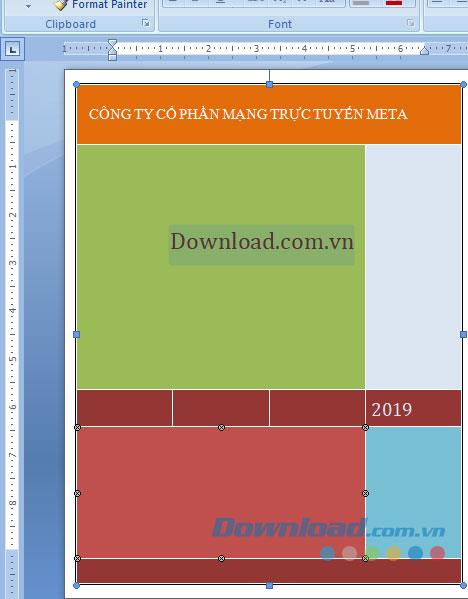
In addition to using the cover templates available in Microsoft Word, we can also create an impressive cover page for the document by following these simple steps.
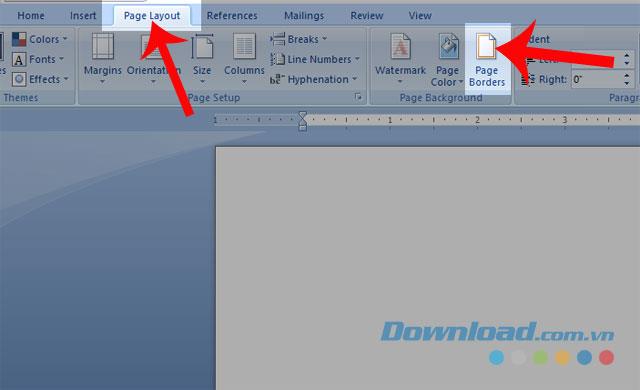
Step 1: First, we will have to create a border for the cover by clicking on the Page Layout item .
Step 2: Click on Page Borders .
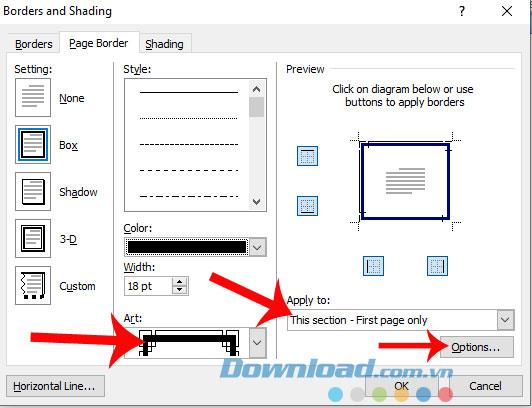
Step 3: In the Borders and Shading dialog box , select the border color and style, because we are creating the border for the cover, so in the Apply to section , select This section - First page only . .
Step 4 : Click the Options button .
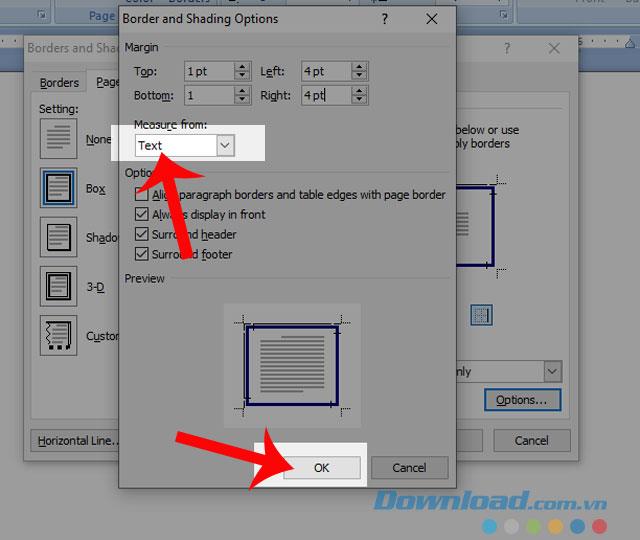
Step 5: At Measure From , select Text , then click OK.
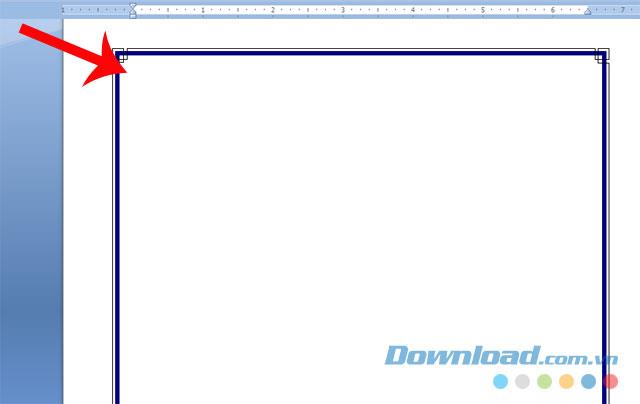
Step 6: After you have finished creating the border for the cover, let's next design the content of the cover with textboxes and images.
Step 7: Finally, below will be the cover after being designed.
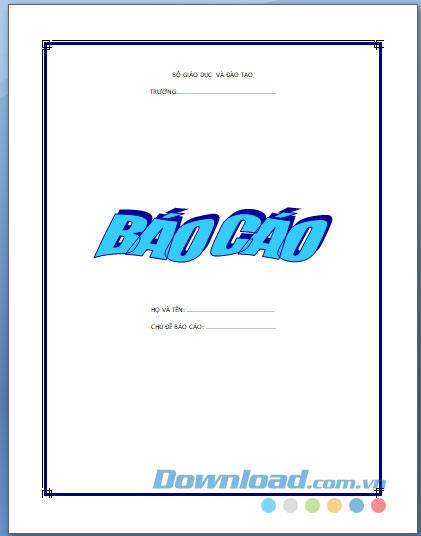
Above is the guide to creating beautiful covers on Microsoft Word, we hope that after following this article, you can easily design a very nice and impressive cover for your documents.
In addition, you can also refer to some articles such as:
I wish you successful implementation!
Discover the vibrant social scene of baccarat on Tedbet, where players worldwide connect, chat, and enjoy the excitement of live dealer games.
In the fast-moving digital landscape of the modern world, businesses can no longer afford to rely on systems that are only strong in one area.
Looking to create engaging product demos in minutes? Look no further! This guide will introduce you to the best tool for the job.
Discover the latest updates in Zooper Widget for Android. Zooper Widget is a compact, highly customizable, and battery-friendly widget with endless possibilities.
Lipp for iOS, alongside Dubsmash and Musical.ly, provides iPhone and iPad users with a new platform to create lip sync videos and dub videos readily.
Learn how to share audio using TeamViewer, including the latest updates for 2024 and 2025, making remote communication more effective.
Learn the latest tips on how to pet a cat in Adorable Home for optimal gameplay in 2024 and 2025. Discover what positions give you hearts.
Explore the latest features of OrangeHRM Open Source, a free HR management system tailored to meet evolving business needs in 2024 and 2025.
Fix IDM not catching file download links. Discover solutions for downloading videos, music, and more with the latest IDM updates in 2024 and 2025.
Discover the latest version of The File Converter for Android, an application that converts various file formats efficiently.
Explore the latest features of Zalo Web, allowing users to chat and connect seamlessly on various browsers without installation.
PDF Password Remover is a powerful tool for removing passwords and restrictions from PDF files. Download the latest version for 2024 to experience enhanced features.
Step-by-step instructions to completely remove Internet Download Manager (IDM) from your system in 2024 and 2025. Learn to uninstall IDM effectively and cleanly.
Discover Mindjet MindManager, an innovative software that helps individuals and teams streamline their work processes through effective mind mapping and project management.
Su DoKu 2.0.0 is an advanced Sudoku game design software that captivates enthusiasts with its simplicity and functionality. Download now and challenge yourself with Sudoku puzzles.


