Instructions for creating green ticks for Facebook

Step-by-step guide on how to create a green tick for Facebook. Learn how to verify your account and gain credibility with the green verification mark.
You want to transfer Minecraft game to a new drive without losing any data in the box world that you have lost a lot of construction work. This is an easy way!
Large-sized and popular games will usually be installed on extra drives, i.e., not on the drive containing the operating system (drive C). This is to prevent the game from taking up too much space on the C drive, causing it to overfill and make the computer run at a crawling speed.
For example, with games on Steam, you can easily install them on other drives of your choice. This is extremely useful if you are using both an SSD and a hard drive on the system and want to get the most out of it.
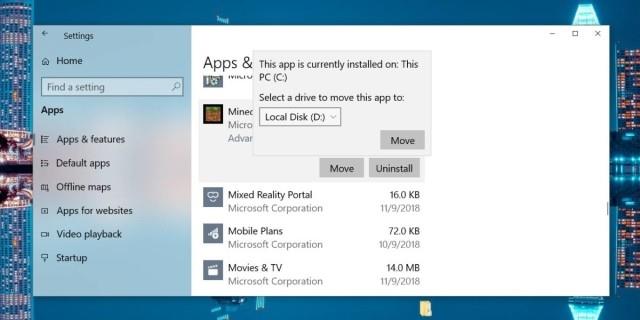
Users can also install Minecraft from the Microsoft Store, but they will install directly to drive C by default. If you've installed the Minecraft game from the Microsoft Store and want to transfer it to another drive, this is entirely possible and the procedure is very easy.

Select a new drive to transfer Minecraft to
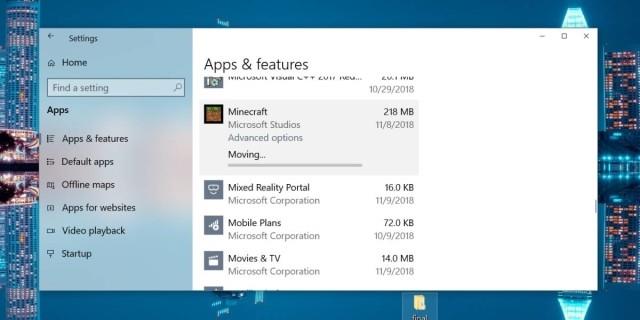
The process of moving Minecraft installation files will not take much time. If the game is open, you should turn it off before moving, otherwise the game will be closed for the migration to complete.
After moving the Minecraft game or any UWP application to a drive other than your Windows drive, the WindowsApps folder will be created in the drive you moved to. Users will not be able to access the contents of this directory without admin rights. You will even have to change the ownership of the folder from its Properties.

The migration process is fast and preserves all your data
Rest assured, you will still play the normal Minecraft game when you move it to another drive. This move will not delete the folders that the application created in the App Data folder . If needed, you can move the game back to drive C or any other drive. This process is performed similarly as above. When clicking the Move button , the menu will list drive C and other drives for users to choose to move to.
Note that this feature only works with UWP applications. If you have installed the Java version of Minecraft, you will not be able to move it to a new drive from the Settings app . Users will have to use the software to assist or uninstall applications and reinstall. Then, choose to install on the drive you want.
It's easy to move the blocky world you've created to a new location without losing anything!
(*) UWP (Universal Windows Platform) application is software that can be used on all Microsoft Windows devices, including personal computers (PC), tablets, smartphones, Xbox One , Microsoft HoloLens, and Internet of Things. UWP applications are mainly purchased and downloaded through the Windows Store.
Step-by-step guide on how to create a green tick for Facebook. Learn how to verify your account and gain credibility with the green verification mark.
Learn how to download torrent files directly using the Firefox web browser with the Torrent Tornado add-on. Simple steps for effective torrent downloading.
Learn how to view someone else’s TikTok followers, both on public and private accounts. Discover effective methods to access follower counts and improve your TikTok strategy.
Learn how to login to Facebook using your email, phone number, or even QR Code authentication without entering a password.
Learn how to stop echo during your Parsec streaming sessions with effective solutions. Echo is a common issue that disrupts communication in games, and we provide proven methods to eliminate it.
Discover how to change your avatar and cover photo on Zalo to express your personality. Follow our easy guide and optimize your Zalo profile image.
Learn how to manage your relationships on Zalo by marking close friends, similar to Instagram. This feature allows easy access to frequently contacted individuals.
Learn how to send screenshots via Viber quickly and without saving them. This guide provides step-by-step instructions to enhance your messaging experience.
Learn how to easily restore deleted messages on Zalo with our step-by-step instructions. Quickly recover your important chats on this popular messaging app.
Discover how to easily add background music to your personal Zalo page with our comprehensive guide on using Zalo for Android and iOS devices.
If you’ve ever found yourself at the end of a Minecraft raid, searching for the last raider to eliminate, you’re not alone. Many players have faced this challenge.
Learn how to uninstall Coc Coc browser completely from your computer, ensuring all data is removed. Follow these simple steps for an effective uninstallation.
Discover how to effectively use the Toshiba AW-A800SV washing machine control panel with our detailed guide!
Discover how to effectively use emergency features on Samsung Galaxy Watch and other smartwatches, including SOS alerts, fall detection, and health records.
Discover how to effectively <strong>share QR code on Zalo</strong>. QR codes enhance connectivity, enabling easy friend requests and more on Zalo.


