Why Reliability and Flexibility Are the Cornerstones of Great Tech

In the fast-moving digital landscape of the modern world, businesses can no longer afford to rely on systems that are only strong in one area.
Adding captions to photos is an effective method of conveying additional content or copyrighting a work. So don't be afraid to insert picture captions into your Microsoft PowerPoint presentations . The article will show you how to add captions to photos in PowerPoint simply and easily.
1. Open PowerPoint and insert the picture you want to add a caption to.
To insert an image, go to the Insert tab > select Pictures in the Images group :
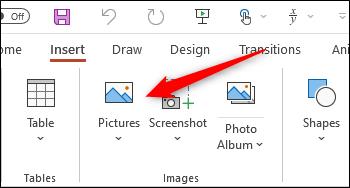
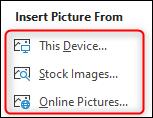
In the drop-down menu, select the location where you want to insert the picture. You have 3 options to download photos from:
2. After adding the image, it's time to insert the caption. In Word, Microsoft provides a built-in image caption embedding feature. Unfortunately, PowerPoint does not have this function. Therefore, you have to manually insert the caption by adding a text box under the image.
Back on the Insert tab , select the top half of the Text Box in the Text group, allowing you to draw the text box horizontally anywhere on that slide.
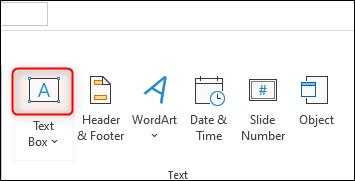
To draw the textbox, click & drag the cursor:

When the textbox is ready, enter the caption:

Once you've finished importing the content, resize it if necessary.

3. Finally, you'll want to group photos & text together. If you plan to move the image around the slide, this is really necessary.
To group pictures and text together, hold Ctrl or Cmd on Mac and select both the image & text box.

Next, click the Group button in the Arrange group of the Picture Format tab .
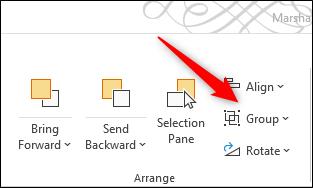
At the drop-down menu that appears, select Group :

Now when you select this image later, the text box and the image will appear in the same frame:

In the fast-moving digital landscape of the modern world, businesses can no longer afford to rely on systems that are only strong in one area.
Looking to create engaging product demos in minutes? Look no further! This guide will introduce you to the best tool for the job.
Discover the latest updates in Zooper Widget for Android. Zooper Widget is a compact, highly customizable, and battery-friendly widget with endless possibilities.
Lipp for iOS, alongside Dubsmash and Musical.ly, provides iPhone and iPad users with a new platform to create lip sync videos and dub videos readily.
Learn how to share audio using TeamViewer, including the latest updates for 2024 and 2025, making remote communication more effective.
Learn the latest tips on how to pet a cat in Adorable Home for optimal gameplay in 2024 and 2025. Discover what positions give you hearts.
Explore the latest features of OrangeHRM Open Source, a free HR management system tailored to meet evolving business needs in 2024 and 2025.
Fix IDM not catching file download links. Discover solutions for downloading videos, music, and more with the latest IDM updates in 2024 and 2025.
Discover the latest version of The File Converter for Android, an application that converts various file formats efficiently.
Explore the latest features of Zalo Web, allowing users to chat and connect seamlessly on various browsers without installation.
PDF Password Remover is a powerful tool for removing passwords and restrictions from PDF files. Download the latest version for 2024 to experience enhanced features.
Step-by-step instructions to completely remove Internet Download Manager (IDM) from your system in 2024 and 2025. Learn to uninstall IDM effectively and cleanly.
Discover Mindjet MindManager, an innovative software that helps individuals and teams streamline their work processes through effective mind mapping and project management.
Su DoKu 2.0.0 is an advanced Sudoku game design software that captivates enthusiasts with its simplicity and functionality. Download now and challenge yourself with Sudoku puzzles.
Discover the new features of Google Photos for Android in 2024 and 2025, including faster backup and advanced search capabilities.


