How to enable/disable auto-save screenshots in Snipping Tool on Windows 11
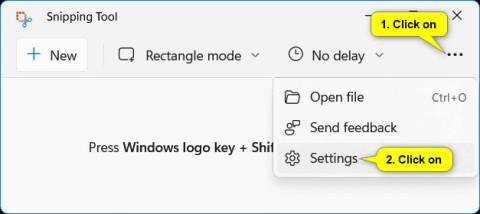
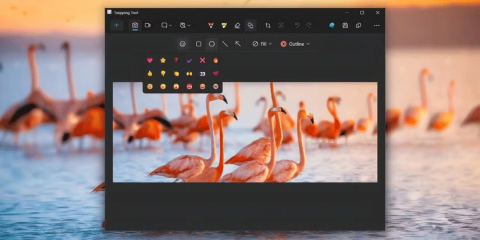
This guide will show you how to enable or disable automatic screenshot saving for the Snipping Tool app on Windows 11.
Snipping Tool is an important feature of any Windows operating system; it allows users to capture, edit, and save screenshots directly to their PC.
However, since Windows Vista, the program has started to become unstable. Even after migrating to Windows 10 and 11, Snipping Tool is prone to strange issues. Such recurring issues make the Snipping Tool not working error appear more frequently and hinder the workflow.
Quantrimang.com has found out some reasons why Snipping Tool stops working and how to solve them easily. Let's find out the details through the following article!
Table of Contents
Let’s start by getting to the root of the problem. Since the Snipping Tool is a subset of the File Explorer service, it’s likely that’s where the problem is coming from. If File Explorer isn’t responding, then neither is the Snipping Tool.
So restarting File Explorer might undo whatever is preventing Snipping Tool from working properly. To do this, press Ctrl + Alt + Del , then select Task Manager. Alternatively, you can press CTRL + Shift + ESC to jump directly to Task Manager.
Scroll down until you find Windows Explorer and right-click it. In the drop-down menu that appears, select Restart.
You’ll notice some strange changes to your screen as File Explorer restarts. For example, the taskbar will disappear and your desktop will turn completely black. This is completely normal, however, as all of these elements rely on File Explorer. When you restart the service, all of these elements are forced to restart as well.
Once everything is back to normal, try opening the Snipping Tool and using it.
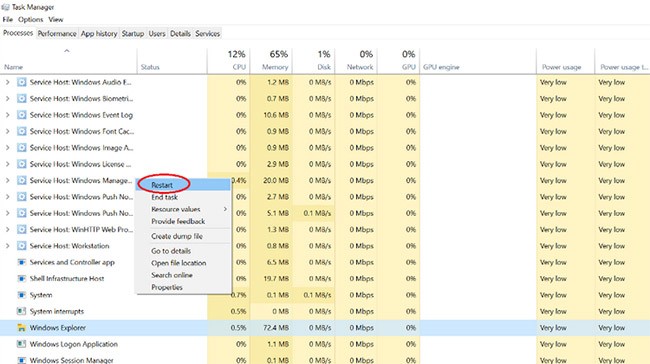
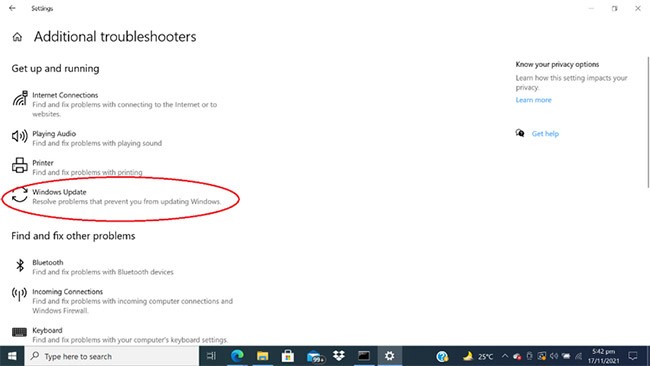
Restarting Windows File Explorer should solve the problem for 90% of users. If not, try running the Windows Update Troubleshooter. You can run it by following the instructions below:
B1: Open the Settings menu by pressing Win + I .
Step 2: Select Update and Security .
B3: From the control panel on the left, go to Troubleshoot > Additional Troubleshooters .
B4: Then, select Windows Update Troubleshooter .
Sometimes, a program you have recently downloaded can interfere with the smooth functioning of Snipping Tool. If you want to find out what is causing this problem, follow the steps given below:
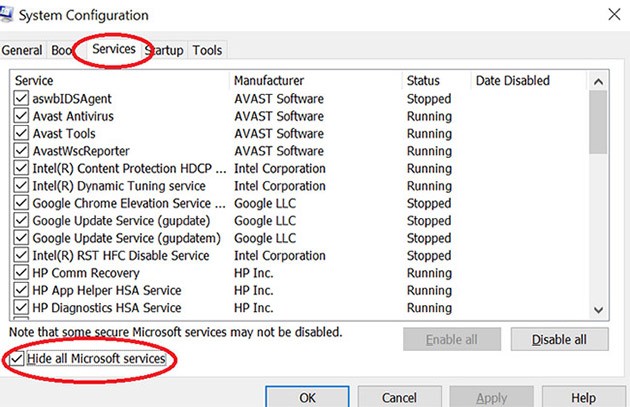
Step 1: Type System configuration into the Windows search bar and open the System Configuration control panel.
B2: Switch to the Services tab at the top, then select the option to hide all Microsoft services at the bottom.
B3 : Disable any service that you think might interfere with Snipping Tool.
B4: After disabling them, try running Snipping Tool again. If it works normally, it means that the above application has conflicted with Snipping Tool. It should be disabled to keep Snipping Tool on Windows working normally.
If all else fails, you can still use the scannow command to repair and restore corrupted files that are causing the Snipping Tool to malfunction. You can do this with the help of the Command Prompt tool .
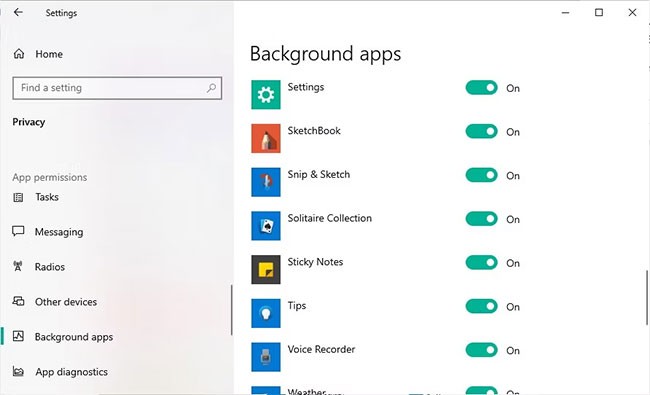
Snipping Tool may also not work if it lacks the necessary permissions to run in the background. This means the app won't work unless you're active in its window. To fix this, allow the Snipping Tool app to run in the background by following these steps:
B1: Click the Windows icon and select Settings from the context menu.
B2: Click the Privacy button on the Settings page.
B3: Scroll down the left panel to find Background apps .
B4: Search for Snip & Sketch from the list of apps and make sure it is enabled.
Sometimes, outdated or corrupted graphics drivers are the culprit behind Snipping Tool not working. Their core responsibility is to capture and process screenshots into a format that Windows devices understand.
If the graphics driver is outdated, it will not translate the image properly and become incompatible with your computer, resulting in the “Snipping Tool not working” error. Therefore, in this case, it is important to update these drivers to the latest version available.
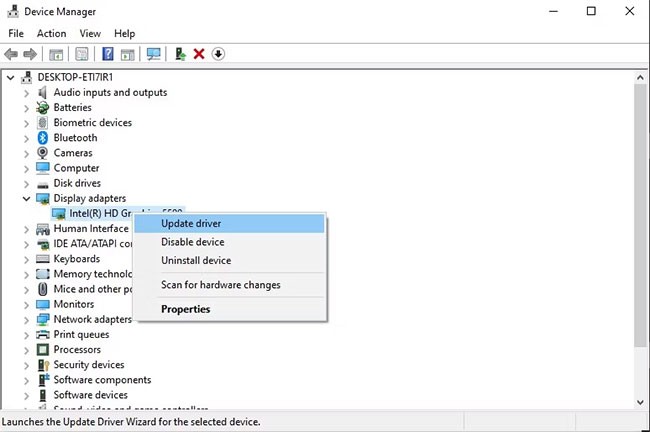
If your Snipping Tool app is crashing in Windows 11 and unable to take screenshots, then you might be experiencing a date/time error related to the app's digital certificate.
You need to temporarily change the date and time from automatic to manual and back to automatic once the error is gone.
1. Go to Settings > Time & Language > Date & Time.
2. Turn off the Set time automatically switch .
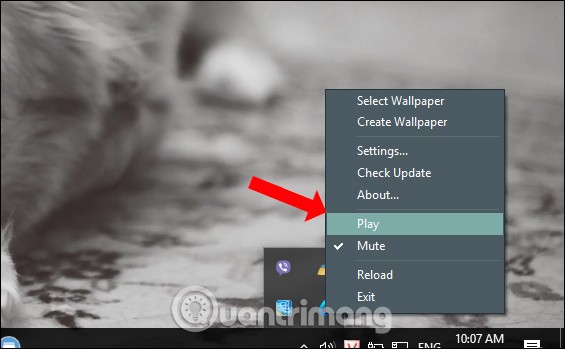
3. Select Change from the Set the date and time manually option .
4. Regardless of what the current date is, manually change the date to October 30, 2021. Leave the time part as it is.
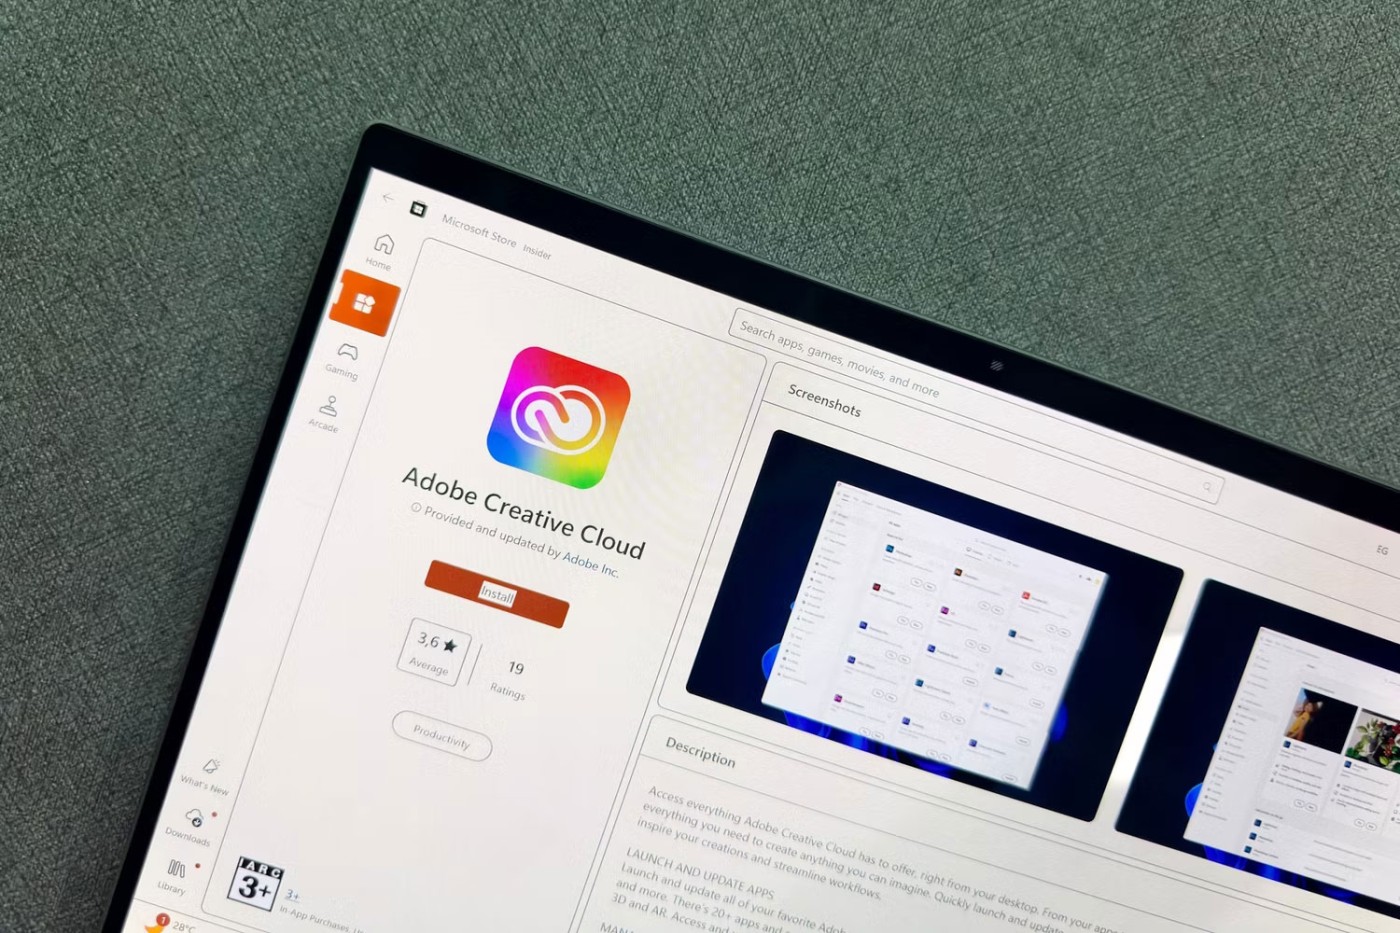
Test to see if Snipping Tool is working. If it's working, switch the time back to automatic in Set time automatically . The correct date should now be displayed on your computer.
For those who upgraded to Windows 11 from Windows 10 , you can leave the older version of the Snipping Tool in the “Windows.old” folder. This is also known as the “classic” Snipping Tool.
Launching the latest Windows 11 Snipping Tool app may cause it to crash, but you can continue to use the classic Snipping Tool app to take screenshots in Windows 11.
1. On the C drive, you should be able to see the “Windows.old” folder. If you don’t find it there, move on to other solutions.
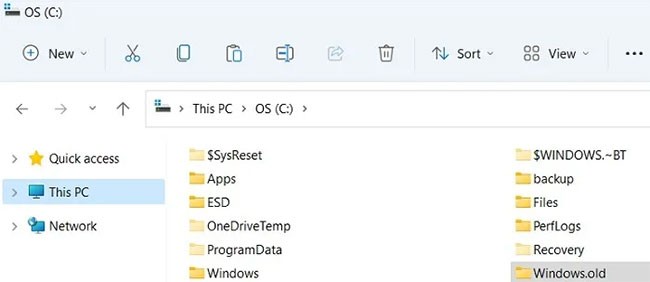
2. Search for the application file named “Snipping” in the Windows 11 file and folder search menu.
3. Open the application file from its original location. You will be taken to the folder containing the old Snipping Tool.
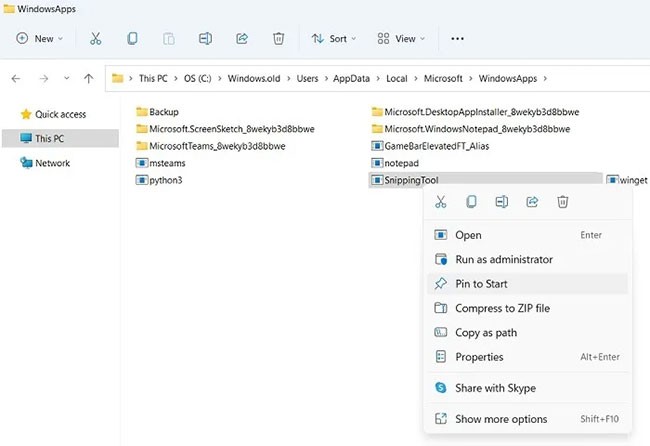
4. Pin the Snipping Tool app file to the Start menu or save the entire folder to your Windows 11 taskbar.
With the new Windows update, the old folder issues will be completely resolved.
The Clipboard automatically saves changes when you copy-paste anything on your computer. If you can open the Snipping Tool program, but it doesn't copy-paste any images, turn on the “Automatically Copy Changes” feature.
1. Open and launch Snipping Tool.
2. Click on the three dots option to enable the “See more” option , where you can open Settings.

3. Make sure the “Automatically Copy Changes” option is enabled. While you can turn off the other toggles in the menu to suit your needs, the “Auto copy to clipboard” option should always be enabled.
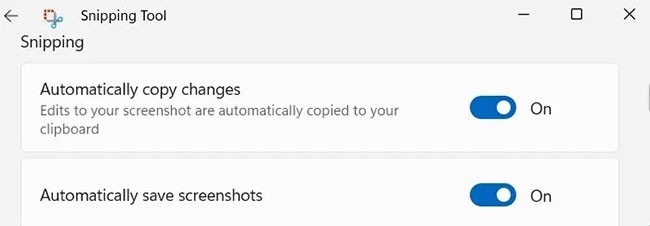
Since these screenshots are saved to the Clipboard by default, taking a new screenshot will destroy the old one. You will have to enable another option labeled “Multiple windows” to save multiple screenshots.
After uninstalling Snipping Tool in Windows 11, you can periodically repair and reset the app. This will fix any newly discovered issues in the app's processes as shown below.
1. Go to Settings > Apps > Snipping Tool > Advanced options . The Apps & features menu will open.
2. Navigate to the Reset menu and click Repair. Wait a few seconds for it to be repaired.
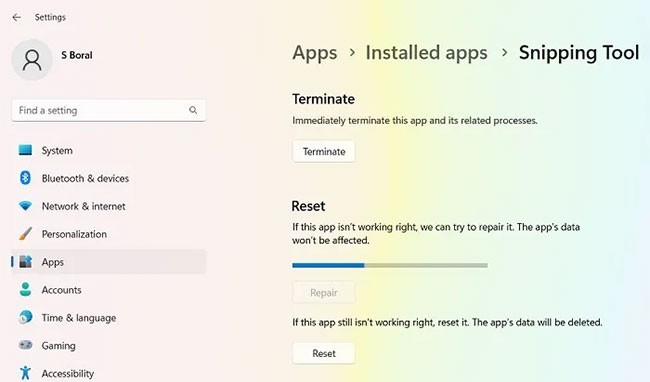
3. If there are no outstanding issues, you will notice a check mark next to the Repair button as shown below.
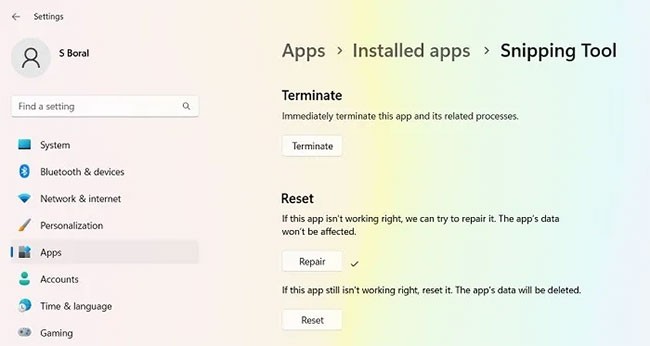
Repeat the same process for the Reset button. Once the issues are resolved, you should not have any more issues with the app.
For those struggling with Windows 11's Snipping Tool's failed update issues, a useful workaround is to set the PrtScr key on your keyboard to serve as the default launch button for Snipping Tool.
1. Open and launch Snipping Tool. Select the three-dot menu to open Settings.
2. In the Setting menu, select Print Screen key shortcut and Change in Windows settings .

3. You will see a “Did you mean to switch apps?” message when Snipping Tool is trying to open Settings. Click Yes to continue.

4. Turn on the Use the Print Screen button to open screen snipping toggle switch . You can select different screen capture options, such as Freeform Snip, Rectangular Snip, and Full Screen Snipping, directly from the PrtScn button on your keyboard.
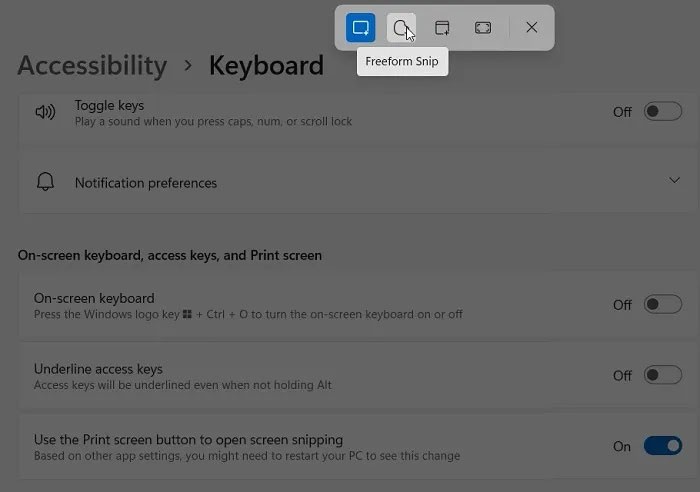
The PrtScr key has many related functions that work with other Windows tools, such as PowerShell, Command Prompt, and Microsoft Office. To use them, you will need to temporarily disable the PrtScr key.
Does your Snipping Tool crash when launching? Due to a faulty update or other reasons, Snipping Tool may have been installed incorrectly. An improper installation may cause the program to crash and need to be replaced with a new version.
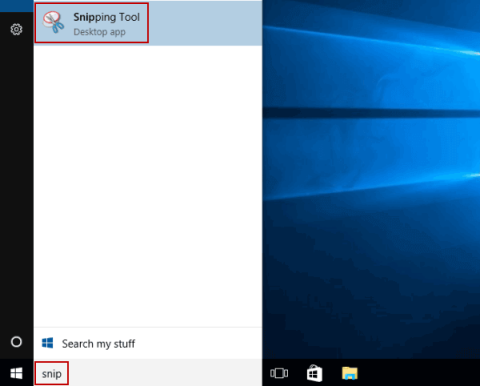
1. To uninstall the Snipping Tool program in Windows 11, select “Add or remove programs” from the Start menu search or in Control Panel.
2. Scroll down to the Snipping Tool app and from its three-dot menu, select “Uninstall” to proceed with the removal.
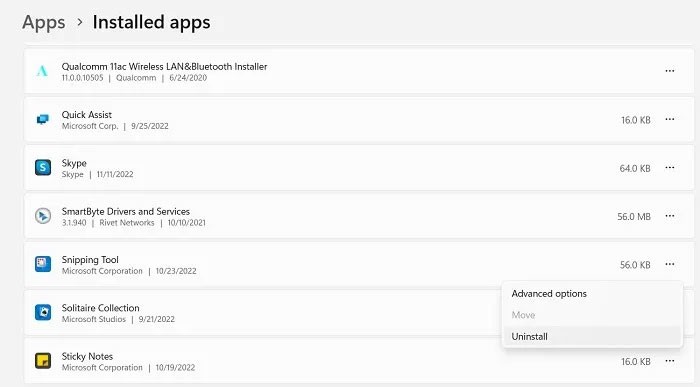
3. After uninstalling Snipping Tool in Windows 11, you can reinstall it from the Microsoft Store.
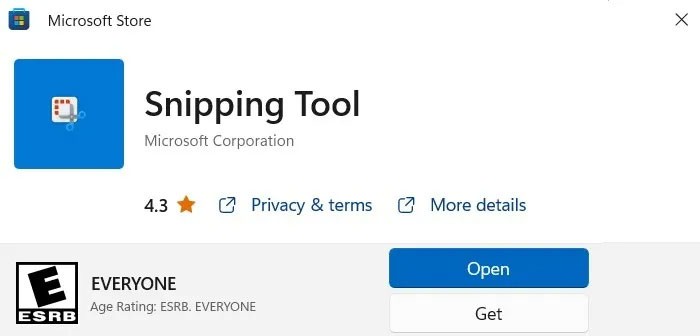
Sometimes you may find that Snipping Tool is not working even though there is nothing wrong with the update. There may be some deep policy setting on your device that has disabled Snipping Tool without you noticing.
Windows 11's advanced admin settings have a Local Group Policy Editor that helps undo any policies you don't want on your device.
1. Go to the Run menu using Win + R . Type “gpedit.msc” to launch the Local Group Policy Editor.
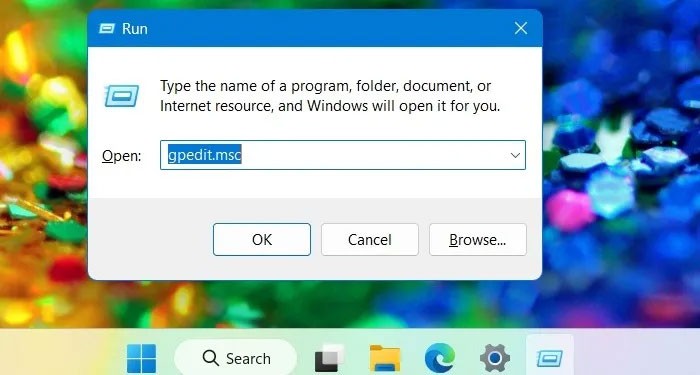
2. Scroll down to Tablet PC > Accessories and click the Do not allow Snipping Tool to run setting option to assess its status.
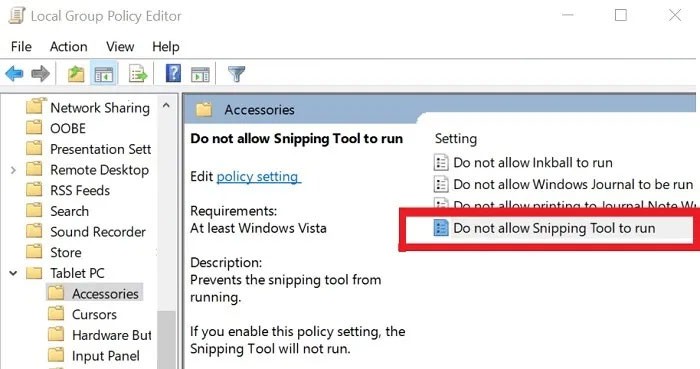
3. If the next dialog box shows that “Do not allow Snipping Tool to run” is Enabled , you need to change it to Disabled.
In addition to the Local Group Policy Editor, you can also use a small registry tweak to launch the Snipping Tool on your Windows 11 device. This is useful when you don't see the Snipping Tool folder and application in your File Explorer.
1. Go to the Run menu using Win + R . Type “regedit” to launch the Registry Editor on your screen.
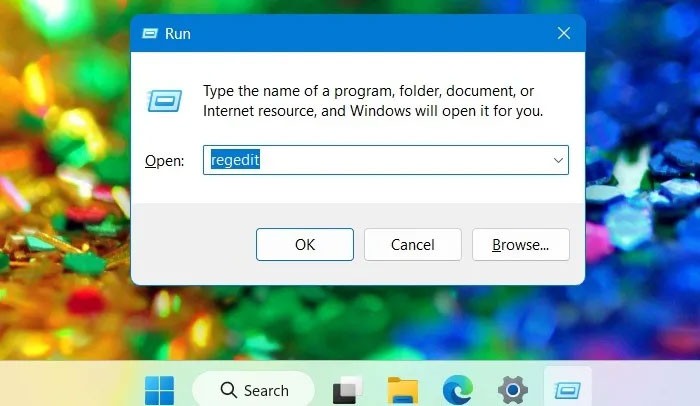
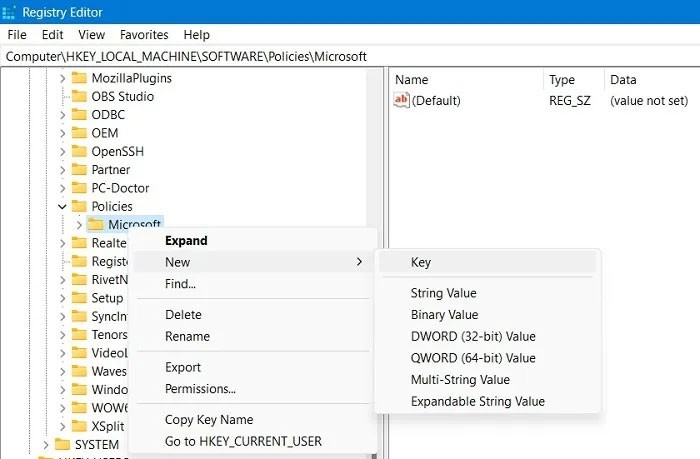
2. Go to the following path in Registry Editor:
Computer\HKEY_LOCAL_MACHINE\SOFTWARE\Policies\MicrosoftRight click on Microsoft to select a new key and name it TabletPC.
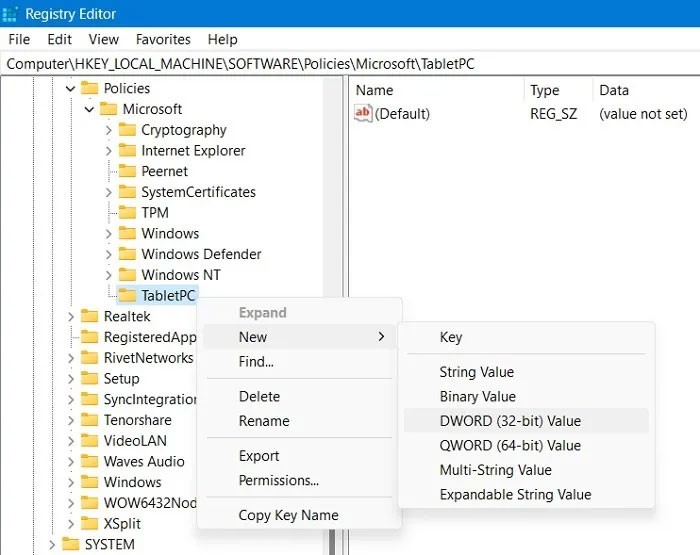
3. Select the newly created TabletPC key and right-click to add a new DWORD (32-bit) value. Call it DisableSnippingTool.
4. Right-click to edit the DWORD (32-bit) value string above and set it to “0”. The default value is “1” , which will disable the Snipping Tool.
Note : Only try this method if Snipping Tool is not visible on your system.
Snipping Tool can run into unexpected problems if your operating system is full of corrupted files. It's easy to fix problems caused by installed apps by doing a clean install of Windows 11.
1. Before performing a clean install, backup your files as they will be lost during the process.
2. Download “Create Windows 11 Installation Media” at this link.
3. Launch the installer. Follow the on-screen instructions until you reach an option that allows you to select the media to be used. Selecting the “USB flash drive” option will allow you to install the USB boot setup.
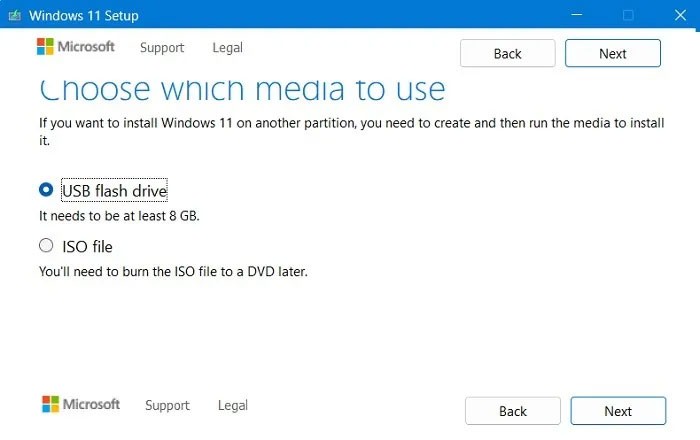
4. Once the USB installer is ready, plug it into a USB port on your Windows device.
5. Restart your PC or laptop and enter the boot keys (will vary depending on the device manufacturer). Usually, they are F2, F10 or F12 or Esc.
6. Follow the on-screen instructions to activate the latest Windows 11 operating system on your device. This version should be bug-free, as any old patch updates will be gone.
If your original copy of Windows 11 is genuine and valid, then it is easier to fix any problems by performing a simple Cloud Reset. It works similar to a clean install but is much easier to do because you don't need a USB.
1. Go to Settings > System > Recovery > Recovery options .
2. Select Reset PC in the menu options for Reset this PC .
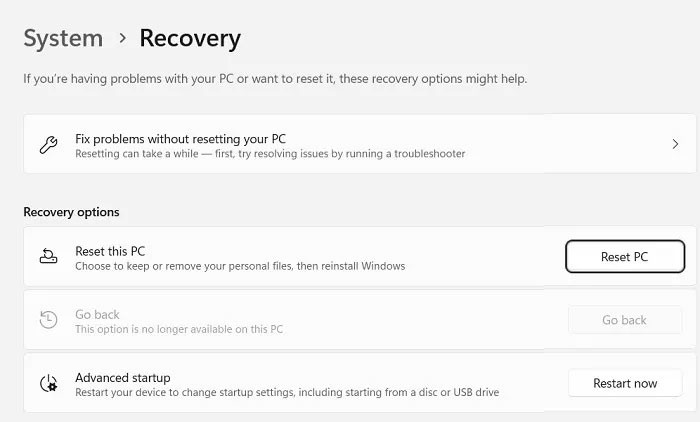
3. Follow the instructions and select the Remove everything option instead of Keep my files . This will ensure a new system without errors.
4. Select Cloud download to reinstall Windows. This will connect your system to the latest version of Windows 11 in the cloud.
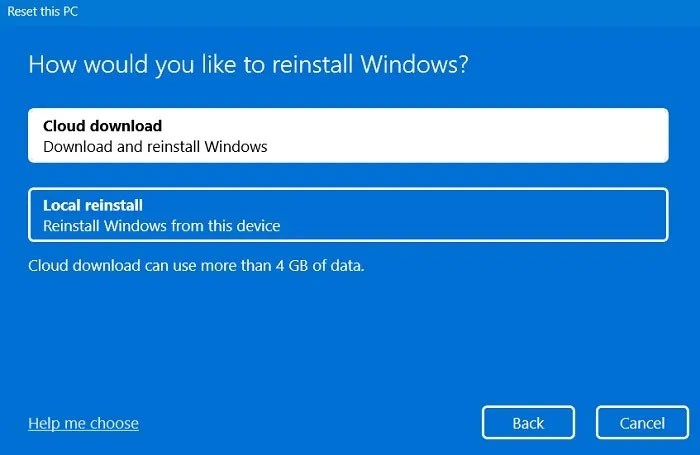
5. In the next few steps, you can start the Reset process. Once it starts, you cannot stop it.
6. Leave your device plugged in and connected to the Internet. Once the cloud download is complete, a new version of Windows will be installed automatically.
Why does my computer freeze when using Snipping Tool?
If your PC freezes when using the Snipping Tool, it indicates a possible corrupted graphics driver. To fix the problem, launch CMD with admin rights and run sfc/Scannow , followed by DISM.exe.
Once outdated drivers have been identified through the system scan, you can open them from Device Management (devmgmt.msc in the Run menu). Update and reinstall the drivers following the instructions on your CMD screen.
Why Windows Snipping/Snip & Sketch Tool doesn't cover the entire screen?
If the Windows 11 Snipping or Windows 10 Snip & Sketch tools don't cover the entire monitor screen, it means the display isn't set to the correct resolution. Go to Settings > System > Display > Scale & Layout and set the scale to the recommended value on your device.
How to fix black screen error encountered when using Snipping Tool in Windows 11?
If you get a black screen when saving a screenshot using the Snipping Tool, it means there is some problem with your graphics driver. Open Device Manager using the devmgmt.msc Run command menu and select any graphics drivers related to Display adapters and Integrated monitors. Right-click on them to update the missing drivers. Sometimes they will be marked with an exclamation mark.
What are the alternatives to Snipping Tool in Windows 11?
In Windows 11, Snip & Sketch has been merged with the Snipping Tool. There are a number of other free and paid screenshot options you can use:
How to take scrolling screenshots in Windows 11?
To take a scrolling screenshot in Windows 11/10, follow the steps in the guide: How to take a scrolling, long screenshot in Windows .
Since the Snipping Tool is closely related to taking screenshots, its importance cannot be underestimated. Screenshots are an easy way to convey data, and not being able to use this function can be frustrating.
There is no doubt that Snipping Tool is an indispensable part of Windows operating system, so knowing how to make full use of this function is also essential.
This guide will show you how to enable or disable automatic screenshot saving for the Snipping Tool app on Windows 11.
Snipping Tool is a Windows application that allows users to create and edit screenshots. This article will show you how to take screenshots, edit, save, and email screenshots, as well as how to use the available markup tools and how to change Snipping Tool settings.
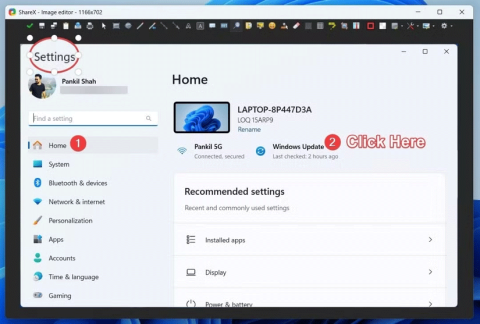
While the Windows Snipping Tool has been improved recently, it still leaves a lot to be desired. You won't realize its limitations until you try ShareX.
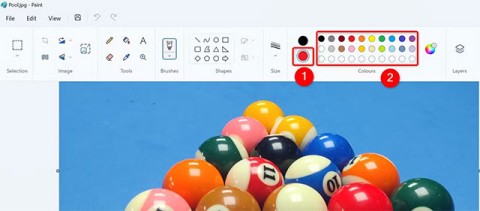
If your photos contain sensitive content that you don't want others to see, hide those parts of the content using the tools at your disposal. You can use the built-in tools available on your Windows 11 PC to do this.
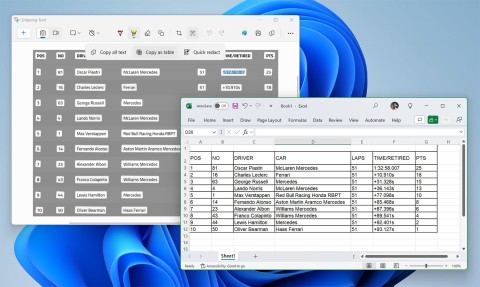
The latest version 11.2409.22.0 of Snipping Tool comes with a very interesting new feature: It allows users to copy data tables via screenshots.
Some recent changes have enhanced this basic app, allowing users to do more than just take screenshots.
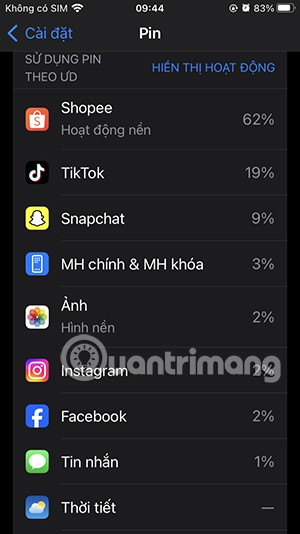
iPhone lists the full battery usage of applications, helping you know which applications use a lot of battery on your iPhone.
How to calculate the diagonal of a rhombus? Please find the calculation method and examples below to understand the formula for calculating the diagonal of a rhombus.
Kill Monsters to Save Princess, one of the longest named games in Roblox or shortened to Save Your Princess.
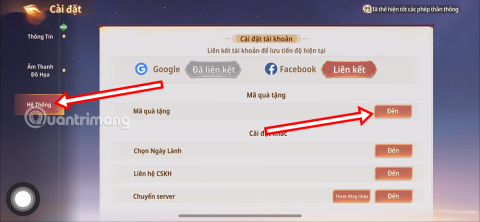
The latest Go Back to the West code will come with attractive items for you to exchange for rewards.
Download Blockman Go on PC to entertain you when your phone capacity is limited and the battery is low while playing.
Your PC ran into a problem and needs to restart and won't start? Here's how to fix it!
Even though the product has only been released for a short time, Nvidia RTX 5080 and RTX 5090 graphics card owners are complaining about a series of problems.
As a long-term support release, Ubuntu 20.04 LTS (Long-Term Support) will be supported with continuous updates for a total of 5 years, meaning it will reach end-of-life around April 2025.
Meow: Sen Oi Dung So gives gamers a series of codes with events for players to participate and receive rewards.
Code Super Snail gives players a series of attractive rewards, we still recommend players to receive rewards from the beginning of the game to make the time when starting the game easier.
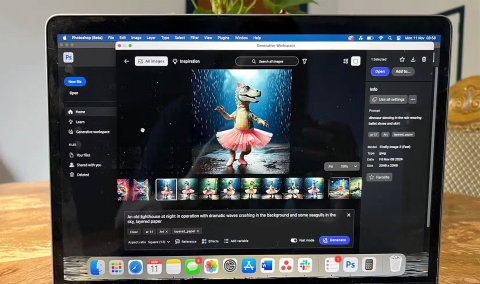
Generative Workspace is one of the top AI features announced at Adobe Max 2024. It will be the new home for your Generative AI images and files.
In fact, many people have thought that wifi password is a math problem with a series of formulas that take up several pages of paper and if you are blind in math, then forget it, you will definitely not be able to use wifi.
Insect eggs come in different shapes and colors. You can find brown insect eggs and more.
The winter solstice — the day marking the beginning of winter — occurs on the shortest day and longest night of the year. Here are some interesting facts about the winter solstice that you may not know.
The Coca-Cola logo is iconic on its own. But if you look a little closer, it contains something dear to the heart of the company—a nod to joy.
