Cybercriminals are using Microsoft Teams calls to commit fraud

Cybercriminals are calling people over Microsoft Teams pretending to be a company and offering help, but they won't do anything.
Microsoft Teams is your online chat, meeting, calling, and collaboration app, no matter where you are. Microsoft Teams is one of the online teaching software used to teach and work online to help your team maintain remote work and improve work efficiency. Join WebTech360 to learn and how to use this software right below.
main content
Microsoft Teams is one of the applications to create an effective online workspace, teaching and learning integrated with Microsoft's Office365.
https://youtu.be/nKU-FMzZFF0
Here are some reasons why Teams is gradually becoming the most favorite tool of office workers and students during the COVID-19 season:
You can use Teams on most popular platforms:
However, to download the software to your computer, or the app to your phone, you need to register for an account successfully.
To sign up for Microsoft Teams for free you need a Microsoft account first.
If you don't have a Microsoft account, sign up at: https://account.microsoft.com/
You can use your Gmail.com address or your personal phone number to sign up for a Microsoft account.
Also if you already have emails from Microsoft like @Outlook.com, @live.com, @hotmail.com is already a Microsoft account. Note that if you register by school, you should use the email provided by your school to log in.
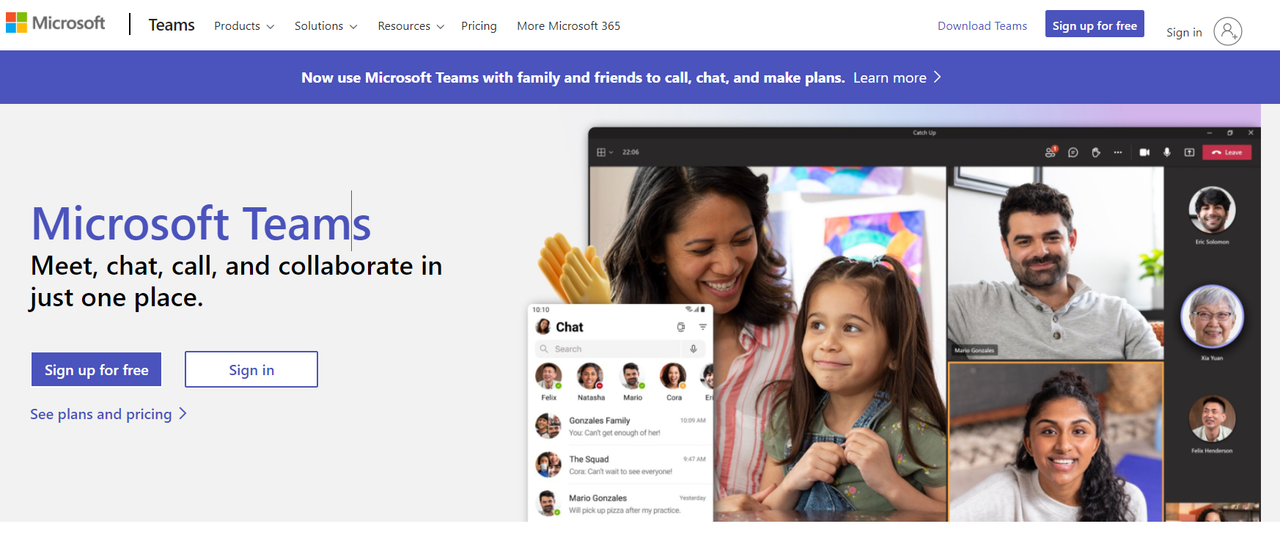
Once you have an account, go to: https://products.office.com/en-vn/microsoft-teams/group-chat-software select “Sign up for free” and choose to register for Teams according to the purpose. use.
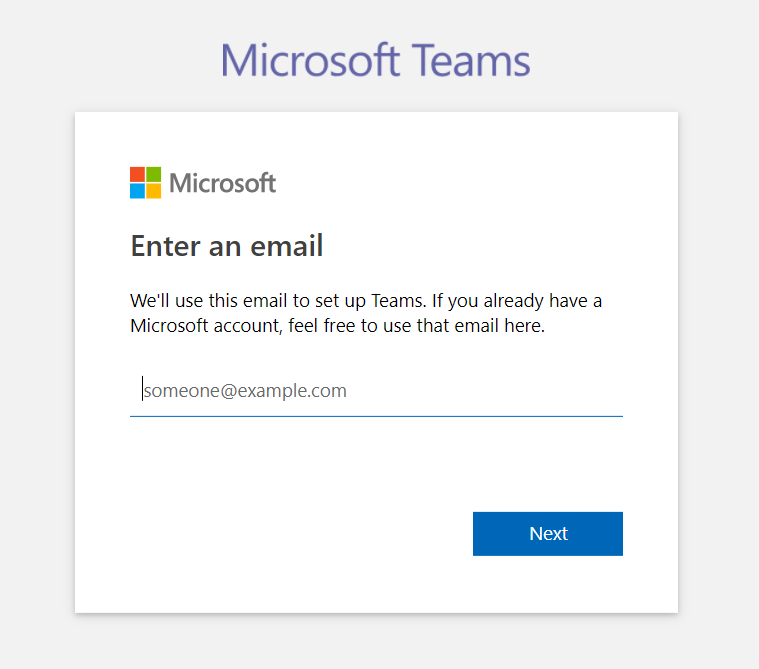
Enter your personal Microsoft account Email or the email provided by the school to log in => Enter the password of your Microsoft account.
Enter your company name/Select your Country or Region. And wait for Microsoft Teams to set up an account for you.
Here is the link to download Microsoft Teams to install on computers and smartphones to teach - learn and work from home:
Once downloaded, use the account you created above to log in and start using Microsoft Teams following the instructions below.
Teachers and students can refer to the detailed instructions on using Microsoft Teams for teaching below:
To create a new class on Teams you can follow these steps:
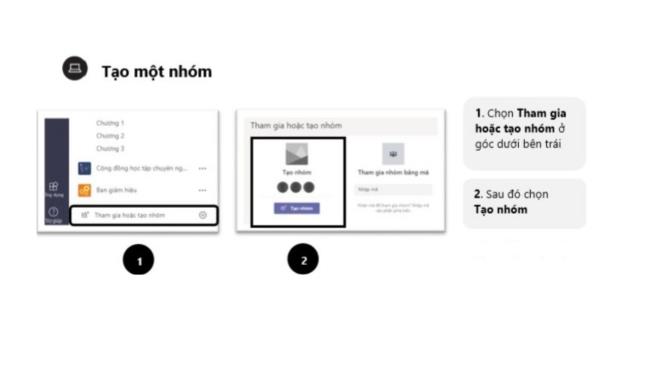
Step 1: At the interface of Microsoft Teams, select Teams => Join or create a team (Join or create a team) in the upper right corner of the screen, then click the Create Team button.
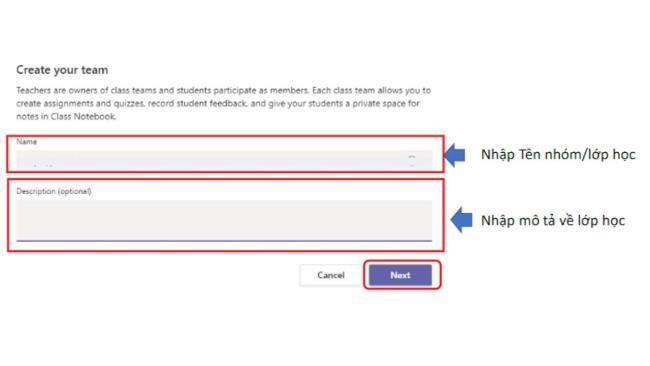
Step 2: Select Class, then enter the class name and a brief description of the class information and click Next.

Step 3: Once you have a class, you can add students to the class by:
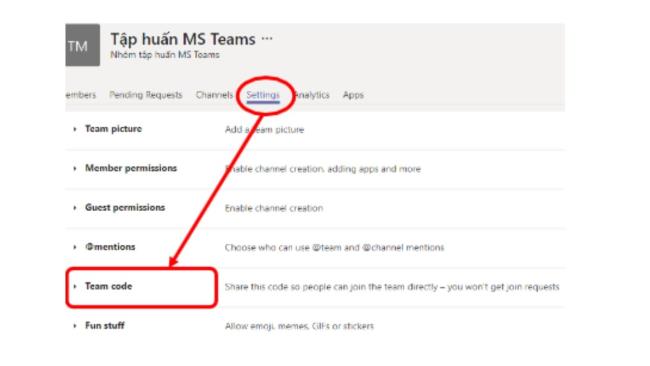
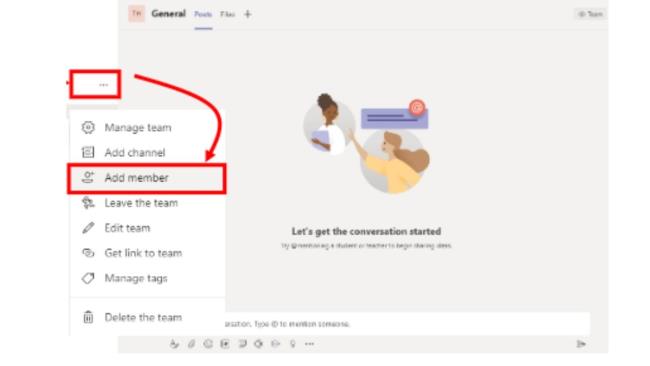
In addition to creating large classes "teams", teachers can create smaller study groups "channels" in the classroom.
Join the class on the team
For students, once the teacher has sent the class code, they can join the class on the team by themselves:
At the interface of MicroSorft Teams, select Teams => Join or create a team (Join or create a team) in the upper right corner of the screen, then select Join a team with code => Enter code => Join team.
First, let's learn the interface of a group and the corresponding functions:

To conduct a lesson on Teams, what actions do teachers need to perform? Here are the most detailed instructions:
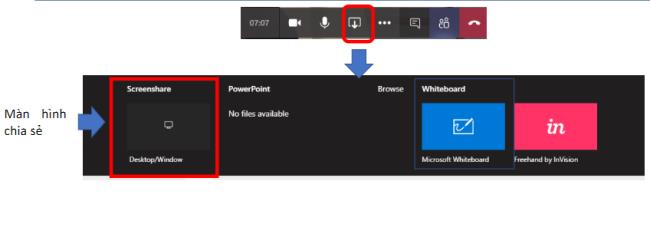
Conduct online lectures via the Meet Now feature
Upload materials to the classroom
To upload class materials, teachers follow these steps: Go to the group => Posts => Upload Class Material => Select Upload => Select the file to upload and click Open (Open)
Assign class assignments/Create tests on Teams
Go to the group => Assignment tab => select Create

Note: when assigning lessons to students, students will receive notification messages via email, learning Teams notifications on mobile phones.
Grade assignments
If it is a multiple-choice test, the student's score will be automatically graded on Teams, while the teacher's essay form will automatically grade it. To grade this lesson, teachers choose Grades => enter scores directly for each student.
Once you have entered the classroom created by the teacher on Teams, students can use a number of Teams features to make learning more effective, such as:
Download lectures and reference materials: To download lectures and some study materials, you can perform the following steps: Go to the class group => select File tab => Right click on the file you want to download => select Download
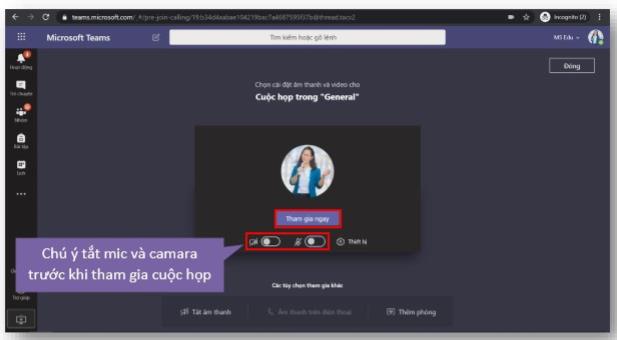
Join online lecture: When the instructor starts the lecture, students will receive a notification => click on the online lecture => Select "Join" and start the lesson.
Do exercises/tests on Teams: Go to the Assignment tab => Select the exercise to do. Select Submit when you have completed the assignments.
View assignment scores: The grades of the exercises will be placed in the Grades tab after the teachers have graded them.
WebTech360 will introduce you to the basic functions that can be applied when working online with a team via Microsoft Teams Meeting:
When you start working on Teams, you need to set up a separate working group equivalent to a project, a department in fact. Do the following:
On the interface you choose "Join or create a team" (Join or create a team) in the top right corner => select Create Team / Create Team. Then enter the team name and a description of the team.

Each Team will have smaller channels called Channels that will be automatically created. Multiple channels can be created in a Team. For example, you can create a “Marketing” team, in which there may be smaller divisions such as “Social Media”, “Content Marketing”…
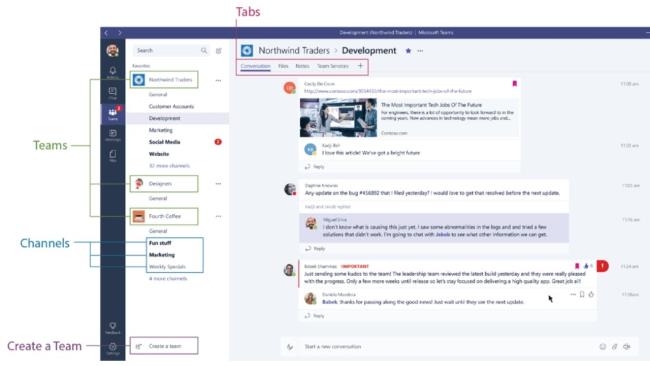
Along the left side, you can navigate to different areas in Teams. Such as Chat (Chat), Meeting (Meeting), Files (Files) and Activity (Activity).
Invite members to the group
After creating the group, you can invite members to the group with the following actions: Click "Invite people" in the lower left corner, you can directly enter your friend's name or choose to get the link to go. invite friends, or send invitations via email…
Chat: Teams allows members to chat back and forth with a full chat history. To chat privately with a person/group, you can Click on the New chat section, type the name of that person/group in the "To" field, write your message and press Send to send.
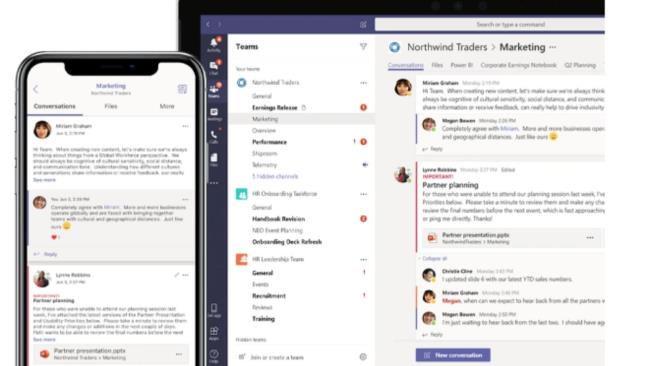
In particular, when texting in a group, you can use @nickchat to tag people in the group or the whole group when you want to announce or assign something. The person in question will be notified and clearly seen in the conversation. Like the chat feature of other social networks you can also 'like' content and share emojis or GIFs.
Make Online meetings (Meeting): When you need to conduct online meetings connecting many people, you can follow the steps below:
Click Meet Now below your message area to start a meeting in Teams. Enter a name to join the meeting, and then get started. You can also use features such as screen sharing for presentations, chats, etc. in the meeting.
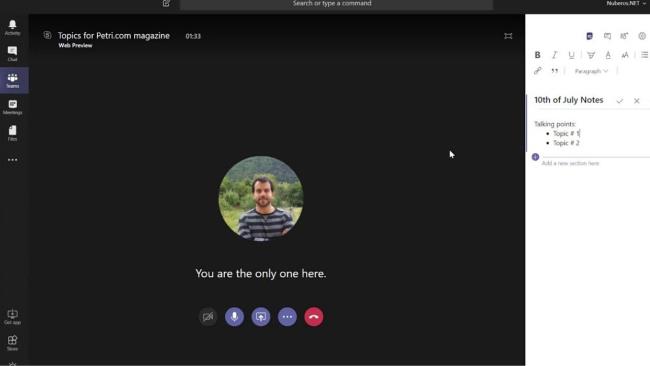
You can use the Meeting Tab to sync your meetings from Outlook and also allow you to schedule meetings in Meetings sent to Teams. If you want to schedule other meetings with external users or individuals, you will still need to use Outlook, as the Teams meeting tab is only for scheduling meetings in Teams.
Store Files: Go to Team and select the File tab – this is where you can manage important files of the team. Includes actions: delete, download, move files, open, copy, edit or get links to share with others.
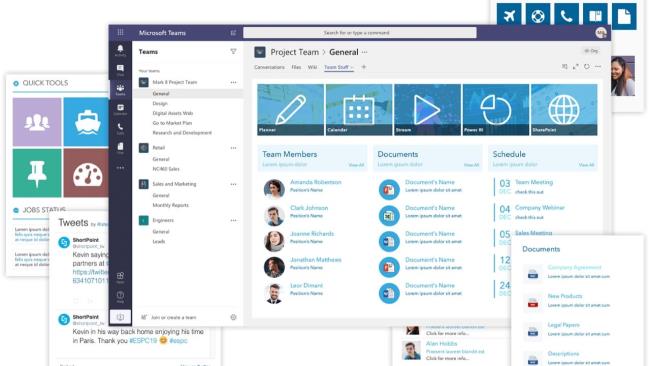
In the File tab, you can quickly find and view files on OneNote, OneDrive, and in Teams. There is also a very useful tab Recent tab so you can quickly access the latest documents saving time searching.
Microsoft Teams Business Notes: Teams Notes can be synced with the MS OneNote app. In Teams, you can view and edit your OneNote, or vice versa.
Add Tabs: To work efficiently, you can add new tabs like Planner, Excel, Word, Power BI, etc. All the other Microsoft applications can easily be added to support your work: save time, avoid distractions, improve work efficiency.
Microsoft Teams is currently offered by Microsoft in two forms, Teams for free and Microsoft Teams premium (Premium) included in the Office 365 solution package for Business and School.
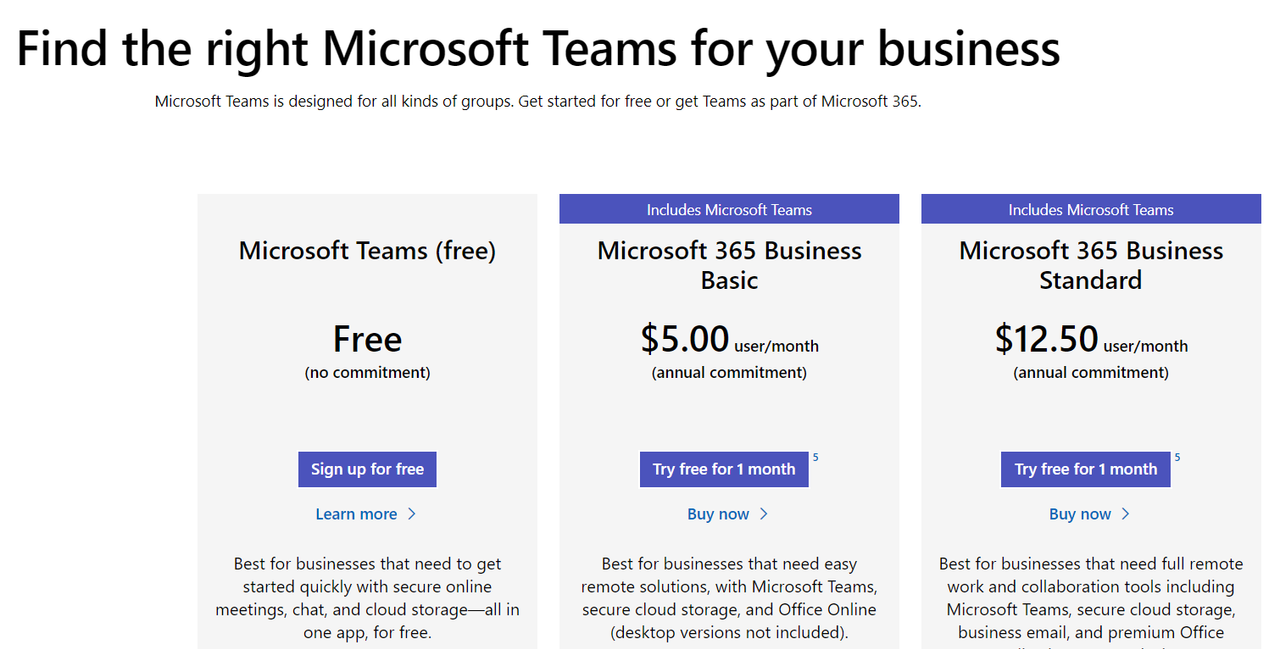
To upgrade your account and experience the outstanding features of Microsoft Teams in the Office 365 suite, visit the address below:
https://products.office.com/en-us/microsoft-teams/compare-microsoft-teams-options
Let's review the outstanding features and necessary notes when using MS Teams in the table below:
| Advantages | Defect |
|
|
Hopefully, the detailed instructions on how to use Microsoft Teams above will help everyone for learning - working from home. If you have any questions, you can comment below, WebTech360.com will answer your questions as soon as possible.
Cybercriminals are calling people over Microsoft Teams pretending to be a company and offering help, but they won't do anything.
Instructions to fix the error of not being able to download files in Microsoft Teams. How to download videos on Microsoft Teams is not difficult. However, sometimes you will encounter problems along the way
How to add green screen to Zoom, Skype, Microsoft Teams, Green screen will help you easily erase the background area when making video calls. Learn how to add a live green screen
How to set "out of office" status on Microsoft Teams, You plan to take a vacation for a while and want to notify colleagues and partners on Microsoft Teams
Using keyboard shortcuts in Microsoft Teams in combination with an external keyboard will help you work, online meetings, and teach effectively.
In addition to regular exercise and not smoking, diet is one of the best ways to protect your heart. Here are the best diets for heart health.
Diet is important to our health. Yet most of our meals are lacking in these six important nutrients.
At first glance, AirPods look just like any other true wireless earbuds. But that all changed when a few little-known features were discovered.
In this article, we will guide you how to regain access to your hard drive when it fails. Let's follow along!
Dental floss is a common tool for cleaning teeth, however, not everyone knows how to use it properly. Below are instructions on how to use dental floss to clean teeth effectively.
Building muscle takes time and the right training, but its something anyone can do. Heres how to build muscle, according to experts.
The third trimester is often the most difficult time to sleep during pregnancy. Here are some ways to treat insomnia in the third trimester.
There are many ways to lose weight without changing anything in your diet. Here are some scientifically proven automatic weight loss or calorie-burning methods that anyone can use.
Apple has introduced iOS 26 – a major update with a brand new frosted glass design, smarter experiences, and improvements to familiar apps.
Yoga can provide many health benefits, including better sleep. Because yoga can be relaxing and restorative, its a great way to beat insomnia after a busy day.
The flower of the other shore is a unique flower, carrying many unique meanings. So what is the flower of the other shore, is the flower of the other shore real, what is the meaning and legend of the flower of the other shore?
Craving for snacks but afraid of gaining weight? Dont worry, lets explore together many types of weight loss snacks that are high in fiber, low in calories without making you try to starve yourself.
Prioritizing a consistent sleep schedule and evening routine can help improve the quality of your sleep. Heres what you need to know to stop tossing and turning at night.
Adding a printer to Windows 10 is simple, although the process for wired devices will be different than for wireless devices.
You want to have a beautiful, shiny, healthy nail quickly. The simple tips for beautiful nails below will be useful for you.


