Emotes are like the official language of Twitch. Unlike most gifs and emojis, they’re unique to the platform and can’t be applied to other apps.
You can use them for goofing around in chat rooms or showing support for fellow creators. It’s also a good way to make your channel stand out and get more subscribers. In this article, we’ll show you how to add emotes to Twitch, how customization works, and where to find the best ones.
How to Add Emotes to Twitch?
Twitch emotes are basically small images or gifs that streamers use on a regular basis. The easiest way to get them is by downloading add-ons for your browser.
Probably the most popular Twitch enhancement is BetterTTV. Here’s how to add emotes to Twitch by installing BTTV:
- Open your browser and go to https://betterttv.com/.
- Click Download for [Browser] to add the extension to your browser.
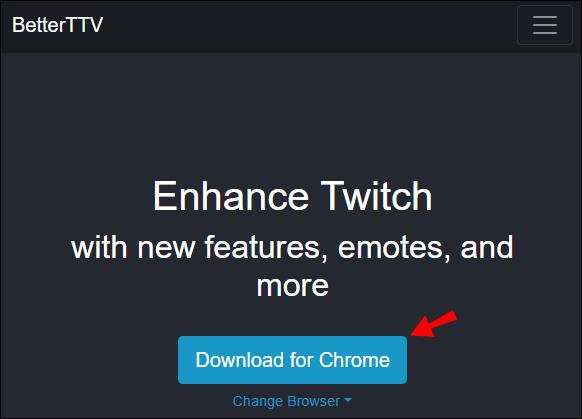
- When the download is finished, open the add-on.
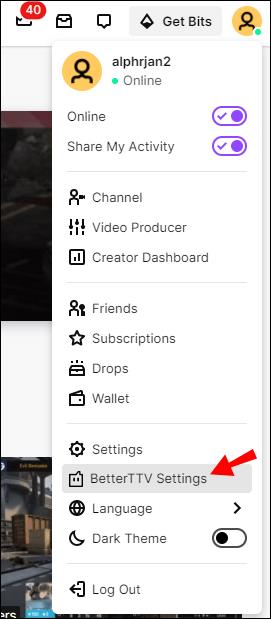
- Click on the small gear icon at the bottom of the screen to open BetterTTV Settings.
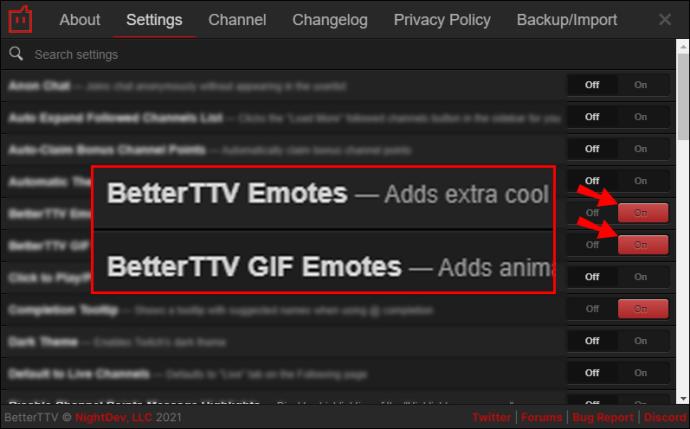
- Enable both BetterTTV Emotes and BetterTTV Gif Emotes by clicking the On button on the left-hand side.
Now you’ll be able to use BTTV emotes on your channel. Open your chat box and type in the emote code or simply click on the smiley face icon and browse.
BTTV offers a selection of the most widely-used emotes. It’s more than enough for casual Twitch users. However, most Partners and Affiliates choose to create their own emotes to make their aesthetic more recognizable.
How to Make Twitch Emotes?
Unlike emojis, the design possibilities for Twitch emotes are endless. strict formatting and size requirements. Here are the prerequisites for design:
- The emote has to have a .png format.
- You can use only the following image sizes: 28 x 28px, 56 x 56px, 112 x 112px. If you’re using Simple Upload, your image can be between 112 x 112px and 4096 x 4096px.
- You can’t upload a file bigger than 1MB.
- Only use a transparent background.
- Make sure that you use high-resolution images and that there are no blurred lines.
If you go by these rules, you’ll be able to create your own Twitch emotes with ease. All you need is a photo editing app and some basic skills. Here’s how to make Twitch emotes in Adobe Photoshop:
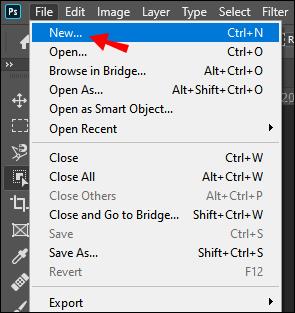
- Go to Photoshop and open a new file.
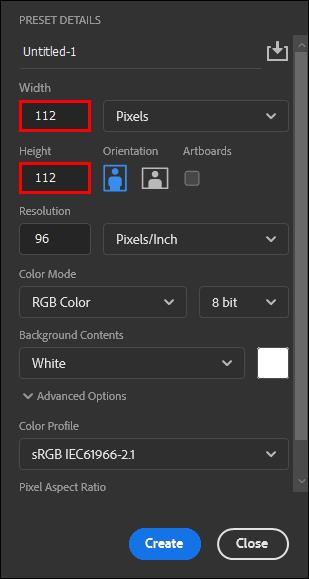
- Enter the dimensions of your image, 112px for both Width and Height.
- Click on the box next to Background Contents and choose Transparent from the drop-down menu. Confirm with OK.
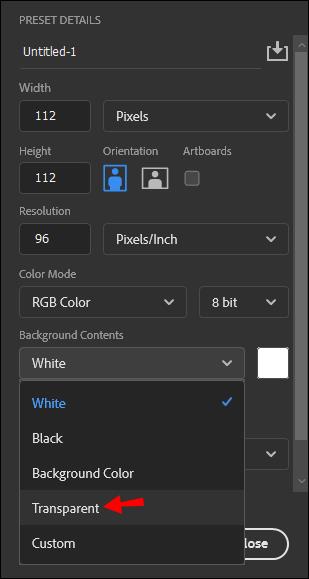
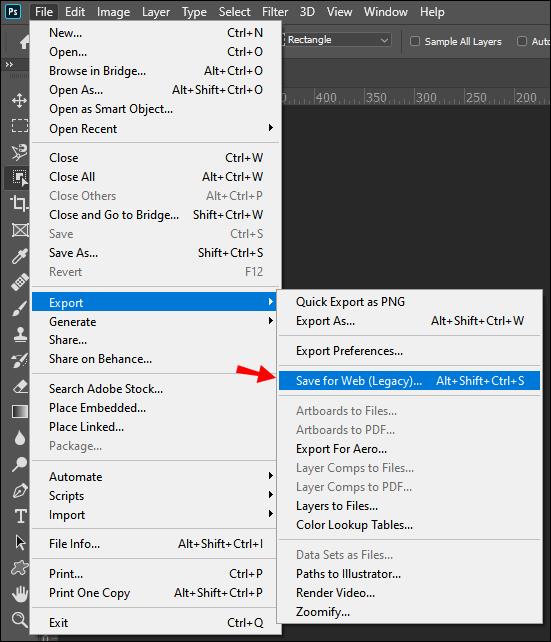
- Customize the file by adding text and images and then go to File > Save for Web.
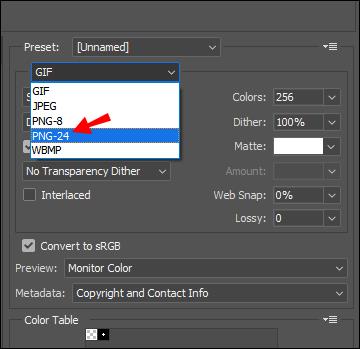
- Change the file type from default to PNG-24 and save it.
- Click on Image to create a smaller file. Set both the Height and Width to 56px and click OK. Remember to use a different name for the new image so you don’t replace the original. Do the same to make the 28 x 28px emote.
- Once you’re done, you can upload all files to your Twitch channel. If you’re an Affiliate or a Partner with a good track record, there’s no approval process. You can use your emotes without waiting for 48 hours.
Of course, Photoshop is not the only software tool that allows you to make emotes. Here’s a list of programs you can use if you don’t have access to Photoshop:
How to Upload Your Emotes to Twitch?
Once you come up with a signature emote, you can add it to your channel. If you fulfill all the requirements, it only takes a few steps. Here’s how to upload your emotes to Twitch:
- Go to your Twitch channel and click on your avatar. Click on Creator Dashboard to open a drop-down menu.
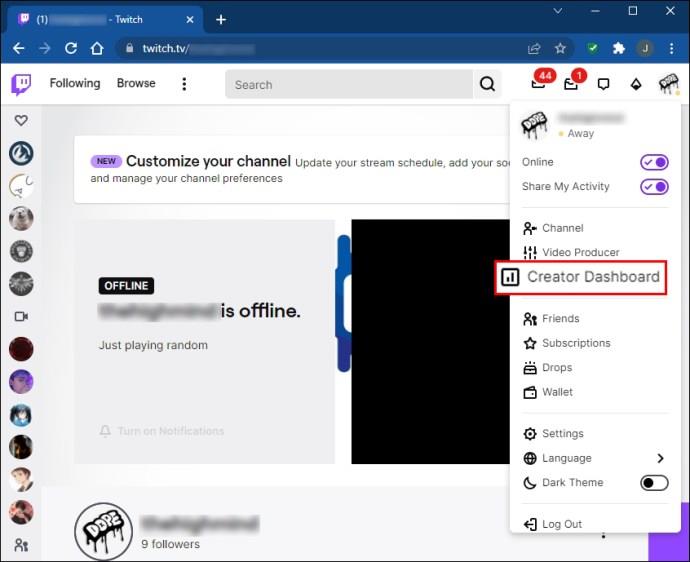
- Choose Preferences and go to Affiliate/Partner > Emotes Settings.
- Choose to Upload Emotes. There are three options to choose from, i.e., three different emote sizes. Submit the emotes by clicking on the appropriate box.
After approximately 48 hours, Twitch will automatically add the emotes to your channel. Of course, some creators can avoid the waiting period, provided they fulfill the following requirements.
For Partners:
- A minimum of 60 days since receiving the Partner status.
- A minimum of 60 days without violating Terms of Service or Community Guidelines.
For Affiliates:
- A total of 60 days of streaming as an Affiliate over the course of 2 years.
- No warnings or suspensions for conduct infractions in at least 60 days.
- No emotes denied or removed in the previous 60 days of streaming.
If Twitch denies your emotes, usually it’s because you failed to follow the aforementioned formatting requirements. Another possible reason for failed uploads is disrespecting Community Guidelines. Here’s what you should pay attention to when creating your own emote:
- Don’t include anything that can be perceived as a slur or offensive imagery or symbol.
- Don’t use your emotes for harassment or threats of violence.
- Stay away from sexual content and violence/gore.
- Don’t promote drug abuse or other criminal conduct.
- Extreme political statements are often discouraged.
- You can’t use individual characters as it has to be an image or a string of text.
- No copyright infringement like unauthorized use of other people’s logos or intellectual property in your emote.
How to Delete Your Twitch Emotes?
If you’re unhappy with how your emote turned out, you can remove it from your channel. Here’s how to delete your Twitch emotes:
- Go to your Creator Dashboard and select Preferences from the drop-down menu.
- Go to Affiliate/Partner > Subscription > Emote Settings.
- Click Edit and find the emotes you want to delete. Click on the little boxes to select.
- Click Delete to remove them from your channel.
How to Design Good Emotes?
Respecting general design requirements doesn’t prevent you from being creative. Emotes are the best path to establishing your signature aesthetics, so make sure to come up with an original design. You want your subscribers to be able to recognize your channel in any chat room or stream.
All users have different tastes, but a decent design has a few universal traits. If you’re new to this, you might want to stick to some ground rules at first. Here’s how to design good emotes on Twitch:
- Make sure your images and letters look good in all three available sizes.
- Use a simple design. Intricate patterns and detailed images probably won’t show on Twitch.
- Always use all the space available. That way all the lines will be crisp, and the image will have a better resolution.
- Choose colors that look well in both Light and Dark modes. The recommended setting is 1px of the #F1F1F1 color code.
- Use existing emotes for references to make yours more “memeable.”
- Transform your signature lines and inside jokes into emotes.
- Allow your subscribers to influence your stream through emotes. For example, change the color on the screen or add a sound effect.
Where to Find the Best Twitch Emotes?
In case you find all of this a bit overwhelming, you can always ask for help. In fact, you can even hire someone to make the emotes for you. There are several different platforms where you can reach out to potential designers.
Before you do that, think about what you want to incorporate into your emote. Even though you’re not the one doing the work, it should still be representative of your channel.
After you decide what you’re looking for, here’s where to find the best emotes:
There are also many illustrators on Twitch who specialize in emotes. Just scroll through the Art category and find the work that best suits your aesthetic.
Additional FAQs
1. How Many Emotes Can I Get?
There’s a limit to the number of emotes allowed on your channel. Each creator has a certain number of slots available depending on their status.
The key factors are the number of subscribers and your overall activity on Twitch. Members of the Partner program are granted two Tier 1 emotes right at the beginning. Affiliates are granted one slot for every tier. As your community grows, so does the number of slots.
Twitch also made some changes to the policy due to increased demand. As of recently, Partners can get not two but six Tier 1 emotes. Affiliates can unlock as many as five Tier 1 emotes and one additional emote for each subsequent subscription tier.
2. Who Can Get Custom Emotes on Twitch?
Unfortunately, not everyone can get custom Emotes on Twitch. In order to do that, you have to become an Affiliate. Here are the requirements for joining the program:
• You have to have a minimum of 50 subscribers.
• You must have a total of 500 minutes of streaming in the past 30 days.
• There has to be a minimum of 7 days of unique broadcasting in the last 30 days.
• The number of average concurrent viewers has to be at least 3.
Once you’re eligible, you can join the Affiliate program. To accept the invitation, complete the following steps:
1. Click to Get Started.
2. Go to Creator Dashboard > Preferences.
3. Fill in the register with the general information about your channel.
4. Agree to the Terms of Service.
5. Complete the tax interviews (both Royalty and Service Tax).
6. Choose a payment method.
Once you’re done, you’ll be able to create custom emotes according to design requirements and Community Guidelines.
3. What’s the Difference Between a Global and Channel Emote on Twitch?
Unlike custom emotes, global emotes are available for all users. You might recognize some of the more popular ones like “Kappa,” “SourPls,” and “ZreknarF.”
Channel emotes are unique to each creator. You unlock them by subscribing to their Twitch.tv channel.
If you want to browse your emote selection, just click on the little smiley face icon on your chatbox. You can also use auto-fill to open a list of recommended emotes. Just type in a semicolon in the chatbox.
Emote Control
Playing with Twitch emotes can be really fun. As long as you don’t violate the Community Guidelines and stick to the formatting rules, the sky’s the limit.
If you have trouble designing your channel emotes, you can hire a professional artist to do it. Even if you’re not allowed to create your own, you can always use global emotes.
Does your channel have custom emotes? Do you prefer making them yourself or having other people do it for you? Comment below and tell us which Twitch streamer do you think has the best emotes.


