28 Windows 11 shortcuts you should know and use often

28 new Windows 11 shortcuts in addition to familiar Win 11 shortcuts will help you work faster and more efficiently.
Turn off Windows 10 password so that every time you turn on the computer, it will automatically load the operating system, you just need to press the power button and go make a cup of coffee, come back everything is ready to work without having to waste time waiting for the password, not to mention the case you forget the Windows 10 password . Of course, we recommend that you only use this feature when working in a secure environment, because turning off the computer password will reduce security, others can peek at the data on the computer when you are absent.
How to disable Windows 10 password can also be applied in case you want to lend your computer to someone. In that case, create a child account or an account with limited access and disable the password entry feature for that account.
By default, you need a system password to log in to your Windows computer. The system will always ask you to set this password when it comes out of the box. There are also a number of second-factor login options, such as dynamic lock, Windows Hello PIN , picture password, or physical security key. Enabling automatic login for your Windows 10 device means eliminating all of these authentication steps, including the system password.
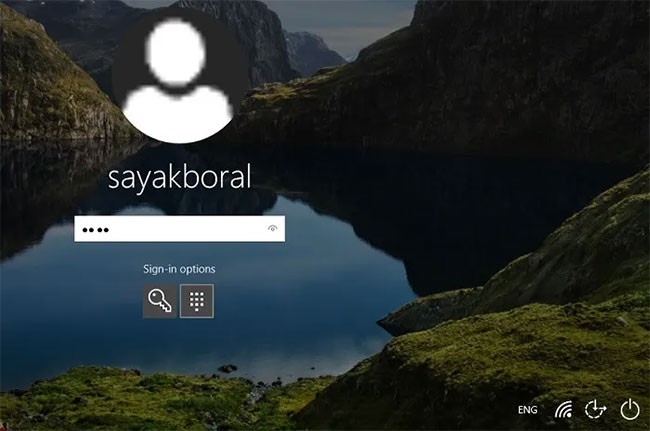
So why would you want to do this? Here are the top reasons to consider enabling automatic logon in Windows.
Reasons to enable automatic login
Avoid entering user passwords/PINs
Even though it's just a few keystrokes, constantly re-entering your password/PIN seems like a waste of time. If you're absolutely certain no one else will have access to your device, enabling automatic sign-in for Windows will save you time.
Furthermore, complex passwords and PINs are easy to forget. If that happens to you, you should have security questions handy, otherwise you won't be able to log in to your Windows device - and only a factory reset will get you back in. Not having to enter a password/PIN will reduce the chances of you being unable to log in to your own device.
Automatically restart PC after power loss
If you live in an area prone to unexpected power outages, enabling automatic login in Windows will quickly get you back into your specific user account, through a simple automatic reboot once power is restored.
Managing headless servers
Headless servers are computers without peripherals, such as a keyboard, mouse, and monitor. They sit on a rack and are managed by a central console via SSH , Telnet, or other network protocols. If you are a remote administrator, it is faster to configure Windows to automatically log in to such headless devices.
Enable secure automatic login without password using AutoLogon tool
For more secure automatic login to Windows 10, you can use the free AutoLogon for Windows tool. AutoLogon allows you to easily configure Windows' built-in automatic login mechanism. The login process can be managed by user account or by modifying the registry.
Instead of waiting for users to enter their username and password, Windows uses the credentials you enter using Autologon, which are encoded in the Registry, to automatically log in to the specified user. This is a useful feature if you want to force people to log in with a password but also want to make it easy to bypass it yourself. Few people know about this feature on Windows.
[!WARNING] Although the password is encrypted in the registry as an LSA secret, it can be easily retrieved and decrypted by a user with admin privileges.
Autologon is easy to use. Just run autologon.exe, fill in the dialog box, and click Enable. The next time the system boots, Windows will attempt to use the entered credentials to log the user in at the console. Note that Autologon does not verify the submitted credentials, nor does it verify that the specified user account is authorized to log in to the computer.
Note : When Exchange Activesync password restrictions are in place, Windows will not process the automatic logon configuration.
This utility is part of the Sysinternals system utilities package and is available for download on Microsoft's website. Autologon is also useful because previous methods of enabling autologon in Windows 10 may not work on computers joined to an Active Directory domain.
1. Download and run Autologon.exe (or autologon64.exe ) with admin rights;
2. Accept the terms of the license agreement.
3. Specify the user account, domain and password of the user you want to perform auto login and click the Enable button.
4. A window will appear indicating that automatic mode has been enabled.
Autologon successfully configured. The autologon password is encrypted.(Autologon has been configured successfully. The Autologon password is encrypted.)
The encrypted password is stored in LSA format in the registry key HKLM\SECURITY\Policy\Secrets. In this case, the password is not stored in clear text, but the encryption algorithm is not strong and any local computer administrator (except the user) can decrypt it.
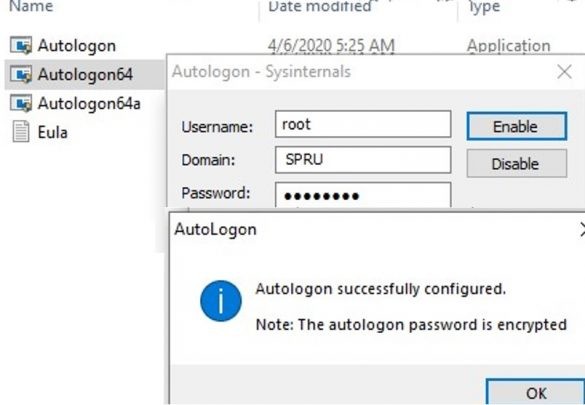
You can set a user's credentials to automatically log on to Windows using the Autologon command line options. To configure Windows Autologin for a user, you can use the following command:
autologon64.exe USER_NAME DOMAIN PASSWORD /accepteulaTo disable automatic login to Windows 10 without password, simply click on the Disable button.
To turn off Windows 10 password, do the following:
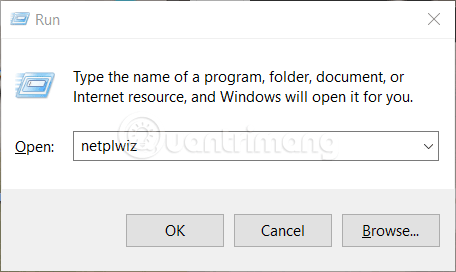
Step 1: Press the Windows + R key combination to open the Run command window . On the Run command window, type the command below and press Enter: netplwiz
Step 2: Now the user account settings configuration window appears on the screen. Here, select the user account for which you want to disable the password-free login feature. Then uncheck the Users must enter a user name and password to use this computer box . Follow these instructions if you do not see the Users must enter a user name and password to use this computer box here.
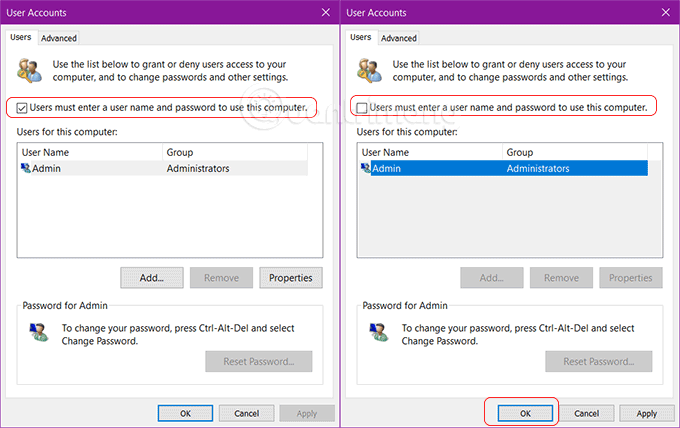
Step 3: After unchecking the option, click Apply . A new window will appear on the screen, where you enter the password and confirm the user password again. If the user account you want to set up automatic login is not displayed on the list, click the Add button to add the user account you want to the list.
This is to give you the ability to create a Local account and configure auto login for that account.
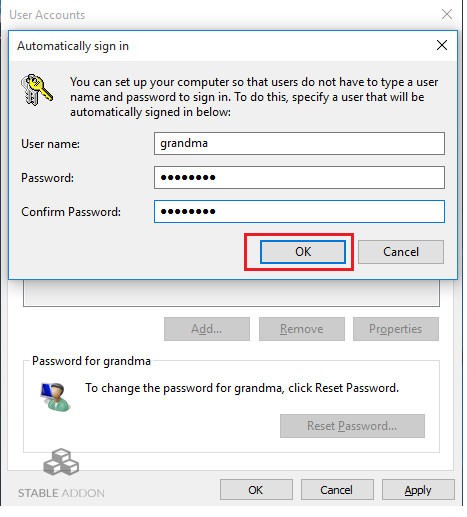
Finally enter and confirm the user password and click OK .
The next time you log in, the user account that you configured to automatically log in will not ask you to enter a password. If you want to go straight to the desktop after logging in instead of the lock screen, you can follow the instructions to turn off the Windows 10 lock screen .
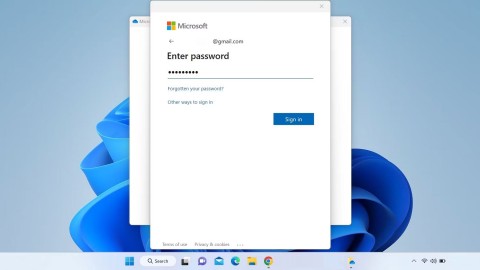
Alternatively, if you use a Microsoft account, you can remove the password completely, but you'll need to switch to a local account.
Warning : Removing the password from your account will leave your device vulnerable to local and remote unauthorized access.
To switch to a local account and remove the password, follow these steps:
2. Click Accounts.
3. Click Your info.
4. Click the Sign in with a local account instead link .
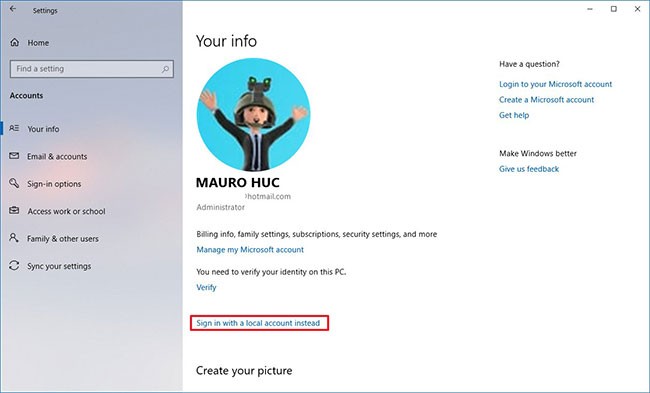
5. Enter current password.
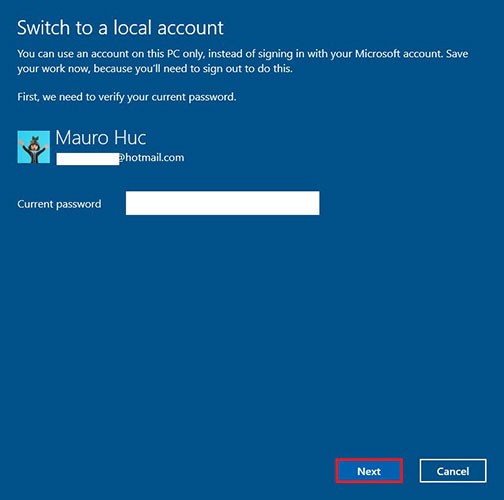
6. Click the Next button.
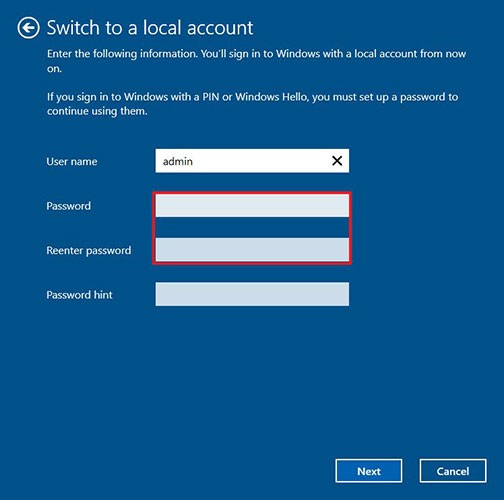
7. Create a username for the account.
8. Skip creating a password to completely remove the password.
9. Click the Next button.
10. Click the Sign out and finish button .
Once you complete the steps, your device will no longer be connected to your Microsoft account and it will automatically sign in every time you start your system.
To remove Windows 10 password, follow these steps:
1. Open Settings.
2. Click Accounts.
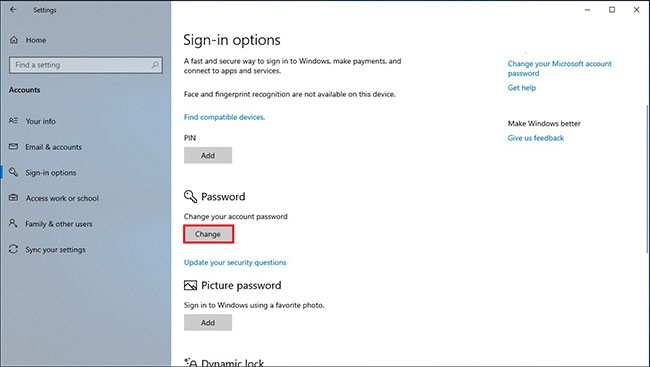
3. Click on the Sign-in option .
4. In the Password section, click the Change button.
5. Enter your current account password.
6. Click the Next button.
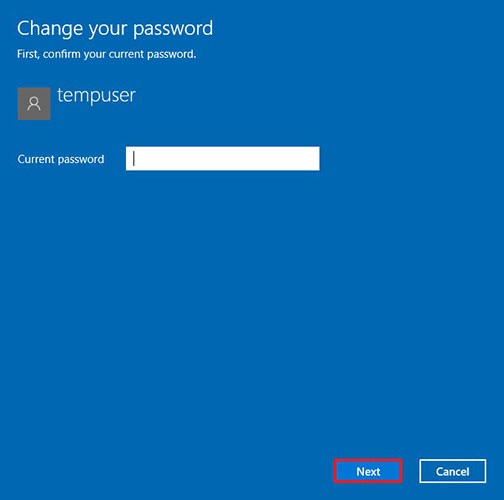
7. Skip creating a password to remove passwords completely.
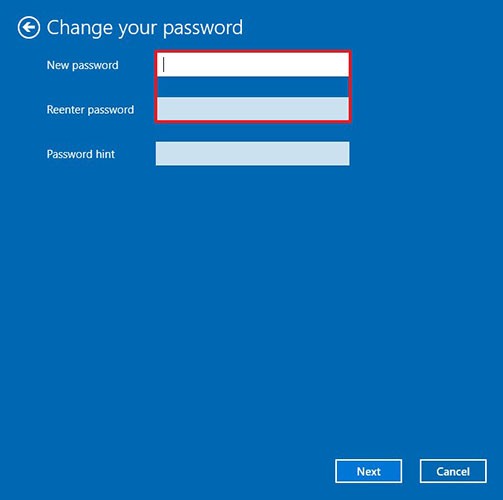
8. Click the Finish button.
Once you complete the steps, a password will no longer be required to access your Windows 10 computer. You can also remove a local account password in Windows 10 via Control Panel .
Of course, this is not secure, but there are still situations where the device may not need a password and the risk is minimal when there are no strangers around.
Let's look at a more common way to automatically sign in to Windows 10 without entering a password. This method allows you to enable password-free sign-in for your Microsoft account, domain account, or Windows 10 local account via Registry Editor.
Warning: This method of auto-login is less secure because your password will be stored in the Registry as plain text and can be viewed by any local user.
1. Press Win + R and type regedit .
2. Go to registry key:
HKEY_LOCAL_MACHINE\Software\Microsoft\Windows NT\CurrentVersion\Winlogon3. Change the value of the AutoAdminLogon registry parameter from 0 to 1 .
4. Create a new string parameter DefaultDomainName , specifying the domain name or local computer name as its value.
Tip: The computer name can be found in System Properties or using the hostname command .
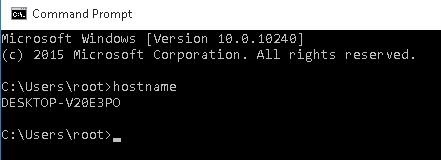
5. In the DefaultUserName parameter , you need to specify the user account name, which will be used to log in (replace it with another username or leave it unchanged);
6. Create a DefaultPassword string parameter where you must specify the password for the account in plain text.
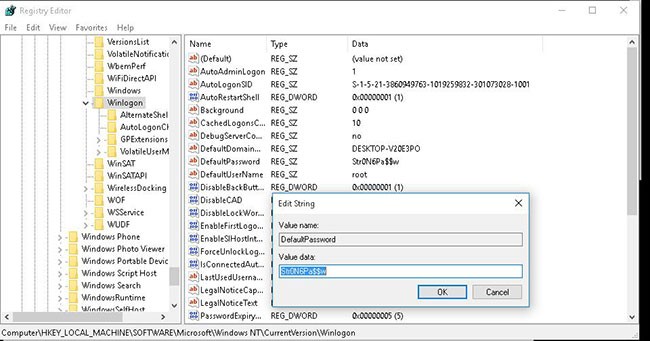
7. Close Registry Editor and restart your computer.
8. After Windows restarts, you will automatically log in with the specified account and will not need to enter a password on the login screen.
To enable autologon via Registry, you can use the following commands (replace root and P@ssword with your username and password, WORKGROUP should be replaced with the AD domain name if a domain account is used):
reg add "HKLM\SOFTWARE\Microsoft\Windows NT\CurrentVersion\Winlogon" /v AutoAdminLogon /t REG_SZ /d 1 /f
reg add "HKLM\SOFTWARE\Microsoft\Windows NT\CurrentVersion\Winlogon" /v DefaultUserName /t REG_SZ /d root /f
reg add "HKLM\SOFTWARE\Microsoft\Windows NT\CurrentVersion\Winlogon" /v DefaultPassword /t REG_SZ /d P@ssword /f
reg add "HKLM\SOFTWARE\Microsoft\Windows NT\CurrentVersion\Winlogon" /v ForceAutoLogon /t REG_SZ /d 1 /f
reg add "HKLM\SOFTWARE\Microsoft\Windows NT\CurrentVersion\Winlogon" /v DefaultDomainName /t REG_SZ /d WORKGROUP /f
reg add "HKLM\SOFTWARE\Microsoft\Windows NT\CurrentVersion\Winlogon" /v IgnoreShiftOvveride /t REG_SZ /d 1 /f
reg add "HKLM\SOFTWARE\Microsoft\Windows NT\CurrentVersion\Winlogon" /v AutoLogonCount /t REG_DWORD /d 1 /f
Alternatively, you can use a PowerShell script to save user credentials to the Registry:
$Username ='max'
$Pass = 'Max$uperP@ss'
$RegistryPath = 'HKLM:\SOFTWARE\Microsoft\Windows NT\CurrentVersion\Winlogon'
Set-ItemProperty $RegistryPath 'AutoAdminLogon' -Value "1" -Type String
Set-ItemProperty $RegistryPath 'DefaultUsername' -Value $Username -type String
Set-ItemProperty $RegistryPath 'DefaultPassword' -Value $Pass -type String
Restart-Computer
Automatic logon does not work if a logon banner policy is applied to the computer Computer Configuration > Policies > Windows Settings > Security Settings > Local Policies > Security Options > Interactive Logon : Message text for users attempting to log on .
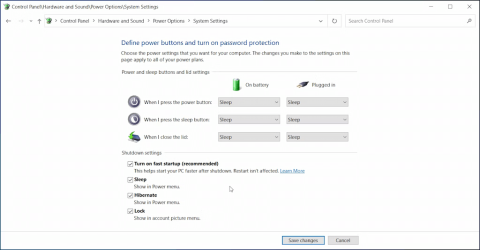
Using GPO, you can disable the password requirement when the computer wakes from sleep or hibernation .
Step 1 : To do this, run the gpedit.msc console (in major versions of Windows 10, you can run the Local Policy Editor console using the methods in this article).
Step 2 : Go to the policy section Computer Configuration > Administrative Templates > System > Power Management > Sleep Settings .
Step 3 : Turn off the GPO parameters “Require a password when a computer wakes (on battery)” and “Require a password when a computer wakes on battery (plugged in)”.
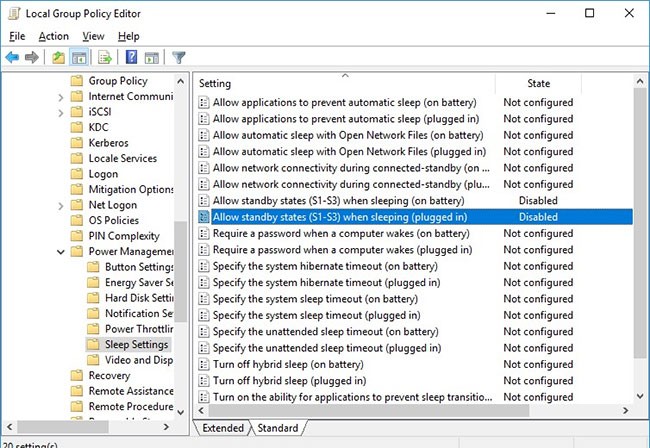
Step 4 : Now, Windows will not ask for password after resuming from sleep or hibernation.
See more articles below:
28 new Windows 11 shortcuts in addition to familiar Win 11 shortcuts will help you work faster and more efficiently.
How to restore the Sleep option on the Power Menu, please refer to the article below of WebTech360.
At the Qualcomm Snapdragon Summit on October 22, Microsoft announced a series of improvements coming to Windows PCs that will improve the overall experience for musicians, music producers, and other audio professionals.
Previously, Adobe Fresco only supported devices with touchscreens and styluses.
Do you see a red circle with a white cross to the left of your files, folders, or Windows drives? If so, it means OneDrive is out of sync and the folders affected by this issue are not syncing properly.
Turning off background applications on Windows 10 will help your computer run less sluggishly and save system resources. The following article by WebTech360 will guide readers on how to turn off background applications on Windows 10.
If you only use your mouse for common tasks, it is not necessary to enable mouse acceleration. Here are instructions for turning off mouse acceleration in Windows 11.
File Pilot is a lightweight, clean, and feature-rich file manager that outperforms the Windows default tool in every way.
In this series of articles we will introduce you to how to customize the default user profile in Windows 7.
Ransomware Protection is a useful feature that comes with Windows 11 to help secure users' devices against Ransomware attacks.
When your Windows PC has problems booting, Advanced Boot Options can help you figure out what's wrong.
Windows 10 is well supported. Software and hardware compatibility issues are rare. On the other hand, there have been major compatibility issues with Windows 11.
A quick and effective solution is to identify and delete large, space-consuming files that are hiding on your computer.
Like other Windows operating systems, Windows 11 still contains software and components that make the machine heavy.
If you want to review weather information, show the weather widget again on the Windows 10 Taskbar, follow the instructions below.
