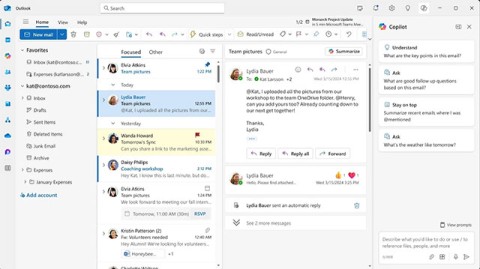
Microsoft will make the new Outlook mandatory to install on Windows 10
Microsoft is currently having difficulty converting users to new products and services.
What if your PC could handle the mundane tasks for you? With Windows PowerShell, it can. Here's how to use PowerShell to automate the repetitive, everyday tasks that no one wants to do over and over again.
Table of Contents
Microsoft PowerShell is a command-line utility and scripting language that is a powerful tool for administrators to automate a wide range of tasks for computers and networks. PowerShell contains components of the Command Prompt and is built on the .NET framework. If you are reading about WebTech360, you should know that PowerShell is the tool of choice for IT administrators to manage large networks.
Learning how to use PowerShell will simplify many tedious day-to-day tasks. You can also make system-wide changes over the network without having to individually configure each server. PowerShell is becoming an essential part of running hybrid cloud environments .
PowerShell has many different uses to help you work more efficiently and keep your network running efficiently. The most basic uses include: scheduling daily updates on systems, generating reports on current processes, periodic services, and more. While many of these tasks can be done through the GUI, the point of PowerShell is to do them faster.
If you have a routine maintenance task that takes a few minutes to set up, you can script the same functionality into a single command, named PowerShell. Then, the next time you open that script, it will run in the background. Mastering PowerShell scripting logic, understanding how objects, var (variables) work, and deploying it intelligently across your network will make you wonder why you didn’t use PowerShell sooner.
This tutorial will cover the basics of PowerShell, which will be helpful for those new to IT, especially if you are familiar with the Windows Command Prompt. It will cover how to use basic tools and commands, how to work with files and folders, understand objects, use variables, and manage remote servers.
After the release of Windows NT, CMD.EXE became the command line utility for Windows. Although CMD.EXE inherited some elements from its DOS predecessor (COMMAN.COM), it was still based on a rather “primitive” scripting language: using Windows Command files (.CMD and .BAT). The addition of Windows Scripting Host and the VBScript and JScript languages greatly enhanced the scripting capabilities of the utility.
These technologies are a fairly balanced mix of advanced command line utilities and scripting environments. The real concern is not how many CMD.EXE, .CMD, and Windows Scripting Host files can be manipulated with them. The main complaint and concern is getting some seemingly simple tasks done.
Using a “framework” of command-line and scripting tools, any moderately comprehensive script requires a combination of batch commands, Windows Scripting Host, and standalone executables. Each script uses different conventions for execution and requests, parsing, and returning data.
Poor variable support in CMD.EXE, inconsistent interfaces, and limited access to Windows settings, combined with another weakness, make command line scripting difficult to implement and use. What is this 'other weakness', you might ask? It's text. In these technologies, everything is text. The output of a command or script is text and must be parsed and reformatted to act as input for the next command. This is the basic starting point that PowerShell takes from all traditional shells.
The three concepts introduced in this section are just the very basics to understand the key concepts that form the foundation of PowerShell. You will need to spend more time learning and mastering the more advanced concepts as you approach PowerShell commands.
PowerShell is installed by default in Windows 10, Windows 7, Windows Server 2008 R2, and newer versions of Windows. Newer versions of PowerShell add new features and "cmdlets" (Microsoft's term for PowerShell commands - pronounced "command-lets") and are installed with the corresponding version of the Windows Management Framework (WMF).
Currently, WMF 5.1 is the latest recommended version. In some cases, some new features are dependent on the operating system in addition to the WMF version. For example, Windows 8 and Windows Server 2012 support the Test-NetConnection cmdlet, which allows you to test connectivity to a specific TCP/IP port , but this cmdlet is not available in Windows 7 even when running the latest version of WMF.
On most Windows systems, users will have two PowerShell environments available to them, the PowerShell console and the PowerShell ISE (Integrated Scripting Environment). The PowerShell console appears like a traditional command line, but with the full functionality of PowerShell behind it. Variable names, loops, command autocompletion, and piping are all available from the PowerShell console.
For more advanced use (such as scripting), PowerShell ISE provides command autocompletion, code highlighting, and Microsoft's Intellisense code completion to help you create and test PowerShell code. PowerShell ISE also allows you to work with multiple PowerShell scripts at the same time using tabbed navigation.
The foundation of PowerShell commands is the cmdlet. Microsoft took several design strategies when creating cmdlets in PowerShell.
First is the ability to easily infer cmdlet names, or at least make them more discoverable. PowerShell commands or cmdlets are also designed to be easier to use, with standardized syntax, making it easier to create scripts from the command line interface.
cmdlets use the Verb-Noun format, as in Get-Service, Stop-Service, or Import-Csv. The verb part of the cmdlet name indicates the action performed on the noun. Typically, cmdlets that are used to retrieve information will have the verb Get in their name, such as Get-Process or Get-Content . Commands used to modify something usually start with the verb Set , and commands used to add a new entity to something usually start with Add or New .
Second, parameters commonly used in PowerShell are also given standardized names. For example, the -ComputerName parameter allows the cmdlet to be executed on one or more remote computers. -Credential is used to provide an authentication object, containing user credentials, to run the command as a specific user.
You can use aliases for both cmdlets and parameters to save keystrokes and shorten the overall length of the command (useful when chaining multiple commands together). While these aliases don't always use standard naming conventions, they still reflect traditional command-line utilities.
In PowerShell, aliases such as DIR, CD, DEL, and CLS correspond to the Get-ChildItem, Set-Location, Remove-Item, and Clear-Host cmdlets, respectively. Parameter aliases can work in two ways: they can use a predefined alias provided by the cmdlet, or they can be aliased by entering enough characters to create a unique match between the cmdlet's supported parameters.
Most system administrators have to manipulate files and folders in the course of their work, whether it is moving a folder to another location on the server, archiving log files, or searching for large files. In cases where the same operations are repeated on many files, using PowerShell to automate them will be an effective time-saving solution.
To find files and folders, one of the first command line tools that an administrator would learn in the old days of computing was the dir command. Dir will list the files and folders contained in the specified directory.
PowerShell has a similar command in the form of the Get-ChildItem Cmdlet . Get-ChildItem allows you to quickly build a list of files in a directory in such a way that you can manipulate the files via a pipe command or assign the output to a variable.
Get-ChildItem can be used simply by providing a path, either through a pipeline, using the -Path parameter or directly after the cmdlet name. To modify the response returned by Get-ChildItem, it is necessary to consider some parameters made available by the cmdlet.
The -Filter parameter is one way you can search for files. By default, Get-ChildItem only returns direct children of the target directory. This functionality can be extended by using the -Recurse parameter , which recursively searches directories contained in the current directory.
In PowerShell 4.0 Get-ChildItem added the ability to limit results to files or directories using the –File or –Directory switch . Previous versions of PowerShell had to pass the results to Where-Object, filtering on the PSIsContainer property to make this determination. An example of both techniques used to return directories contained in C:Users is shown here:
Get-ChildItem C:Users -Directory Get-ChildItem C:Users | Where-Object {$_.PSIsContainer –eq $true}To detect hidden or system files, -Force must be used . Get-ChildItem in PowerShell 4.0 and later can also be used to return only hidden, read-only, or system files using -Hidden, -ReadOnly , and –System respectively. Similar functionality could be achieved in previous versions by filtering the Mode property using Where-Object:
Get-ChildItem C:Users | Where-Object {$_.Mode -like '*R*'}Check if file exists
Normally when working with files, all we need to know is whether the file exists or whether the directory path is valid. PowerShell provides a cmdlet to do this in the form of Test-Path, which returns a value of true or false.
Test-Path is used as a precautionary step before attempting to copy or delete a specific file.
Copy, move and delete files
Copy-Item: Copies one or more files or directories from a location, specified by the -Path parameter, to the location specified by the -Destination option.
Move-Item: Move a file or folder.
When a directory structure is being copied or moved, -Recurse should be used to have the cmdlet perform the action on the directory and its contents. In some cases, -Force is also required , such as when a read-only file is overwritten by a copy operation.
Remove-Item: Delete file, folder.
Switch -Force should be used when encountering a read-only file and -Recurse should be used when deleting a directory and its contents.
Using PowerShell -WhatIf and -Confirm
Before performing a serious, mass deletion, use -WhatIf . -WhatIf allows you to see what would happen if you ran a script or command, and whether it would have any potential negative impact by deleting important business data. It's also worth noting that -WhatIf isn't limited to file operations, it's widely used in PowerShell.
For scripts that you intend to run manually or worse, have dependent commands that run manually, consider using -Confirm . This allows you to require user interaction before the operation actually takes place.
PowerShell Scripts = Batch Files on Steroids
PowerShell itself is written in the .NET language and is heavily based on the .NET Framework. As such, PowerShell is designed as an object-oriented shell and scripting language. Everything in PowerShell is treated as an object with the full capabilities of the .NET Framework. A command exposes a collection of objects that can be used using the properties and methods of that object type. When you want to pipe the output of one command to another, PowerShell actually passes the object through, not just the text output of the first command. This gives the next command full access to all the properties and methods of the object in the pipeline.
Treating everything as an object and being able to accept objects between commands is a big change in the theory of command-line utilities. That said, PowerShell still works like a traditional shell. Commands, scripts, and executables can be typed and run from the command line, and the results are displayed as text. Windows .CMD and .BAT files, VBScripts, JScripts, and the executables that run inside CMD.EXE all still run in PowerShell. However, because they are not object-oriented, they do not have full access to the objects created and used in PowerShell. These legacy scripts and executables will still treat everything as text, but you can combine PowerShell with a number of other technologies. This is especially important if you want to start using PowerShell with a collection of existing scripts that you can't convert all at once.
Cmdlets can accept parameters to change their behavior. When running a Cmdlet or function, you can provide parameter values to specify what, when, where, and how each PowerShell command runs.
For example, Get-Process will retrieve and list all running processes in your operating system:

But what if you just want to get a specific process? You can do that using parameters. For example, to get all Slack processes, you can use the Name parameter with the Get-Process Cmdlet:
Get-Process -Name SlackThen you will only see processes named "slack":

Tip : Some parameters are "positional" meaning their names are optional. In this case, Get-Process -Name Slack and Get-Process Slack both perform the same task.
Each Cmdlet will accept different types of parameters. Use the Get-Help command to see the accepted parameters of the Cmdlet in the SYNTAX section.
Get-Help Get-ProcessYou will see a list of all possible ways you can run the given Cmdlet:

In this case, the Get-Process Cmdlet accepts parameters like Name, Id, ComputerName, Module, FileVersionInfo , and other common parameters. The symbols here mean:
|
Symbol |
Name |
Meaning |
|---|---|---|
|
Drum |
Parameter does not accept input |
|
|
- |
Hyphen |
Specify the parameter name |
|
<> |
curly brackets |
Placeholder for text |
|
[] |
Parentheses |
The parameter can accept one or more values. |
|
{} |
curly brackets |
The parameter accepts a set of values. |
Parameters accept a set of values that will indicate the type of data they require, such as string, integer, boolean, or DateTime. For example, the following command:
Get-Process [[-Name] ]... means that the Name parameter accepts one or more string values, whereas this command:
Get-Process -Id ... means that the Id parameter accepts one or more integer values.
The previous Get-Process example used the Name parameter to narrow down the results. However, if you want to narrow it down to a more specific process, you can use the ID parameter , which requires an integer as stated in its syntax.
Get-Process -Id 3016Then you will see only one process in the list:

PowerShell processes all data as objects. To build a script, these objects are run through a series of Cmdlets or functions connected using the pipe symbol (|). Choosing the right Cmdlets and connecting them in a logical sequence using a pipeline is important for an efficient script.
Suppose you are creating a script to sort and display the 5 files that take up the most space in a directory. There are more powerful ways to write a file sorting script, but this simple one is easy to understand:
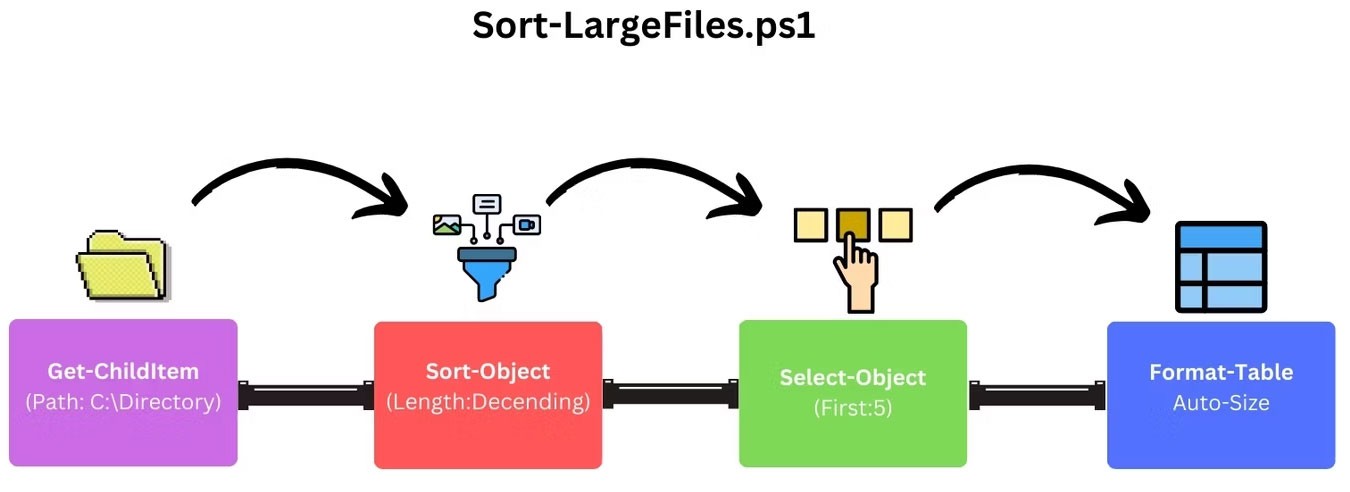
To do this in PowerShell, use a pipeline that looks like this:
Get-ChildItem -Path "C:\Directory" -File | Sort-Object Length -Descending `
| Select-Object -First 5 | Format-Table Name, Length -AutoSizeNow that we have a working pipeline, you can save it as a PS1 script file so you don't have to import it every time you use it.
The simplest way to create a PS1 file is to paste your script into Notepad and save the file with a .ps1 extension.

Once you have created the PS1 file, you can use it in PowerShell by running ./ScriptName.ps1 :

Tip : If you get a permissions error, the quickest solution is to run PowerShell with admin rights when running your script.
Congratulations! You can now create PowerShell PS1 scripts.
Reading about and understanding the awesomeness of new technology is one thing, but actually using it is another! In the rest of this article, we will develop a PowerShell script to demonstrate its capabilities and how to use it.
DIR is one of the most common commands in CMD.EXE . This command displays all the files and subdirectories contained within a parent directory (as shown in Figure 1). Along with the name of each object, the information provided includes the last update date and time and the size of each file. DIR also displays the combined size of all the files in the directory, as well as the total number of files and subdirectories.
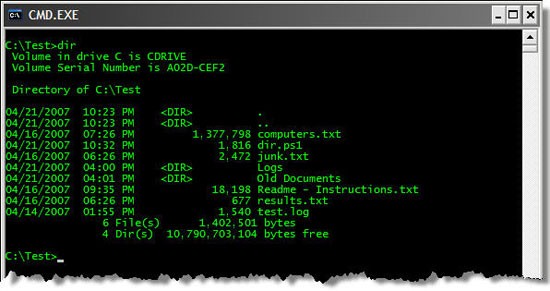
Figure 1
Running DIR in PowerShell also produces a directory listing like Figure 2, but in a slightly different way. PowerShell does not have a DIR command, but instead has Get-ChildItem, which performs the same function. In PowerShell, DIR is an alias for Get-ChildItem. I don't intend to go into aliases in this article. You can think of DIR in PowerShell as an abbreviation for Get-ChildItem.
DIR in PowerShell provides much of the same information as mentioned above: a list of files and folders, the date and time they were last modified, and the size of each file. However, it lacks the summary information that DIR in CMD.EXE provides: the total size of all files in the folder, the total number of files, and the total number of subfolders.
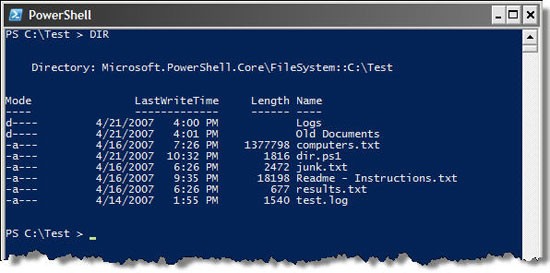
Figure 2
For the example scenario, you will need to create a PowerShell script that simulates the CMD.EXE DIR command. Below I will explain the most essential parts of a script.
DIR.PS1: Header
A PowerShell script consists of PowerShell commands in a plain text file with the extension .PS1. Instead of DIR, you would use a text file called DIR.PS1.
To run the script, type the following command in the PowerShell screen:
.DIR.PS1 X:FolderWhere X is the drive partition letter (like C, D, E) and Folder is the folder name.
If you want to know some information about a drive’s partition, you’ll need to use Windows Management Instrumentation (WMI). The details of WMI are beyond the scope of this article, so we won’t go into them here. But the PowerShell code below is easy enough to understand without using WMI. You can create a “$filter” variable to use with the Get-WmiObject command. This filter tells the Get-WmiObject command that you only want information about a specific drive. The results of the Get-WmiObject command are stored in a variable called $volInfo. Remember, in PowerShell everything is an object; $volInfo is now an object returned by Get-WmiObject.
$filter = "DeviceID = '" + $drive + ":'"
$volInfo = Get-WmiObject -Class Win32_LogicalDisk -Filter $filter
Now you have access to all the objects and methods associated with the object. The volume serial number is accessible through the VolumeSerialNumber property. The returned number is an 8-character string. But often you want to format it as four numbers, separated by a hyphen. can be done similarly as in the following line. The hyphen at the end of the first line is the line continuation character in PowerShell. It basically tells PowerShell that the line does not break and that it includes the next line. Line breaks are not required when writing code, but to reduce the width and make the code more readable, you should do so.
$serial = $volInfo.VolumeSerialNumber.SubString(0, 4) + "-" + `
$volInfo.VolumeSerialNumber.SubString(4, 4)
Now that you have a $volInfo object, you can write the DIR header information to the screen. If the drive has no name, the text written to the screen will be slightly different than if the drive has a name. A simple If-Else statement is used to check if the VolumeName property is an empty string. The Write-Host statement is used to write each line of text to the screen.
If ($volInfo.VolumeName -eq "") { Write-Host (" Volume in drive " + $drive + " has no label") } Else { Write-Host (" Volume in drive " + $drive + " is " + $volInfo.VolumeName) } Write-Host (" Volume Serial Number is " + $serial) Write-Host ("`n Directory of " + $args[0] + "`n")The “ `n ” character at the beginning and end of the Write-Host command is used to insert a new line before and after the text. The Write-Host command adds a new line at the end of each line. So the effect of “ `n ” is to create a blank line before and after the text.
Did you notice the “-eq” in the If command? It is an equality comparison operator. The table below shows you all the comparison operators:
| -eq, -ieq | Compare by |
| -ne, -ine | Comparison is not equal |
| -gt, -igt | Compare greater than |
| -ge, -ige | Compare greater than or equal to |
| -lt, -ilt | Compare smaller than |
| -le, -ile | Compare less than or equal to |
The -i character before comparison operators indicates that the operator is case-insensitive.

Figure 3: Output data of the script you currently have
DIR.PS1: List of files/folders
Now, you are ready to display the contents and properties of this folder. The first thing to do is to call the PowerShell Get-ChildItem command to get a collection of files and pass it to the script as a parameter. The Get-ChildItem command will get a collection of file and folder objects, not just their names, but will also pipe these objects directly into the Sort-Object command to sort them. By default, the Sort-Object command will sort objects based on the Name property. So you do not need to specify any other parameters. The sorted collection of objects will then be stored in a variable named $items.
$items = Get-ChildItem $args[0] | Sort-ObjectOnce you have a collection of file and folder objects, you need to loop through them and display the appropriate properties. The command for this is ForEach. For each file or folder, the properties displayed will be the last modified date and time, name, length, or size of the file. The strange looking strings inside the parentheses are .NET string format codes. They are used to left/right align fields and format dates, times, and numbers. Understanding these string format codes is not very important, as they are not essential to the nature of this script.
The If statement is where you determine whether an object is a directory or not. If the first character of the Mode attribute is “d,” the object is a directory. You need to double check because the code for directories is often different than the code for files.
Notice the $totalDirs++ line inside the If statement. This is a counter responsible for keeping track of the number of directories. Similarly, there is a $totalFiles variable that is used to keep track of the total size of all the files. These values are always calculated during execution. But they are only displayed when the file listing process is finished.
ForEach ($i In $items)
{
$date = "{0, -20:MM/dd/yyyy hh:mm tt}" -f $i.LastWriteTime
$file = $i.Name
If ($i.Mode.SubString(0, 1) -eq "d")
{
$totalDirs++
$list = $date + " {0, -15}" -f "
" + " " + $file
}
Else
{
$totalFiles++
$size = "{0, 18:N0}" -f $i.Length
$list = $date + $size + " " + $file
}
$totalSize += $i.Length
Write-Host $list
}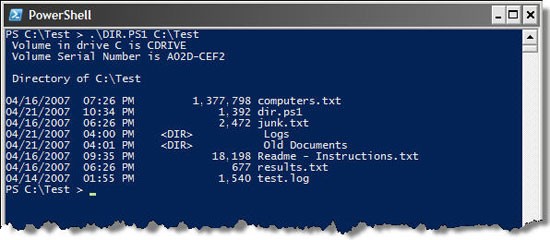
Figure 4: Displays the output data of the updated script.
DIR.PS1: Footer
The only thing left to do is to write to the screen the total number of files, directories, the total size of all files and the free space on this drive partition. To do this you will need to use the counter variables ($totalFiles, $totalDirs, $totalSize) created in the previous section. You can find out the amount of free space from the $volInfo variable created at the beginning of the script.
Write-Host ("{0, 16:N0}" -f $totalFiles + " File(s)" + `
"{0, 15:N0}" -f $totalSize + " bytes")
Write-Host ("{0, 16:N0}" -f $totalDirs + " Dir(s)" + `
"{0, 16:N0}" -f $volInfo.FreeSpace + " bytes free`n")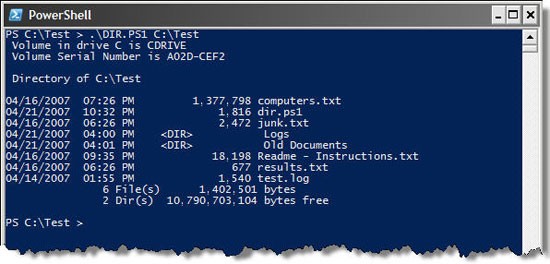
Figure 5: Displays the complete output data of the script.
Forecasts and enhancements can be
Although the script you create produces nearly identical output to the CMD.EXE DIR command, there are some caveats you should be aware of and some enhancements that can be made.
You can use PowerShell to automate almost anything, like batch renaming files for consistency or automatically launching applications. Let's write a few simple Windows PowerShell scripts to see how it works.
Note : If you encounter an error when executing the script regarding execution policy, you may need to temporarily allow the script to execute by running "Set-ExecutionPolicy -Scope Process -ExecutionPolicy Bypass"
Batch rename files in a folder
You can use PowerShell to copy, move, and delete files on your PC. You can also rename files of a specific file type in bulk. For example, here's how you can rename multiple text files by replacing the prefix "oldco" with "newco" in their file names:
Get-ChildItem -Path "C:\CompanyFiles" -Filter "*.txt" | Rename-Item -NewName {$_.Name -replace "oldco","newco"}In the above script, ".txt" is the file extension filter. You can modify it and set it to .jpg, .docx, etc to search for different types of files.
Auto launch application
If you open the same set of applications every day, you can write a PowerShell script to launch them with a single click:
#Open multiple apps with a single click
Start-Process "notepad.exe"
Start-Process "calc.exe"
Start-Process "Chrome.exe"
Start-Process "slack.exe"
Paste the script into a Notepad file and save it as LaunchFavoriteApps.ps1. Then, just double-click the file to launch all the apps listed in the script.
Copy important files to a backup location
You can periodically backup important files to a backup location using the following script. Be sure to change the source and destination paths as needed:
#Copy MyFiles folder contents to MyFilesBackup in D:\
Copy-Item -Path "C:\Documents\MyFiles" -Destination "D:\MyFilesBackup" -RecurseSince many types of files are downloaded every day, the Downloads folder can quickly become cluttered with all sorts of files scattered around. To fix this, we can write a PowerShell script that sorts downloaded files into folders by file type at the end of each day.
Open a new Notepad file and paste the following script. Make sure to change the source folder path in the script to match the Downloads folder path:
# Change the source folder path below
$sourcePath = "E:\Downloads"
# Add file mapping folder names; the Others folder includes all the files that do not match file types in the other categories
$fileTypes = @{
"Documents" = @("*.docx", "*.pdf", "*.txt")
"Images" = @("*.jpg", "*.png", "*.gif")
"Media" = @("*.mp4", "*.mp3", "*.mov")
"Zip" = @("*.zip", "*.rar")
"ISO" = @("*.iso")
"Others" = @("*")
}
# Iterate through each folder type and prepare a destination folder for organizing files
foreach ($folder in $fileTypes.Keys) {
# Create the destination folder path
$destPath = Join-Path -Path $sourcePath -ChildPath $folder
# Check if the destination folder exists, and create it if it doesn't
if (!(Test-Path -Path $destPath)) {
New-Item -ItemType Directory -Path $destPath | Out-Null
}
# Move matching files from the source folder to the destination folder based on file type patterns
foreach ($pattern in $fileTypes[$folder]) {
Get-ChildItem -Path $sourcePath -Filter $pattern -File -ErrorAction SilentlyContinue | ForEach-Object {
try {
Move-Item -Path $_.FullName -Destination $destPath -Force -ErrorAction Stop
Write-Output "Moved: $($_.FullName) to $destPath"
} catch {
Write-Warning "Failed to move file: $($_.FullName). Error: $_"
}
}
}
}
Write-Output "Files organized successfully!"
To save the file, click File > Save As and enter OrganizeDownloadsFolder.ps1 as the file name. Then, click Save as Type and select All Files . Double-click the OrganizeDownloadsFolder.ps1 file to run the script.
Of course, writing a script is one part of the automation process. The second part is making sure the script can be automatically executed to perform the task. To do this, we can create scheduled tasks to run the script daily or as needed.
Open PowerShell, then copy and paste the following script and press Enter . Make sure to replace 'J:\OrganizeDownloadsFolder.ps1' with the full file path to your OrganizeDownloadsFolder.ps1 script.
$action = New-ScheduledTaskAction -Execute "PowerShell.exe" -Argument "-File 'J:\OrganizeDownloadsFolder.ps1'"
$trigger = New-ScheduledTaskTrigger -Daily -At "5:00 PM"
Register-ScheduledTask -Action $action -Trigger $trigger -TaskName "OrganizeDownloadsFolderDaily"
Once done, press Enter . The script will create a scheduled task in Task Scheduler to run the file organization script every day at 5:00 PM. If you prefer a different time, you can modify it in the above script.
Additionally, you can use PowerShell to automate other everyday tasks, such as a space monitoring script that alerts you when you run out of free space on your primary drive, password-protecting batches of PDF documents, and even applying live wallpapers from your images folder.
Although PowerShell is a powerful utility and scripting language, it takes a little time to grasp and use it, especially if you are not familiar with the .NET Framework environment. I hope this article and the example script will be useful for anyone who wants to understand PowerShell. But the example script created in the article is quite simple. I believe it can be built and developed more completely to serve more complex applications.
Microsoft is currently having difficulty converting users to new products and services.
We all have repetitive tasks we want to automate on our PCs. Luckily, there are plenty of third-party Windows apps that can take the load off your shoulders and help you use your time more efficiently.
The Edge browser has a rather annoying feature that opens Office documents immediately instead of downloading them to your device for later viewing. Here's how to disable the Office file viewer on Edge.
If you want to send fake emails to prank your friends and family, there are a number of online services worth exploring.
With the ease of access to streaming platforms, it's no surprise that you can now watch Live TV.
Even the smallest makeup habits can unintentionally age you. This article will reveal the most common makeup mistakes that can age you without you even realizing it.
Below are some fun riddles about human body parts such as hands, feet, eyes, mouth... extremely interesting, please refer to them to quiz children, relatives or friends and have fun relaxing moments.
A series of reward chests, currencies, items and attractive gifts are waiting for you in the latest CMN Tay Du Truyen Ky game code.
In the process of processing and entering Excel data tables, there will be data that you need to convert from numbers to words. To do this quickly, instead of having to type manually, you can use some tools in the article below.
Instagram now lets you create your own Instagram message stickers from photos or videos already in your phone's album.
With iCloud Photos, you can view your entire photo library from any device. But you need to download photos from iCloud if you want to edit or do anything else. There are several ways to download photos from iCloud to devices like iPhone, Mac, and even Windows PC.
iPhone lists the full battery usage of applications, helping you know which applications use a lot of battery on your iPhone.
How to calculate the diagonal of a rhombus? Please find the calculation method and examples below to understand the formula for calculating the diagonal of a rhombus.
Kill Monsters to Save Princess, one of the longest named games in Roblox or shortened to Save Your Princess.
The latest Go Back to the West code will come with attractive items for you to exchange for rewards.
Download Blockman Go on PC to entertain you when your phone capacity is limited and the battery is low while playing.
Your PC ran into a problem and needs to restart and won't start? Here's how to fix it!
