Home
» Wiki
»
Instructions on how to prepare E-Learning lessons using iSpring Suite software
Instructions on how to prepare E-Learning lessons using iSpring Suite software
How can teachers prepare E-learning lessons using iSpring Suite software? The following article will introduce and guide you to use iSpring software from A - Z
1. Why use iSpring Suite to compose E-learning lessons
iSpring Suite is software compatible with Microsoft PowerPoint versions to help teachers prepare professional E-learning lessons according to international standards. Here are some reasons you should use this software to prepare for every hour of class:
iSpring is the most used software to help teachers create E-Learning lessons in the world. This is one of the specialized software for preparing lectures with many upgraded versions. The latest version is the iSpring Suite 9 version released in April 2018 which is widely applied and downloaded by many people for teaching and presentations.
The version of iSpring Suite 9 released in April 2018 is applied and downloaded by many people
The software is automatically integrated with MS Powerpoint after installation: You just need to download iSpring and install, immediately this software will be automatically integrated into Powerpoint on your computer. When entering Powerpoint, you will see a new icon on the toolbar with the name "iSpring Suit" with many useful tools for editing.
Help create more vivid and attractive lectures with many features: When using this software in combination with MS Powerpoint, you will create lectures that are not only ordinary slides but also games. , multiple choice exercises, synchronized video, audio, etc.
In addition, iSpring also has many other outstanding advantages such as low price, easy-to-use interface that helps teachers save time to learn and use. Thus, in order to improve each of their lectures, this is one of the effective and necessary tools to help teachers build their electronic lessons.
2. Instructions for downloading and installing iSpring Suite software
Currently the latest version of iSpring is iSpring Suite 9. So you can choose to download this version to use the latest utilities of the software.
Note when downloading iSpring you need to ensure the minimum configuration of your computer is:
Central processing unit (CPU): Quad-Core or higher 2.0 GHz or faster recommended
Random Access Memory (RAM): 4 GB
Hard Disk: 2 GB for installation
Operating System: Windows 7/8/10
Microsoft PowerPoint 2007/2010/2013/2016 (iSpring Suite 9 does not support Windows XP and PowerPoint 2003)
Once the download is complete, you can proceed with the installation of iSpring Suite similar to other programs as follows:
Step 1: Select the downloaded file to start the program installation process.
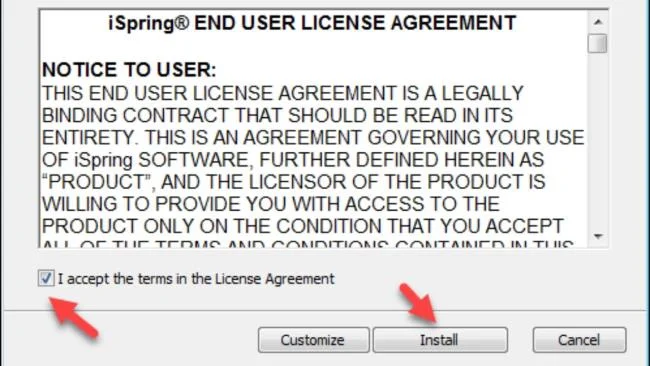
Step 2: Select I accept the terms in the License Agreement => select Install
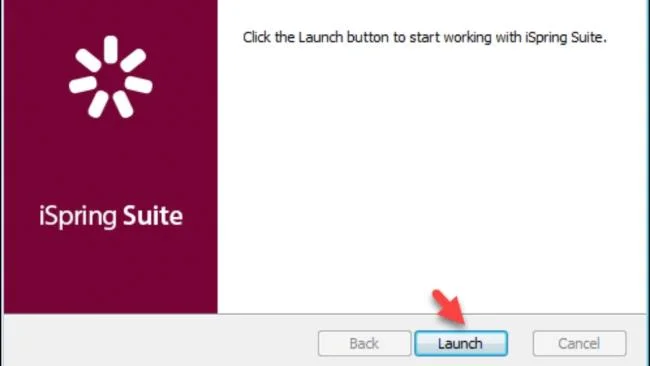
Step 3: Select Launch.
Step 2: Select I accept the terms in the License Agreement => select InstallStep 3: Select Launch to install the program
Note: Before installing you need to close the PowerPoint program
3. Main functions when composing with iSpring
Below are the main functions of iSpring, which teachers need to understand before composing electronic lectures with this software.
Function
Uses
Create quiz
(Insert the quiz into the online lecture)
Insert an existing quiz or create a new one right on the interface
There are many suggested multiple-choice templates available (up to 11 types of multiple-choice questions and 12 types of survey questions such as true/false questions, fill-in-the-blank, multiple-answer questions, ..)
If integrated with online websites after students complete the test, the program will grade and display the scores of the testers, send the results to the server or email the teacher.
Insert Flash, Insert Youtube
Insert existing Flash files
Insert a video directly from Youtube.com into a PowerPoint slide by copying the URL of the clip on youtube.com and pasting it in.
Sound recording, video recording
Allows recording or video recording of teachers giving lectures by webcam and automatically attaching to slides to help lessons
Lecture management
Manage the lecture to match the effects on the slide and the whole lecture.
Set up instructor information
Fully updated information about lecturers: name, photo, title, phone, email, website, ..
4. Detailed instructions on how to create an electronic lecture using iSpring Suite
Here's how to create a detailed lesson, teachers can refer to to be most effective when composing an electronic lecture with iSpring:
Step 1: Compose a lecture using PowerPoint
To start a lecture, open PowerPoint and make a lecture on this software as usual. Or turn on iSpring Suite, select Course => select New Courses, the interface will appear when you create a new presentation on PowerPoint with integrated iSpring tools.
Then you create simple slides first then move on to step 2
Depending on the content of the lecture, you can choose the appropriate tools to use when you need to clarify the content in the lesson. To make lectures richer and more attractive to learners. Here are some tools you can use:
Tools
How to create
iSpring QuizMaker: create surveys or quizzes
To create a quiz, follow these steps:
Select the slide to insert, on the Powerpoint toolbar, select iSpring Suite => select Quiz Qui
When the iSpring QuizMaker program window appears, open the file containing the survey or quiz to be inserted in the Recent Quiz section (if it is already available)
Or you can create quizzes on iSpring directly in the Serve . section
When you have finished uploading/creating, select Save and Return to Course to finish
iSpring TalkMaster: create an interactive conversation simulation (allowing the user to select questions and give interactive answers)
To create an interactive conversation, teachers follow these steps:
Select the slide you want to insert, on the Powerpoint toolbar, select iSpring Suite => select Dialog Simulation
The iSpring TalkMaster window appears, choose to open the file containing the conversation to be inserted or select New Sense to create directly on iSpring
Enter the content of the interactive exercise and align it for easy viewing
Select Save and Return to Course
iSpring Visual: create interactive e-Learning templates arranged in graph structures
To create an interactive survey with students, teachers can use iSpring Visual by following these steps:
Select the slide to insert, on the Powerpoint toolbar, select iSpring Suite => select Interation
When the iSpring Visuals window appears => select New Interaction => select the appropriate exercise type => select Create Interaction.
Enter the content of the interactive exercise and align it for easy viewing
Select Save and Return to Course
Create and insert screen recording videos (insert video recordings of teachers' lectures into the lecture)
To create a video recording or screen recording, teachers follow these steps:
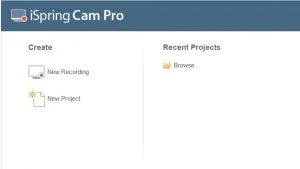
Select iSpring Suite 9 => select Screen Recording.
On the iSpring Cam Pro window that appears => select New Recording
When the Recording Settings dialog box appears, you can choose from a number of recording types below
Screen: Record only the screen.
Camera: Record images via webcam.
Screen and Camera: Record screen and video through webcam.
Click the Start a new recording button to start recording the screen.
Press the F10 key => iSpring Cam Pro window appears.
Go to Home => select Save and Return to Course and you're done.
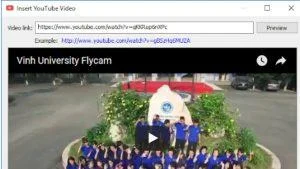
Insert videos on YouTube
To insert a YouTube video, teachers follow these steps:
Select the slide to insert
On the toolbar of iSpring Suite 9, select the Youtube button => appear the Insert Youtube Video window
Get the link of the video you want to insert paste the link into the Video link section and select the start time in the Show after … seconds . section
Select the OK button to finish
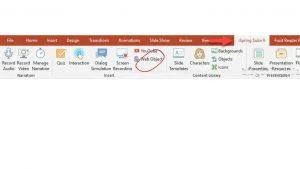
Wed Object
(Insert into the lecture website links to examples, examples, ...)
To insert a web page from an address, teachers perform the following steps:
Select the slide to insert
On the toolbar of iSpring Suite 9, select the Web Object button => the Insert Web Object window appears
Get the link of the website you want to insert and paste the link into the Web address field and select the start time in the Show after … seconds . field
Select the OK button to finish
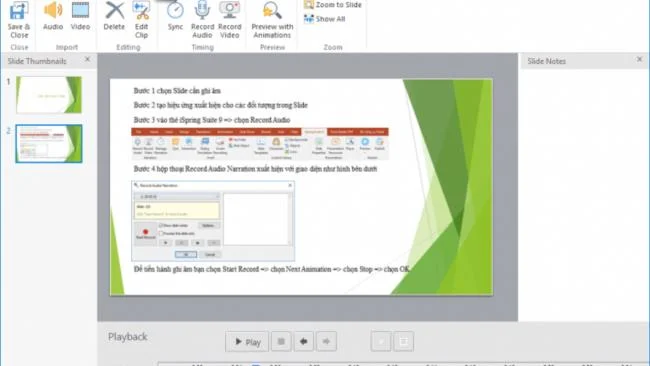
Step 3: Record/record and sync
This is one of the useful features of iSpring that helps teachers to record lectures/videos during lectures and synchronize data with effects on slides. The steps for recording/recording are as follows:
Select the slide to record / record => Create effects to appear for objects in the slide.
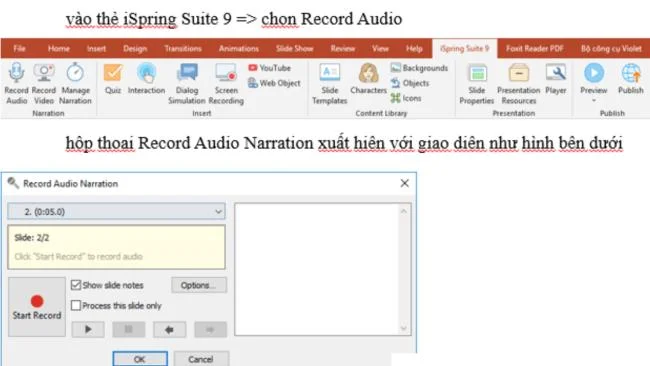
Go to the iSpring Suite 9 tab => select Record Video (if you want to record), select Record Audio (if you want to record)
When selecting Record Video => Record Video Narration dialog box will appear, select Start Record => select Next Animation => select OK
When selecting Record Audio => Record Audio Narration dialog box will appear, select Start Record => select Next Animation => select OK
Record lectures on iSpring Suite
Note: When you select Next Animation, the effect will appear and you will also start teaching. After finishing the lecture, click Next Animation, the next effect in the slide will appear and you will continue to teach, and so on until the end.
The number of clicks Next Animation is also the number of effects that you have set up in the slide
To check and listen to your recording, go to iSpring Suite 9 => select Preview => select Preview Selected Slides.
Lecture management / synchronization: After inserting the lecture recording into the slide, you can: insert, delete, edit and synchronize audio; insert, delete, edit and sync videos; Recording; recording… using the Manager Narration feature with tool buttons:
Manage/synchronize lectures
Audio: Insert audio
Delete: Delete
Edit Clip: Edit
Sync: Sync
Record Audio: Record Audio
Record Video: Record Video
Manager Narration: Preview with effects
Zoom to Slide: Zoom in on slide
Show All: Show all
Step 4: Add teacher and school information
You can add information about teachers, lecturers, and schools in the lesson by:
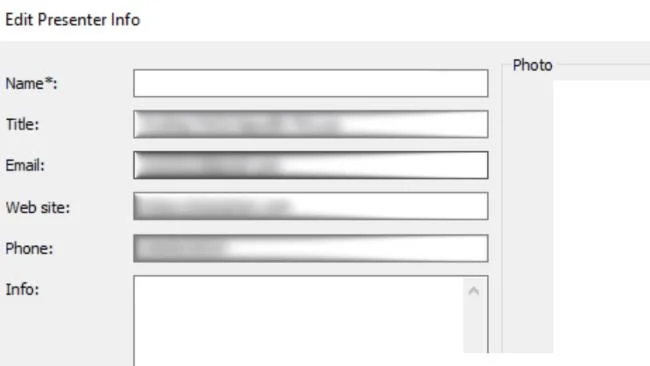
Select Presentation Resources => Presenters => select “Add” will appear the Edit Presenter Info dialog box
Enter your full information such as Name, Title, Email, Wed site, Phone, Info => Select OK to finish
Enter your full information such as Name, Title, Email, Wed site, Phone, Info
Step 5: Set properties for the slide
This is the step to help you set up the structure of the slides in the lecture, hide the slides, adjust the duration of the slides, etc. Teachers can follow these steps:
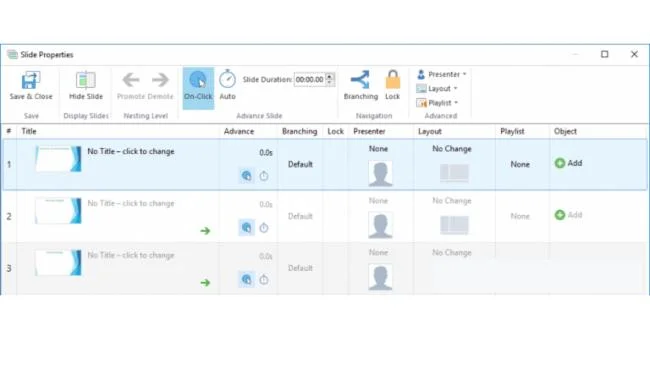
Step 1: You go to iSpring Suite 9 => select Slide Properties
Step 2: The Slide Properties window appears with the interface as shown below
Slide Properties window
With the corresponding function
The “Title” tag helps you change the title of the slide
The "Advance" tab helps you to set up the slide transition feature: with 2 modes On-Click (switch to the next slide manually) or Auto (automatically switch slides) or you can choose both.
The “Lock” tab allows you to lock the slide, and when the slide is locked, you cannot drag the previous bar to skip or select “< PREFER” or select “NEXT >”.
The “Layout” tab allows you to customize the layout of each slide.
Step 6: Preview to preview and check again
To preview the lecture, go to iSpring Suite 9 => select Preview => Choose one of the following view modes:
Preview from This Slide: preview from the selected slide to the last slide
Preview Selected Slides: preview the currently selected slide
Preview Entire Presentation: preview all slides
After selecting one of the options above, the Presentation Preview window appears, allowing you to preview the slide.
Step 7: Publish to publish the lecture
After creating the lesson, you can export the lecture to the required formats. Currently iSpring Suite 9 currently supports 4 types of publishing: save to computer, save on iSpring Cloud, Spring Learn, YouTube.
To do this, you can follow these steps:
Step 1: Go to iSpring Suite 9 => select Publish => Publish Presentation dialog box appears. Choose one of 4 publishing styles:
My Computer: This type of publishing on a computer is often used when you want to save the lecture on your computer, share it with friends, colleagues, submit an exam, etc.
iSpring Cloud: Publish to your iSpring cloud and the only way to use this type of publishing is to buy it for $297/year.
iSpring Learn: Publishing to iSpring LMS is similar to iSpring Cloud, you also have to buy it to use this type of publishing. iSpring Learn has many different prices corresponding to the detailed number of people see the version below.
ispring-suite (8)
YouTube: Publish to YouTube.
Step 2: Customize the required parameters (size, file type, ..)
Step 3: Select Publish to let the program publish and fast or slow depending on your computer configuration.
5. Some common errors and how to fix them
Here are some common errors and how to fix them when using iSpring Suite 9:
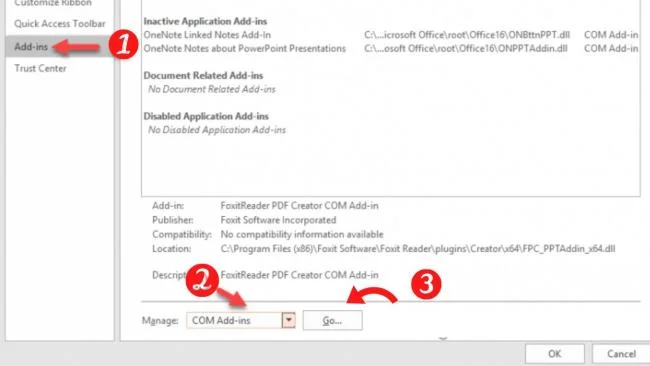
Error hiding iSpring Suite tool in PowerPoint: is an error when opening PowerPoint on the toolbar, the icon of iSpring Suite does not appear. To fix this error you can refer to the following way:
Step 1: go to File => select Options
Step 2: Select Add-ins => at the Manager tab select COM Add-ins => select Go…
Step 3: Check iSpring Suite => select OK
Steps to fix the error of hiding iSpring Suite tool in PowerPoint
PowerPoint and iSpring Suite crashes when using Interaction: You can fix this error by downloading the Far Manager program to your computer.
Step 1: Download Far Manager at: www.farmanager.com/download.php (Note you should choose the version suitable for your computer's operating system)
Step 2: Install the program as usual
Step 3: After installing the program is complete. You right-click on the program's icon and select Run as administrator to run the program as administrator
Step 4: Double click on the "..." then select iSpring => select Suite 9 => select bin32
Step 5: Enter the command Visuals.exe /regserver then press Enter and exit the program.
Besides the above 2 common errors, in the process of composing articles you may also encounter some other errors. The fastest way to fix it is to save the composition and then exit the program and then restart it.
6. Some other notes when using iSpring
Here are some notes you need to know to use this software more effectively:
If your computer has a low configuration, you should perform the steps slowly, sequentially, do not click the mouse continuously because it is easy to cause the program to hang.
PowerPoint files must be saved before using iSpring Suite features.
It is recommended to use preview mode every time you complete a slide because it can be edited immediately to avoid wasting time
The current download iSpring Suite allows you to try it for 14 days and after this 14 days if you want to continue using it, you have to buy a license for $ 770
Hopefully with detailed instructions on how to use iSpring Suite to compose E-learning lessons, teachers can prepare attractive electronic lectures to understand for students.