What is 1314?

1314 is a number often used by young people as a love code. However, not everyone knows what 1314 is and what it means?
How to arrange a 6-sided or 3x3 Rubik's cube? This article will help you learn the simplest way to rotate a 6-sided Rubik's cube.
How to Solve a Rubik’s Cube? If you’ve ever looked at a Rubik’s Cube and wondered how to unlock its secrets, you’ve come to the right place. In this blog, we’ll delve into the art of solving a Rubik’s Cube and find it a fun, fun puzzle to play during your break.
When you hold a Rubik’s Cube in your hand, all you can see is a chaotic mosaic of multi-colored squares. It’s a puzzle, a mind-bending challenge that has baffled many. But guess what? It’s not just about arranging colors, it’s about unlocking your hidden problem-solving potential.
But, where to start? Well, just sit back and read this article till the end. Whether you are a complete beginner or have already tried your hand at solving the Rubik’s Cube, this blog is your roadmap to conquer the legendary Rubik’s Cube.
How to solve Rubik
1. Familiarize yourself with the Notes section at the bottom of the page.
2. Select a face to start with. In the example below, the first layer color will be white.
3. Make a cross. Find the face containing the white center piece and turn it to the top. Put the four white edge pieces in place. (You can do this yourself without the algorithm.) All four edge pieces should be in place within eight moves at most (five or six moves is common).
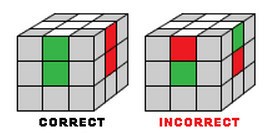
Turn the cross face down on the bottom. Rotate the cube 180° so that the cross is on the bottom.
4. Solve the four corners of the first layer, one by one. You can also place the corners without using an algorithm. To start, here is an example of placing a corner:

Once this step is complete, the first layer will be complete, with a single color (in this case white) at the bottom.
5. Confirm that the first layer is in place. You have now completed the first layer and it should look like this (bottom view)

1. Arrange the four edge pieces of the middle layer in the correct position. In our example, these are the edges that do not contain yellow. You need to know an algorithm to solve the middle layer. The second algorithm is symmetrical to the first algorithm.
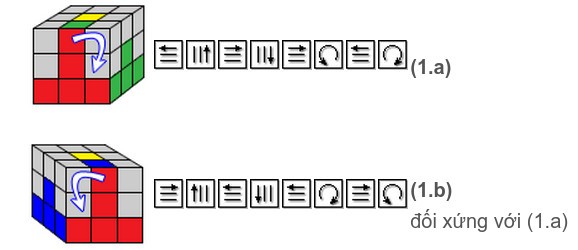
2. Check to see if everything is in place. Now, the first two layers of the Rubik's cube are complete and look like this (from the bottom):

At this step, our goal is to arrange the corner pieces of the last layer in the correct position, regardless of which direction they are facing.
Locate two adjacent corner pieces that are a different color than the top layer (in our case, a color other than yellow).
Rotate the top layer until the two corner pieces are on the same colored side, facing you. For example, if two adjacent corner pieces are both red, you should rotate the top layer until they are on the red side of the cube. Note that on the other side, the two corner pieces of the top layer will be the same color as that side (orange in our example).
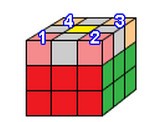
Determine if the two front face corners are in the correct position, and swap them if necessary. In our example, the right face is green, and the left face is blue. Therefore, the right front face corner will be green, and the left front face corner will be blue. If not, you need to swap the two corners using the following algorithm:

Do the same with the two corners in the back. Rotate the cube to bring the other side (orange) in front of you. Swap the two front corners if necessary.
Another alternative, if you find that both the front and rear corner pairs need to be swapped, you can do this with a single algorithm (note its similarity to the previous algorithm):

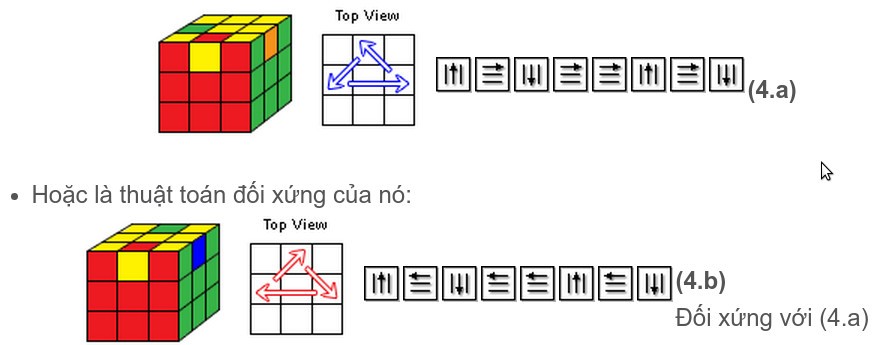
Determine the top color of each corner piece (in our case, yellow). You only need to know a single algorithm to orient the corner pieces:

The algorithm will cause the three corner pieces to rotate on their own at the same time (from the edge position to the top position). The blue arrows will show which three corner pieces you are rotating, and in which direction (clockwise). If the yellow pieces are in the correct positions as shown in the image and you have run the algorithm once, you will have the four yellow pieces at the top:
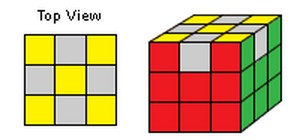
You can also use the symmetric algorithm (here the red arrow shows counterclockwise rotation):
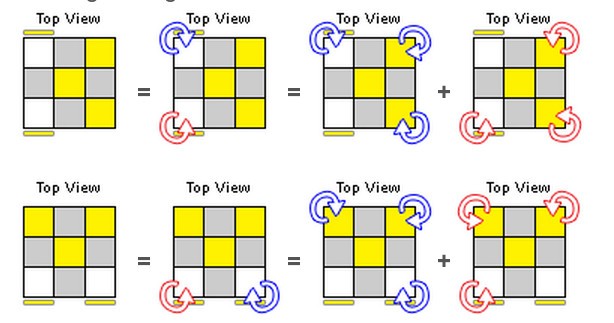

Note: solving one of these algorithms twice is equivalent to solving the other. In many cases, you will need to solve an algorithm more than once:
Two corner pieces are in the right direction:

No corner pieces are in the correct orientation:

In general, (3.a) applies in the following cases:

You only need to know one algorithm for this step. You should check whether one or more edge pieces are in the correct position (at this point, their orientation is not important).
If all the edge pieces are in the correct position, you are done with this step.
If only one edge piece is in the correct position, use the following algorithm:
Note: solving one of these algorithms twice is equivalent to solving the other algorithm.
If all four edge pieces are in place, you can proceed with either algorithm once from any side. You will have a single edge piece in place.
You need to use two algorithms for this final step:
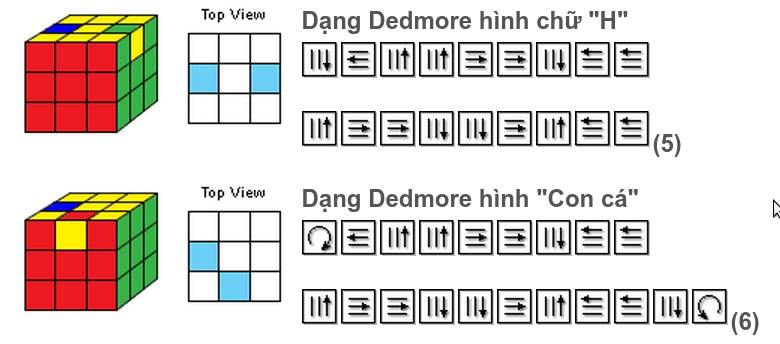
Note that DOWN, LEFT, UP, RIGHT, is the order of most Dedmore "H" and "Fish" type algorithms. You only need to remember one algorithm:

If all four edge pieces are upside down, you should proceed to solve the "H" shape algorithm from any side, and you will need to proceed to this algorithm again to solve the Rubik's cube.
Congratulations! You have solved the Rubik's Cube.
1. This is the key to all annotations used in the article.
The pieces of a Rubik's cube are called Cubes, and the colored areas on a Rubik's cube are called cells.
Rubik has three types of pieces:
Not all Rubik's cubes have the same color. The color used for illustration in this article is called BOY (because the Blue, Orange, and Yellow faces are in clockwise order).
2. This article uses two different perspectives on the Rubik's cube:
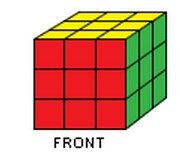
3D view, showing three faces of the Rubik's cube: the front face (red), the top face (yellow), and the right side face (green). In Step 4, the algorithm (1.b) is illustrated with an image showing the left side face of the Rubik's cube (blue), the front face (red), and the top face (yellow).
Top view, showing only the top face of the Rubik's cube (yellow). The front face is at the bottom (red).
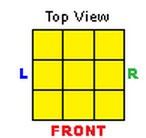
3. For the top-down view, each small bar represents the location of an important colored square. In the figure, the yellow square of the top back corner piece is located on the top (yellow) face, while the yellow square of the top front corner piece is both located on the front face of the Rubik's cube.

4. If the colored box is gray, it means that its color is not important at that time.
5. The arrows (blue or red) show the effect of the algorithm. For example, for algorithm (3.a), it will make the three corner pieces rotate around themselves as shown in the figure. If the yellow squares are at the same position as in the figure, when the algorithm finishes, they will be on top.

6. Looking down, the light blue square shows that an edge piece is oriented incorrectly. In the figure, both the left and right edge pieces are oriented incorrectly. This means that if the top square were yellow, the yellow squares of these two edge pieces would not be on top, but on the side faces.

7. For step annotations it is important that you always look at the Rubik's cube from the front.

Some examples of steps to take:

Practice. Spend some time with your Rubik's Cube and learn how to rotate it in different directions. This is especially important when you are learning how to solve the first layer.
Know the colors of your Rubik's Cube. You need to know which color is opposite which color, and the order of all the colors around them. For example, if white is on top and red is in front, then you need to know that blue is on the right, orange is behind, green is on the left, and yellow is on the bottom.
For those who like to solve Rubik's cubes quickly, or those who don't like the difficulty of solving the cubes, you can look into DIY kits. The cubes have rounder inner corners and DIY kits will allow you to adjust the tightness, making it easier to move the cubes. Consider lubricating your cube with a silicone-based lubricant.
You can start with the same colors as in the article to help you better understand the position of each color, or try to choose colors that make it easier for you to line up the cross.
Locate the four edge pieces and try to think ahead about how to move them into place without actually doing it. With practice and experience, this method will teach you how to solve it in just a few steps. And in competition, participants have 15 seconds to look at their cube before the timer starts.
Understand how the algorithm works. As you work through the algorithm, try to follow the key pieces of the Rubik's Cube to see where they move. Try to look for patterns in the algorithm. For example:
Going further. Once you have mastered all the algorithms, you can look for faster ways to solve the Rubik's Cube:
The layer-by-layer method of solving the Rubik's Cube is just one of the many methods that exist in the world. For example, the Petrus method, which solves the Rubik's Cube in fewer steps, involves completing a 2×2×2 Rubik's Cube, then expanding it to a 2×2×3 Rubik's Cube, adjusting the orientation of the edge pieces, building a 2×3×3 cube (two layers already solved), placing the remaining corner pieces in the correct positions, orienting them, and finally arranging the remaining edge pieces in the correct positions.
Going one step further. For the final layer, if you want to solve the cube quickly, you need to break the last four steps into two-step steps. For example, permute and orient the corners in one step, then permute and orient the edges in one step. Or you can choose to orient all the corners and edges in one step, and permute all the corners and edges in one step.
1314 is a number often used by young people as a love code. However, not everyone knows what 1314 is and what it means?
Dealing with toxic situations can be incredibly difficult. Here are some tips to help you handle toxic environments tactfully and maintain peace of mind.
Most people know that music is not just for entertainment but has many benefits. Here are some ways music stimulates our brain development.
Diet is important to our health. Yet most of our meals are lacking in these six important nutrients.
To get the fastest promotional information from Circle K, you should install the CK Club application. The application saves your payments when shopping or paying at Circle K as well as the number of stamps collected.
Instagram has just announced that it will allow users to post Reels videos up to 3 minutes long, double the previous 90-second limit.
This article will guide you how to view CPU information, check CPU speed directly on your Chromebook.
If you don't want to sell or give away your old tablet, you can use it in 5 ways: as a high-quality photo frame, music player, e-book & magazine reader, housework assistant, and as a secondary screen.
You want to have a beautiful, shiny, healthy nail quickly. The simple tips for beautiful nails below will be useful for you.
This article will list color-inspired tips, shared by top designers from the Creative Market community, so you can get the perfect color combination every time.
Can you really replace your laptop with your phone? Yes, but you'll need the right accessories to turn your phone into a laptop.
One important thing in the full event video was that the upcoming ChatGPT app feature was demoed but no real details were shared. That is, ChatGPT's ability to see everything that's happening on the user's device screen.
Many top AIs, despite being trained to be honest, learn to deceive through training and systematically induce users into false beliefs, a new study finds.
ChatGPT now has a question change option so users can edit the question or content they are exchanging with ChatGPT.
QR codes seem pretty harmless until you scan a bad one and get something nasty thrown at you. If you want to keep your phone and data safe, there are a few ways you can spot a fake QR code.
