Latest Wordle Answers Today 04/25/2025

Wordle was created by Josh Wardle, it originally started as a project for his partner, as they enjoyed playing word guessing games together.
Install and use add-ins in Excel to get additional features and commands in your workbook.
Add-In are components that add functions or custom commands, libraries for office programs such as Excel , Word ... With the power of Add-In, in addition to taking advantage of all the features feature of the parent software, the Add-In will add many features to help the use of office applications, Office software becomes faster and more effective than those who only use the regular installer. .
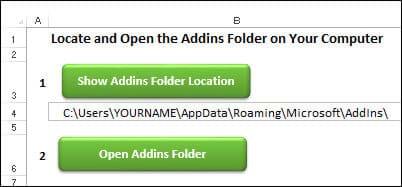
To find the default Add-in folder, you can use one of the following methods:
To manually find the default Excel AddIn folder, follow the steps below:
Note : Close Excel before making any changes to the installed Addins.
Excel 2007 and above:
To install an add-in, follow the instructions:
1. In Windows Explorer, open the Microsoft Addins folder on the computer.
Note : If you are unsure about its location, you can use the Excel Addin Folder Path file to find it.
2. Extract the add-in file if needed to extract the add-in file. It will have the xlam extension.
3. Save the add-in file in the Microsoft Addins folder.
Note : You can save the add-in in any folder, but it will be easier to install if it is saved in the Addins folder.
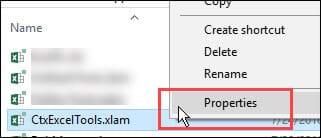
4. To allow Excel to open the add-in file automatically, you may need to unblock it. Right-click on the add-in file and click Properties .
5. If an alert appears, click the Unblock box to add a trace - “ This file is from another computer and may be blocked to help protect this computer ”.
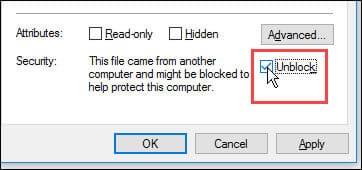
6. Click OK .
7. Open the Excel program.
In Excel:
Note : If you do not see the add-in in the list, click the Browse button . Navigate to the directory where you saved the xlam file and select the add-in file.
4. Click OK to close the window.
5. A new tab for the addin may appear on the Ribbon, or a new command may appear in one of the existing tabs. See the saved add-ins to help locate it.
6. If you don't see the button on the Ribbon, you can add icons to the Quick Access toolbar to run the macro.
After a recent Microsoft update, some Excel add-ins are not loading properly and their custom tabs do not appear on the Excel Ribbon. Follow these steps to unblock the file and it will open correctly.
1. Close Excel, if it is running.
2. Open Windows Explorer and open the folder where you saved the add-in file, usually the Microsoft Addins folder.
Note : If you are unsure of the location of the Addins folder, you can use the Excel Addin Folder Path file to find it. Then close Excel again.
3. To allow Excel to automatically open the addin file, you can unblock it. Right-click on the add-in file and click Properties .
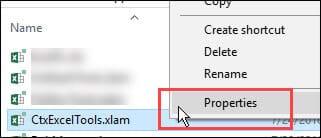
4. If an alert appears, click the Unblock box to add a trace - " This file is from another computer and may be blocked to help protect this computer ".
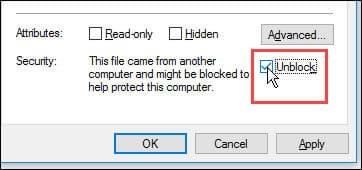
5. Click OK .
6. Then start Excel and the custom add-in file that appears on the Excel Ribbon.
The following Excel add-ins are available with Contextues:


The following is a list of free add-ins that you can download and install to make Excel jobs easier.
This add-in, developed by AppsPro's Rob Bovey, has handy tools for working with named regions, spreadsheets and selections.
With the Excel Utilities commands, users can quickly protect and unprotect all worksheets in a workbook, remove unused styles or use Center Across Selection without merging cells.
Name Manager was developed by Jan Karel Pieterse of JKP Application Development Services, much better than the Excel Name features.
If you use names in Excel, you'll definitely love Name Manager. Find names with errors and delete them or follow the links to other workbooks.
Please take a few minutes to download Name Manager because it can save users a lot of time.
In addition, there are other free add-ins listed below. Users should read the terms of use of add-ins before installing them. Some add-ins are free for personal use but require a commercial license. Also, some of the free add-ins may be discontinued or changed to paid.
|
Add-In |
Developer |
Note |
|
Andrew Engwirda |
Tools for working fat code in VBE. Andrew has other free tools, including Custom Lists and XL Help Files Maker |
|
|
Large collection of utilities |
||
|
Jan Karel Pieterse |
Copy workbooks regularly |
|
|
Andy Pope |
Edit button images |
|
|
Rob Bovey |
Add labels to any chart |
|
|
Rob Bovey |
Delete the VBA code to prevent the problem |
|
|
Bill Manville |
Search for hidden links in workbooks |
|
|
Jan Karel Pieterse |
Find the entire workbook, including buttons. |
|
|
Formula tools for Excel 2010 and up |
||
|
Tools to work with VBA |
||
|
Navigate and audit workbooks |
||
|
Contextures |
Tools for working with Pivot Tables |
|
|
Find words with similar meanings |
||
|
Ken Puls |
Manage your favorite files list |
You can create your own add-in by storing macros in a file, then saving as an add-in:
To delete an add-in in excel that you have saved in the Addins folder, do the following:
Use one of the following methods to open the Add-ins window:
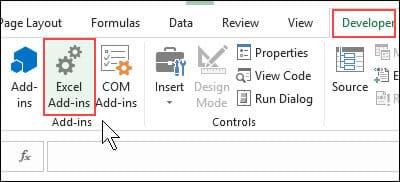
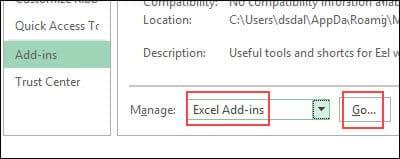
Next, you need to deactivate the add-in:
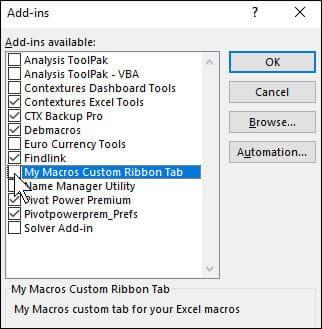
Follow these instructions to remove the add-in file:
Above download.vn has instructions on how to install and remove the add-in. Hopefully this tutorial will help you use the add-in and work on Excel more effectively.
Wordle was created by Josh Wardle, it originally started as a project for his partner, as they enjoyed playing word guessing games together.
Many people have been trying for a long time to see if they can actually replace Google with the ChatGPT Search Chrome extension.
This DTCL season 8.5 Void Traveler is a sub-race and of course, with only 3 generals, these generals must really stand out to have a place in other formations.
It can be difficult to troubleshoot sound issues on Xbox when the problem can occur anywhere between your TV setup and your Xbox system settings.
Being a professional soccer player is one of the suggestions in the Grass Professor event of Lien Quan Mobile. Let's explore with Quantrimang to see who the character this event wants to mention is.
The vast Earth has many mysterious lands that humans have not known and have not set foot on. Nowadays, thanks to the Google Earth tool, anyone can search and explore strange and mysterious places on this planet.
Adobe Max 2024 has launched a series of exciting updates, introducing powerful new AI tools to Adobe's toolset.
There are many different explanations for why cats cover their faces while sleeping, from trying to keep warm to protecting their whiskers. Here's the answer to the question of why cats cover their faces while sleeping.
How many meters is 1 foot? If you don't know, let's find the answer together!
How many kilometers are 120 light years? How many kilometers are 40 light years? Let's find out together about a light year to find the answer!
The timing of your Instagram Reels can make the difference between massive engagement and dead silence. Let’s find out the best times to post on Instagram Reels.
There are many funny captions about dogs on the Internet. This article will gather for you the funniest, most humorous, and most interesting poems about dogs.
You will have the best gaming experience if you use Open NAT or at least Moderate NAT. That is why you need to learn how to change the NAT type.
After several updates, Apple Notes still lacks some features that could make the app even better.
You probably know that password managers are great for storing your online logins. But did you know they have many other great uses?


