ABBYY FineReader is optical character recognition (OCR) software that allows users to convert images of text documents and tables into text formats that can be edited & read on electronic devices.
- ABBYY FineReader
- ABBYY FineReader for Mac
- ABBYY FineReader Online
ABBYY FineReader can convert unsearchable PDF and image files to office documents such as .docx, .pptx and PDF. This program helps users recognize nearly 100 languages and it can handle multilingual documents. The article will provide a basic guide to using ABBYY FineReader for beginners .
How to use ABBYY FineReader
- 1. Upload documents
- 2. Document detection
- Quick start
- Interface of ABBYY FineReader
- Create area
- Adjust area
- Rearrange regions
- Character and font recognition
- Change font
- Create and train a user model
- Edit a user form mẫu
- Create languages and user groups
- Export OCR
see more
1. Upload documents
You should upload documents of good quality and clear. To do this, you should choose a good document scanner, if not, you can refer to: The best way to scan documents using a phone or tablet on WebTech360.
Although ABBYY FineReader can recognize text from ordinary photos taken with the camera, the purpose of using a document scanning app is to reduce blurriness and correct possible distortion. Document scanning apps can also fix lighting problems.
Important: If possible, place the original on a flat, well-lit table and scan. ABBYY FineReader encourages users not to separate lines of text by more than 20 degrees, otherwise they may not be converted correctly.
2. Document detection
After uploading the document to ABBYY FineReader, you can make some adjustments for more accurate results.
Quick start
After opening ABBYY FineReader , you will see the following screen:
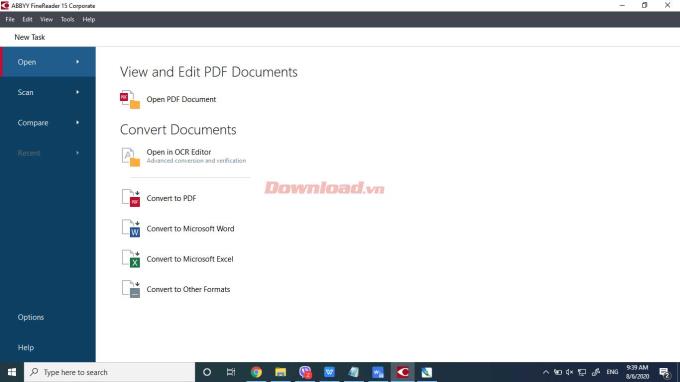
To quickly convert an image or PDF to text, you can click any option in Open in OCR Editor . Then a dialog box will open. For example, the article uses Convert to PDF . However, this depends on the output you want, be it text, spreadsheet or whatever format you want.
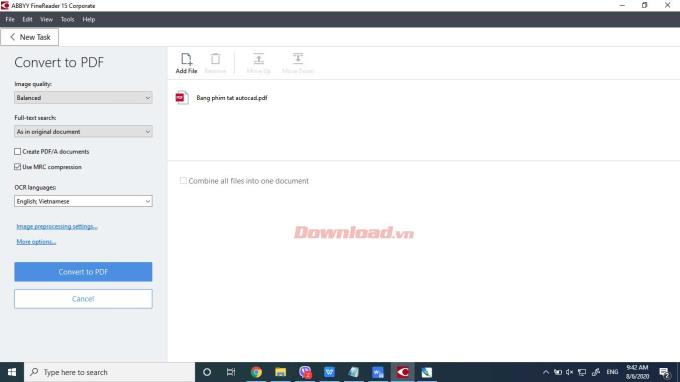
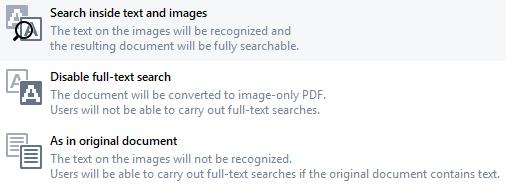
With PDF, you can choose one of the options below. These can affect whether or not you can search the PDF:
You can also change the language settings for the document. After entering the most suitable setting, choose Convert to PDF , a save dialog will open.
Here, the image pre-processing is very important. The higher the image or PDF quality, the more accurate the output will be. Formats you can quickly convert in ABBYY FineReader:
- .docx
- .xlsx
- .txt
- .pptx
- .odt
- .html
- .rtf
- .csv
- .epub
- .fb2
- .djvu
The Quick Convert option for Convert to Microsoft Word and Convert to Microsoft Excel will have simpler formatting options. If you choose Convert to Other Formats , you will only be able to choose the output format & language. These are good choices for documents that have clear text with good contrast and are written in a language that ABBYY can recognize, such as screenshots of text on a computer, phone, or PDF that cannot. find content.
For older documents, low-quality images, and less common text fonts, you should choose Open in OCR Editor . It will prompt you to select the document to process.
Interface of ABBYY FineReader
Overall, ABBYY FineReader is a simple piece of software that requires only a little tweaking to optimize the results. The first time you open the editor, you already have some output that ABBYY has recognized.
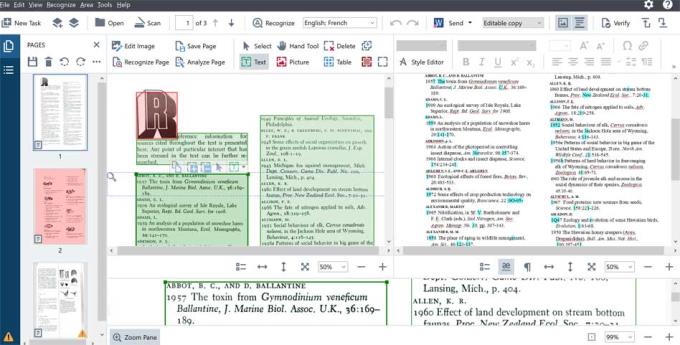
ABBYY FineReader has 3 main windows: the image panel on the left, the text panel on the right, and the document zoom/zoom panel at the bottom of the screen. The default language of ABBYY is English. However, it can still export documents in any language that uses the Latin alphabet.
You can see the Microsoft Word icon on the original output of ABBYY:

That is the default output format for the file. You can change it from the drop-down menu with the .rtf, .txt file extensions.
Next to it is the Editable copy box . This option along with Send controls the output image in the text panel window.
Clicking the mountain icon will allow you to move or include the image in the output. The icon to the right of it provides the option to keep or ignore the header and footer during text recognition.
Create area

As you can see in the previous section, parts of the original document in the palette are highlighted in different colors. Those areas indicate where the extractable text, image or text was found. ABBYY creates them automatically when you open the document in the OCR Editor.
You can find the above toolbar in ABBYY's image panel with supporting tools:
- Add and remove regions.
- Change the area type.
- Adjust the area border and move the whole area.
- Add rectangles to regions or delete them.
- Change order.
The color boxes will appear in the image panel corresponding to the button in the toolbar: the text area is green, the image area is red and the palette area is blue.
To create an area, simply click the button for the type of area you want to create and highlight the entire text, image, or table area you want to export in the Image panel. If you want to be more precise, you can also create an area using the Zoom panel.
Adjust area
Normally, ABBYY will create a separate text area and new paragraphs will sometimes be in different boxes. If those boxes are of the same type, you can simply select a box and expand it to include everything by clicking & dragging the corners of the text box.
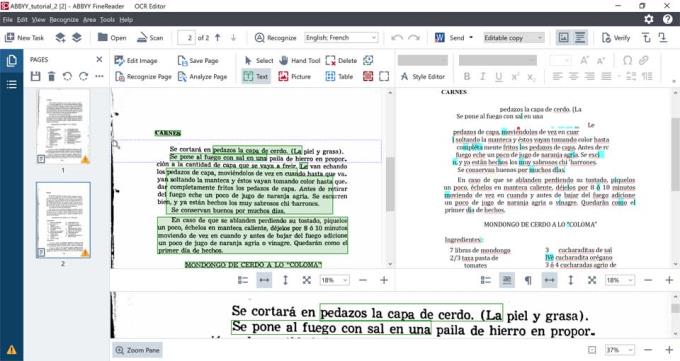
Combine multiple text areas into one:
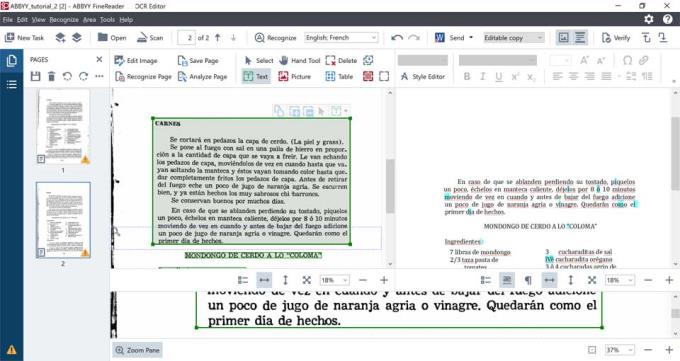
Note: It is necessary when you expand a textbox containing all other areas. If you don't, the text will overlap.
The default shape of an area is a rectangle, but sometimes the parts of the document you want to identify don't match the shape. Leave all text in the textbox as follows:
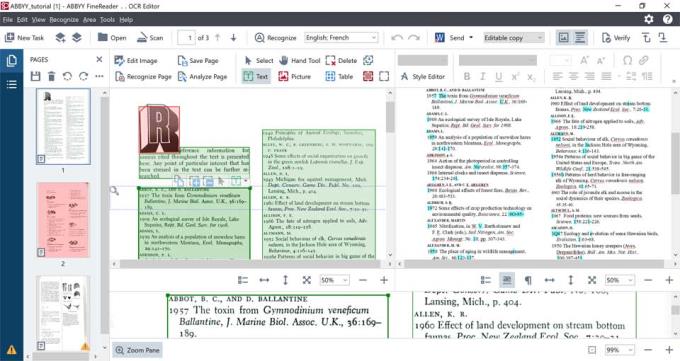
Expanding as in the previous way doesn't work because it's asymmetrical. If you click on the area you want to expand, a floating toolbar will appear:

Two icons containing + and - signs are used to create & delete the area related to the textbox you click on. If you click the icon containing the + sign , you can create a textbox that is connected to the disconnected box.
Note: Merging areas arranged side by side opens a text panel to output text in a straight line. So if you want 2 separate columns, make sure to have 2 separate text areas.
Again, the Zoom panel can be used to adjust areas more precisely. Do the same for all image areas. However, for tables, you have a variety of options.

ABBYY allows you to separate sections of a table into rows and columns, remove delimiters, and analyze the area generated into the table. Thanks to that, you don't have to do this manually.
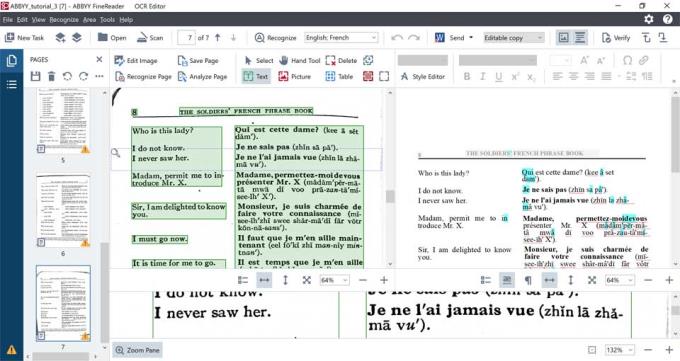
Using the Table tool from the toolbar, you can create a table area:
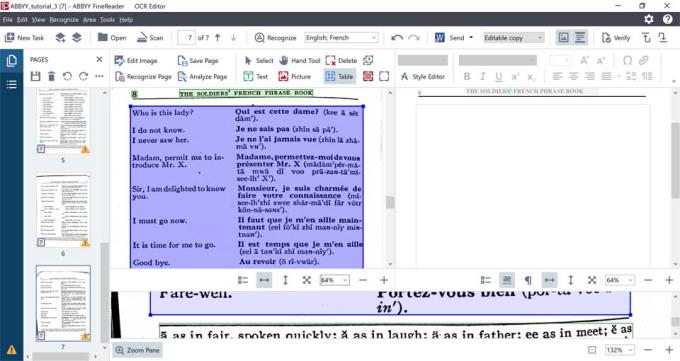
This table is not divided into columns or rows. Instead of doing it manually, from the toolbar pop-up:

Select the icon with the wand in front to try to guess the position of the lines.
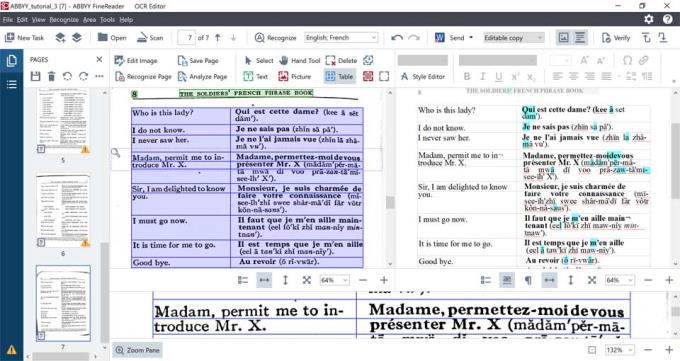
Now the columns and rows are almost where you want them to be. However, there are still a few minor bugs. If you look at the Zoom table, you will see that ABBYY has created an extra row where it is not needed. In this case, select the icon containing the red X from the pop-up toolbar.
Move the cursor to the line you want to delete and select it. Take the time in ABBYY to adjust the position and number of zones the program can recognize based on auto detection. It gives better results and takes less post-processing time before exporting.
Rearrange regions
In ABBYY, each generated zone has its own sequence number during identification. The output of the extracted text will then be in the order of the specified regions.
From the first time using this software, it will arrange the boxes according to position on the page from top to bottom and usually from left to right. Find a small number in the corner of each recognition area to see the overall output sequence of the page.
If you delete an area, the regions will remain in the same order from top to bottom. However, if you delete a text area in the middle of the page, next, create a new area in that part of the page, the area will be appended with an order number at the end of the line instead of a middle order number in above and below.
To fix the problem, you can select the icon of 2 overlapping squares, with a blue arrow pointing down. This allows you to rearrange the order of the first recognized area by ABBYY.

Character and font recognition
Change font
Visit: http://help.abbyy.com/en-us/finereader/14/user_guide/langfonts for a complete list of fonts ABBYY supports.
To change the font in a short document, select a portion of text that has some characters with the wrong font.
Right-click that option > click PROPERTIES in the shortcut menu.
Select the desired font from the Font drop-down list in the Text Properties panel .
The font in the selected text will now change to your liking.
To change the font in a long document:
Click TOOLS > STYLE EDITOR .
In the STYLE EDITOR box , select the style you want to edit and change its font.
Click OK .
The font in the entire text using the style you choose will change accordingly. If you want to recognize decorative fonts or special characters in a document, it is best to use practice mode to improve the accuracy of OCR.
Create and train a user model
In Training mode, a user-generated template can be used when performing OCR on the entire text. This feature is often used when the text has unclear parts, the font is different from the default or ABBYY special characters.
Note: Sample practice does not support Asian languages.
To access the options, from the main menu:
Click Tools > Options > select the OCR tab .
In Use of patterns and training in OCR Editor , select Use training to recognize new characters and ligatures .
Click the Pattern Editor button .
At the Pattern Editor dialog box , select the New button to name your pattern.
Click OK in Create Pattern , then Pattern Editor , click OK in Options to return to the OCR editor .
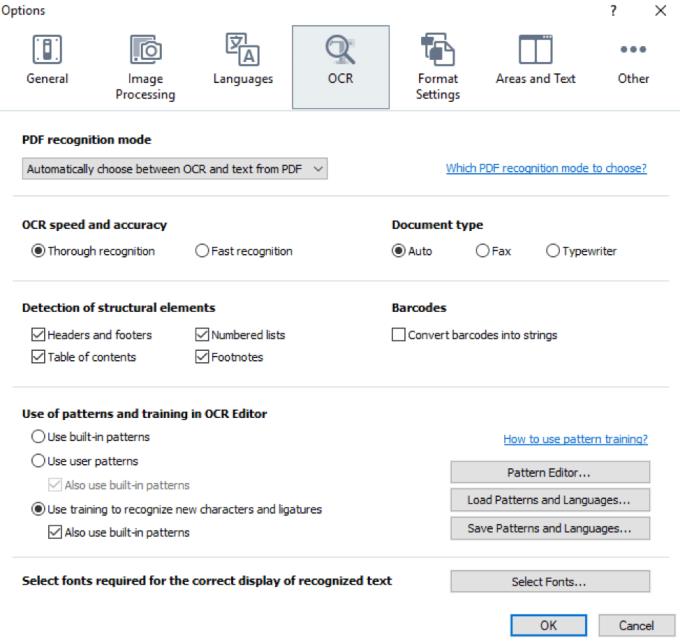
Note: If you select the Also use built-in patterns option under Use training to recognize new characters and ligatures . ABBYY will use built-in templates along with user-generated templates to save you time.
Next, when you return to the document, you can start practicing:
In the toolbar above the image palette, select Recognize Page (the white panel with the red A in the magnifying glass).
During the recognition process, the Pattern Training box will open and ask you to enter a character that matches a selection in the box.
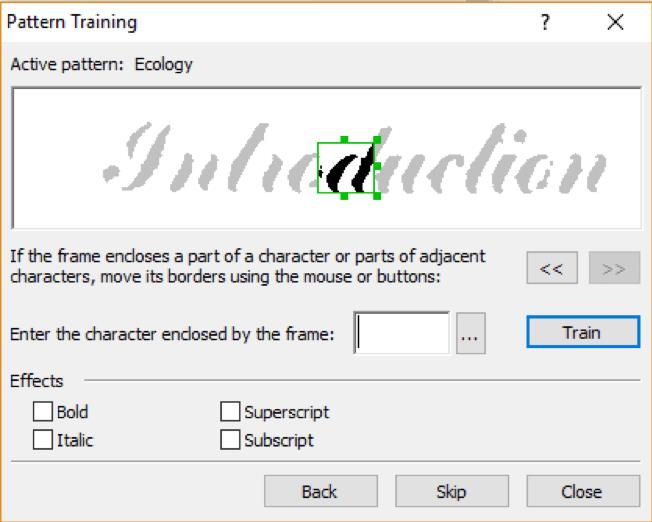
Adjust the contour area if needed, select an effect if you want to include text features in the output. After setting the border, enter the correct corresponding letter or letter, choose practice and continue to the next level.
Note: You don't need to practice on the entire document. However, you will need to continue until you have enough samples for each character or letter in the document, usually 15 to 25 versions per character according to OCR generators.
Edit a user form mẫu
You can only “train” ABBYY FineReader to read characters that are in the OCR language alphabet.
To add characters to the language you are "training" it to recognize in case the letter or character is not entered using the keyboard, use a 2-character combination to represent additional characters or  copy the character. desired self from I nsert Character .
Create languages and user groups
Create a new or similarly derived identity language to edit a user pattern
Click TOOLS > OPTIONS > select the Languages tab .
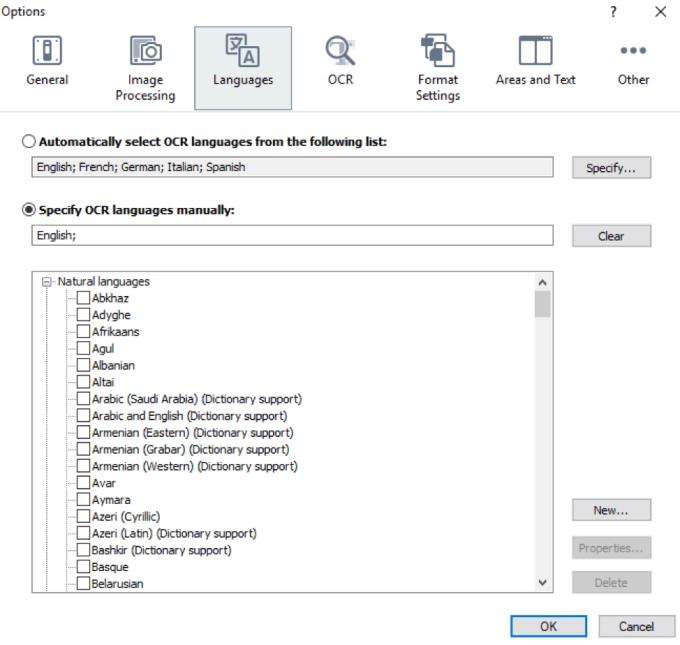
Here, if the document is in multiple languages, you can choose from one of the 192 languages available on ABBYY.
If the document contains characters that are not in the list, select New in the Languages panel .
This action will allow you to create a new language. It can be completely new or can be used in conjunction with an existing language (and related dictionary) in ABBYY. The “new” or “derivative” language will be based on the currently supported language.
In ABBYY, you can select up to 1,000 characters, including operators and other symbols.
Export OCR
OCR results in ABBYY can be saved to a file, sent to other applications such as PDF Editor, Clipboard or email… You can also send OCR results to Kindle.com. Here, they will be converted to a format available in a Kindle reader. You can save the entire document or just selected pages.
To save recognized text:
On the main toolbar, click the arrow next to the Save button and select the mode to save the document and the objects you want to keep on the page.

ABBYY FineReader lists the file formats available in each mode. You have 5 save formats:
Exact copy produces documents in a format that corresponds to the original format, suitable for complex documents such as advertisements. This option restricts the ability to change the text and format of the output document.
Editable copy outputs a slightly different format than the original document to make it easier to edit.
Formatted text keeps the font, font size and paragraph, but changes the distance and position of objects on the page.
Plain text does not retain text formatting.
Flexible layout produces HTML documents with object positions that are technically closest to the original.
On the Format Settings of the Options box , click the desired save option and click OK .
Note: Vertical text will change to landscape in this mode.
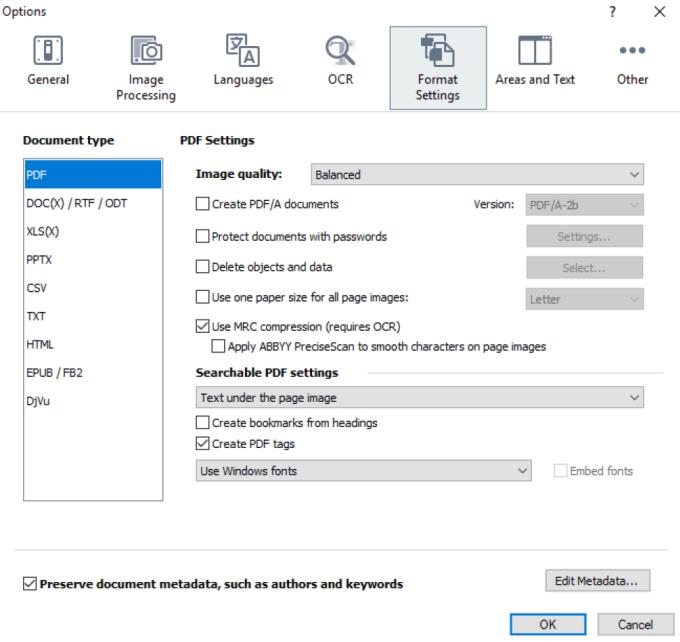
On the main toolbar, click the arrow to the right of the Save button and press the appropriate option or use the command on the File menu .
Above are instructions for using ABBYY FineReader . Hopefully the article will help you convert documents and large images to other formats more easily.



 copy the character. desired self from I nsert Character .


